- Home
- About
-
Shop
-
Sewing Patterns
-
Fabric
- Sewing Supplies
- Folkwear Clothing
-
- Blog
- Customer Gallery
- Contact
June 07, 2024 2 Comments on How To Sew Lace Insertion
This blog post was written in 2020, but has been updated in 2024.
by Molly Hamilton
I am still working on my project goal of making our 227 Edwardian Gown from a gorgeous grey organic cotton voile and hand-dyed lace. (Fabric and lace naturally dyed from Botanica Tinctoria.) This is honestly the first time I have done lace insertion, and I am quite enjoying it. It is not nearly as difficult as I thought it would be, but it is a lot more time consuming than I realized. Hence, the dress is not finished. UPDATE: See the finished dress here in the photos in the pattern description (not me wearing it though) and above.
However, even though I haven't finished the dress yet, I want to show you the easy lace insertion technique that is used in this pattern so you can more easily do it on your own - for making this dress or the 205 Gibson Girl Blouse or 210 Armistice Blouse or in any project you want to do (napkins and tablecloths would be gorgeous and easy!).
See all our patterns that have lace insertion here. And our collection of lace here.
First, make sure your fabric and lace are pre-washed, or wash them before working on your project. Wash them as you plan to wash you finished garment. This is because if you wash you fabric and not your lace (or vice versa or neither), you can end up with lace that shrinks and fabric that does not and end up with a garment that is distorted or too small. You do NOT want to go through all the work of lace insertion to have this happen. My lace and fabric were pre-washed with very hot water during the dyeing process, so I don't need to worry about pre-washing/pre-shrinking either.
Another couple of tips: make sure your machine is at a tension that works well for your fabric (you don't want it eating up your lace or making it tight); and if your fabric is very fine, you can use spray starch to help sew and use the lace.
Also, make sure you have enough lace to do the project you have in mind. Honestly, I don't have enough insertion lace for this project, but I am making changes to the design to make it work. I bought out all the lace of this color that they had, so I had limits from the start. Which is fine - I am making it work.
There are two types of lace used in this project. First is insertion lace. This type of lace has two sides that are straight (or mostly straight). This lace is "inserted" in the garment and becomes part of the fabric. You need two straight edges on the lace to work.

The other type of lace is called edging lace and can be pre-gathered (or gathered) or flat edging. Lace with ruffles is gathered, or pre-gathered; lace that lays mostly flat is edging. But, both have one side that is mostly straight and one side that is scalloped or has some shaping to it.

We now carry insertion and edging lace in our shop and plan to add more. Check out all the lace and beading options we have here.
Usually, you start insertion lace on pattern pieces before they are sewn to any other pattern pieces. Sometimes you sew over seams, but we'll get to that below.
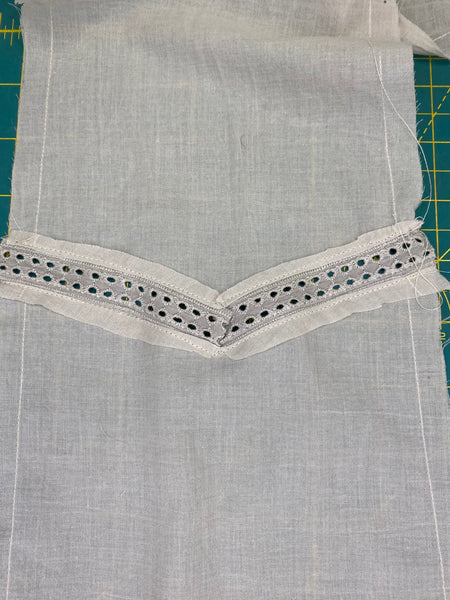
To sew insertion lace on your garment, you pin the lace down right on top of your garment piece where you want it to be - on the right side of your fabric. For corners, make a mitered corner. For curves, ease around the curve. And, don't cut your lace at the end. This allows for some extra lace that might be needed by the end of sewing the lace down.

Then sew along each edge of the lace. For curves (and corners), sew the outside edge first. I like to pin so that I sew on top of the lower end of the pins on the first edge, then pull them out as I sew long the second edge of the lace.


April 01, 2021
I have always admired lace insertion and thought it must be difficult to do. Thanks for clearing that up. I think I can do it!
December 12, 2024 7 Comments on How To Sew Lace Insertion
November 13, 2024 4 Comments on How To Sew Lace Insertion

Meghan
September 20, 2024
I’m primarily a historical patterns kind of sewist (lots of 18th century garments), and have always been so intimidated by Edwardian garments precisely because of the lace. I’ve been considering the Edwardian gown pattern for my wedding dress and I think this tutorial just convinced me that it’s within my skill set. Thanks for making a tricky technique feel so approachable!