- Home
- About
-
Shop
-
Sewing Patterns
-
Fabric
- Sewing Supplies
- Folkwear Clothing
-
- Blog
- Customer Gallery
- Contact
February 14, 2024
By Esi Hutchinson
Folkwear's pattern for this month of February is the 209 Walking Skirt. I really appreciate the shape of this skirt and I personally think it would be flattering on anyone. When we decided we would feature this pattern, I knew I wanted to make a skirt for myself. And, I made some alterations to this skirt to fit my style more. I'm always altering my sewing patterns, and you should too if that means you'll wear what you make more often.
For the Walking Skirt, the gathers in the back of the skirt gives a slight fullness in the back that is reference to the overlapping of the Victorian and Edwardian era and the S-curve shape that was popular then. The skirt is finished with a buttoned placket. However, I did not want the gathers in the back (I have a nice bum and don't need extra fabric there, nor was I wanting to go for the period look).
I took out the gathers in the back of the skirt, and added a zipper to the placket. I also added a decorative hem flounce similar to the hem on the skirt in the 216 Schoolmistress' Shirtwaist & Skirt pattern. I thought the fabric I used (a rayon challis) suited these alterations. In my next blog post I will show you how I added the zipper and the decorative hem flounce. But today I am going to show you how I took out the gathers and adjusted for my size.
Note that in the photos below I am mostly using our Swedish tracing fabric to make my pattern adjustments. I usually trace my pattern, then make adjustments to the tracing fabric. I can write on this sturdy fabric/paper as well as fold it, tape it, and even sew it. Since this fabric/paper is not cheap (but it's not terribly expensive either) and we hate to waste things at the Folkwear office, we often tape used pieces of this paper fabric together from past projects to get enough to have whole pattern pieces. So that is what you are seeing in the photos below! Find this Swedish tracing fabric here.
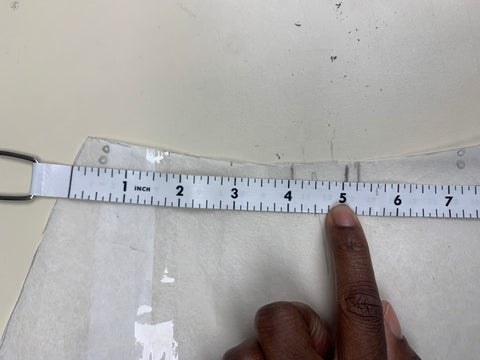
Taking the gathers out was a little confusing for me, but this is how I figured it out. I measured from my cutting line to the square for my size on the Waistband. This square signifies where the Back piece B and Side piece C meet. For me, this was 5 inches.

Then, I took that measurement and measured from the side of the back B pieces toward the center back, and I drew a line to show where I would fold out the pattern to eliminate the gathers. So, 5 inches from the cut line on my Back pieces, I drew a line to show how much I wanted to take out from the Back.

I folded the Back pattern piece lengthwise along this line.

Then I folded the Back again to create a pleat so that the 1/2" (13mm) seamline (and mark where the dots are) lands just outside of the first fold I made.

This is what my piece looked like after I made this adjustment. This does take some of the width of the skirt at the hips and bottom out, but for me, this was not an issue. You could make a dart on the skirt back instead. Or just fold out a dart at the waist of the skirt pattern piece.

I'm in between Folkwear sizes Small and Medium, so I wanted to graded the pieces a bit to fit my body. I drew a gradual line from the size small at the waist to the size medium about 3 inches down from the waist. I did this to all the skirt pieces after I took out the gathering for the back piece B above, which maybe I should have done before, but I wanted a flat pattern piece to make the rest of my fit adjustments.


December 12, 2024 7 Comments on Tips for 209 Walking Skirt - Adjusting the waist and fitting
