- Home
- About
-
Shop
-
Sewing Patterns
-
Fabric
- Sewing Supplies
- Folkwear Clothing
-
- Blog
- Customer Gallery
- Contact

by Esi Hutchinson
Folkwear is featuring our #219 Intimacies this month! Since there are three different garment styles in this pattern, Molly, Victoria, and I decided to each make something from it for ourselves. It is a pattern we have all had our eyes on, just waiting to making something from it, and this was the perfect opportunity. You could make a slip, teddy, camisole, or tap pants/knickers from the pattern. I chose to make the teddy because I think it's so cute, and I don't really have any elegant nightwear in my wardrobe. I also think the teddy fits my style and comfort the best.
This pattern is also available as a PDF, you can get it here!
In this blog post, I'll be showing how I dyed the silk for the teddy as well as how I constructed it.
Fabric and preparation
The teddy calls for fabric that is that is light and drape-y -- something like silk charmeuse, crepe, habotai, cotton voile, or a handkerchief linen.
However, if you want to make the teddy for non-sleepwear, it would be cute in a lightweight denim for a summer outing to the beach or a lunch dat. You could also use a Tencel twill or medium-weight silk/cotton for a more structured and casual look. As always, you should check out our fabric collection to see if there is anything you could use that would fit perfectly for your style and comfort. Pre-wash and press your fabric before cutting.
You will also need two ⅜”/10mm buttons for gusset (or you may use snaps).
Optional: This pattern has instructions for crocheted lace and edging, appliqued lace, scalloped hem finishes, and ribbon rosettes. Keep those embellishment options in mind when you are deciding what you want to make and how you want it to look!
I wanted to use a silk crepe fabric for my teddy, however I didn't like any of the colors I saw online. I ended up getting a white silk crepe from Dharma Trading for me to dye! I planned to dye the fabric to use to make the teddy (not dye the teddy after it was made, though you could do this also). YouTube is a great source for learning how to dye using different dye methods. Also, most online stores will provide the instructions on how to use the dyes they sell. I also highly recommend fabric dyes from Dharma Trading Co. and Earth Guild.
And since it often happens to crafters, the idea in my head did not quite come out the way I planned. First, I had a little mishap when dyeing my fabric. I wanted to dye the fabric a mint green, but the fabric came out blue when using Cushing direct dyes for animal fiber fabric. A good lesson to definitely test a small swatch before you do the whole fabric. I often use these dyes at home so I trusted it completely. The Cushing direct dyes works amazingly well for plant fibers such as cotton, rayon, and linen, however when it comes to silk it can get tricky and not come out the color expected. Anyway, I had to re-dye my fabric using a lemon yellow Jacquard Acid Dye, these dyes are way more promising for using with silks. I didn't end up with the color I wanted initially, but the color I got I actually really love, it's more of a chartreuse. You can cut out your pieces and then dye your fabric or dye your fabric before cutting (or dye the finished garment), up to you. You should think about possible fabric shrinkage, fraying edges, or uneven dyeing, depending on your dyeing methods, and choose the option the best suits your project.

After you have dyed your fabric additionally you can also wash it using Kieralon or Synthrapol to get out the excess loose dye.


Now I can begin sewing the teddy!
These garments don't require a lot of fabric but it can be tricky when pieces are cut on the bias. Test the layout and then rearrange your pieces if needed. You can also read some sewing tips about cutting and sewing with silky and bias cut fabrics here.
Note: Read Authentic Detailing for Intimacies before beginning if you want to finish your garment with any lace appliques and/or lace edging techniques for this pattern.
I recommend using a French seam for most of the seams. I will indicate when it is probably wise not to use a French Seam.
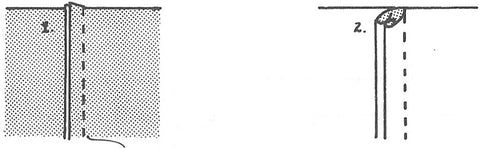
How to sew a French seam: Wrong sides together, stitch seam only a scant 3/16”/5mm (Fig. 1). Press to one side. Turn right sides together and stitch on seam line, taking care to include previous seam (Fig. 2).
A good tip when sewing with silk, silky fabrics, or bias cut fabric is to baste your seams before using the final stitch length. This will prevent unwanted shifting.
With silk, you want to press really well because it shifts a lot, you can spray your fabric with water and use steam, this will make your pressing nice and crisp. Again, you might want to test your pressing with heat and water on scraps of your fabric before using on your garment.
STEP ONE: BODY
It is easier and neater to use a lapped seam (described below) on the Front and Back Inset seam. Or, you can use a use a standard seam if you'd rather.
For a Lapped seam, press under ½"/13mm along the Inset piece.

On the wrong side of the Front, I placed the pressed edge of Inset along right side of seam line of of the Front (matching notches), and pinned on the wrong side to make sure that the raw edges are even.

Turn to the right side and pin on the right side taking the pins out from the wrong side and hand-baste in place.

Baste through all three layers, then on the right side top-stitch along the pressed edge.

Do the same for the Back.


Now you can remove the basting stitches.
Overcast seams by hand or machine to finish these seams.
Now with right sides together, baste then stitch the front and back together. You can use a French seam for this step, but I pressed the seam open and serged the raw edges.

STEP TWO: STRAPS AND FACING
Press under ¼"/6 mm on both long edges of the Strap.

Fold in half lengthwise along Center Fold Line and you can baste, then stitch, close to both long edges.

With right sides together, hand or machine-baste the straps to top points of the back insets.

Now you can try on the teddy to determine the strap length: place a pin at point where top of the Front inset meets desired length of the strap. Trim off excess of STRAP so that it measures ½"/13mm beyond pin.
Hand or machine-baste the strap to the Front inset with right sides together, making sure STRAPS are not twisted before your sew the facing (or add lace edging).

Note: You can omit the facing if you are finishing your garment with lace edging.
Stitch facings together at side seams, and clip inner corners to dot as marked on pattern piece.

You can either press under ¼”/6mm along lower edges of facing or finish with a zig-zag or serger. I serged the bottom raw edges of facing to finish.

Now you can stitch the facing to the body with ¼”/6mm seam line, sandwiching strap ends (make sure not to catch the straps in the stitching in other places).

Clip to seam at Center Front and Center Back to help with a smooth turning of the facing to the inside.

Turn facing to inside and press. Top-stitch close to pressed edges.

You can baste the lower edge of the facing to the teddy. You can top-stitch or slip-stitch by hand along pressed edge. Since my fabric is light and silky, I whip-stitched the facing to the center inset and front/back seam lines, as well as the side seams. This keeps the facing from popping to the outside and hides the stitches on the inside (they aren't seen on the outside of the teddy).


STEP THREE: GUSSETS
Stitch the Front Gussets together at curved edges, to the box (with right sides together). Backstitch at box to secure. I used a French seam here.

Repeat with the Back Gussets.
Press seams open if you did not use a French seam, and zig-zag or serge the raw edges.
Press under ½”/13mm on the short straight edge with button and buttonhole markings on both gussets. Turn another ½"/13mm and stitch along pressed edge.

Stay-stitch on the seam line, ¼”/6mm from the slashline on front and back of teddy, tapering to and pivoting at the box at the top of the slashline.

Now, cut on the slashline to the box.

With right sides together, match seam lines and boxes of the front gusset to the front of the teddy using a ¼”/6mm seam line. (Raw edges will not be even at the top of Slash.) Backstitch at box. I would NOT use a French seam here as it would be way too tedious.

Pivoting at the box, stitch adjoining side of front gusset to front.
Repeat with the back gusset. Press seams away from gussets.

Zig-zag raw edges together to finish.

STEP FOUR: FINISHING
Note: If you plan to finish your garment with lace edging or hand-scalloped edging, disregard Hem instructions below.
Press under ¼”/6mm on bottom raw edge, turn again ¼”/6mm and stitch close to pressed edge around leg opening, starting and ending at gusset edge.

Make two buttonholes as marked on Pattern Piece of front gusset. And, sew two buttons on back gusset. OR, you may apply snaps instead, which I did - using sew-on snaps.

My teddy is finished! I think it turned out pretty well. I love the color I ended up with. Remember if you dyed your garment fabric wash it by itself several times just in case it continues to bleed. With silk its best to handwash or dry clean.
The trickiest part of this pattern for me was the front and back gussets. You can practice beforehand if you have never done it before. For me, silk is the hardest fabric to work with but I love the challenge. It was so rewarding when finished - and feels luxurious and comfortable. I'll be wearing this to sleep! And maybe I'll make one to wear outside my home!


Several Folkwear pants patterns have drawstring waists, including 119 Sarouelles and 145 Chinese Pajamas. These pants are comfortable, easy to wear, and very easy to sew. They are also easy to fit, with lots of room (or ease). All these qualities make them popular options when picking a pattern for pants. Customers love them for casual day pants, pajama pants, and yoga or exercise pants.
Drawstring waists are very traditional and were used extensively for centuries to keep pants at the waist. However, the invention of elastic has made pants even more comfortable and easy to wear. I am going to show you how to add elastic to the waist of these drawstring pants of the 145 Chinese Pajamas, but the same instructions and ideas will translate for just about any drawstring pants.
First, check to see how wide the waistband finishes, which will help you decide which elastic width to purchase. Generally, you want to have elastic that is the same width or slightly narrower than the waistband width. The waistband of the 145 Chinese Pajamas finishes at 3/4", and I used 3/4" wide elastic. You definitely don't want to use elastic that is wider than the waistband's finished width.
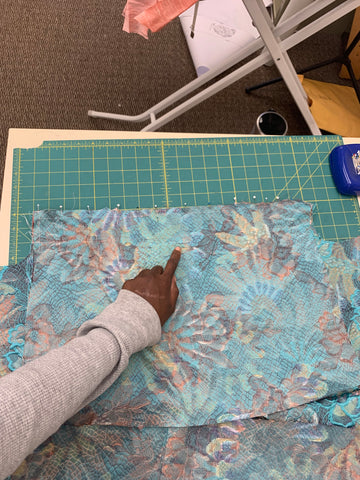
If you want to still have a drawstring in the waistband for aesthetic reasons, or to help with waist fitting, you should leave the opening in the center front of the pants for the drawstring to be pulled through. Below you can see the two dots where I will not stitch the front together. You can also see the mark that shows where the waist will be folded down to make the waistband. This pattern does not have a separate waistband piece. Sewing tip: I used red tipped pins to indicate where to stop stitching.
If you do not want to add a drawstring to the elastic waist, simply sew right through the dots (or opening for the drawstring) in the center front.

Below you can see the front of the pants sewn together with the opening made for the drawstring. I've also finished the seams and pressed the top for the waistband. You can see the opening for the drawstring from the front when the waistband is pressed down in the second image below


You will sew your waistband down as normal, but leave a 1" to 1-1/2" (13-19mm) opening in the center back of the pants to feed the elastic through. You won't use the drawstring opening for the elastic because it is a bit small and when you sew the elastic together, you don't really want that seam in the front, if possible. So start and stop sewing the waistband at the center back as shown below.


Now you will need to cut the elastic for the waistband. You want to cut the elastic 1" (13mm) smaller than your waist measurement (or where the pants will fall on your waist). So if you waist measurement is 30", you will cut the elastic to be 29". Some people recommend 2" smaller than your waist, but you will also take out another 1" when seaming the elastic. And I find this the most comfortable, but you can test what you think is best as well. It is easier to cut the elastic slightly smaller once you've put it in the waistband than to add to the elastic if you cut too small to begin with.
You will feed the elastic through the back of the waistband. To do this, I use a bodkin, but you can also use a large safety pin. Try to keep the elastic un-twisted while feeding through the waist. And once through, make sure it is not twisted. Make sure you don't pull the tail end of the elastic into the waistband. You can pin it to the pants just outside of the waistband so it doesn't pull through.


Once the elastic is fed through the waistband (and make sure it's not twisted), take the two ends and overlap them by about 1/2" (13mm). Stitch together on your machine with a wide zigzag stitch or stitch a box with a straight stitch over the overlap. Be sure to backstitch and stitch over your stitches several times to secure the elastic ends together. This is a good time to try on the pants to make sure you like how the elastic fits. You can make adjustments now to make the elastic smaller if you like.

Tuck the elastic into the waistband.

Now topstitch the opening of the waistband closed.

The elastic waistband is complete. If you are adding a drawstring to the pants, you can do that now.

I made my drawstring from scraps left from cutting out these pants. I cut right along the selvage edge to make a long piece that was about 1 inch wide. I folded 1/4" (6mm) to the inside on both long edges and then folded the piece in half and sewed along that edge to create 1/2" wide drawstring. You want the drawstring to be your waist width plus at least 12 more inches to have a tie.

Feed the drawstring through the front opening of the pants, on the outside of the elastic that is in the waistband.


Once you have fed the drawstring through the waistband and it comes out again, make the two ends even and tie them how you prefer (or don't tie - it's up to you!).


Shortening pants legs, or sleeves, is one of the most basic pattern adjustments you might need to make. It is a simple step that can be helpful for getting pants (and sleeves) to fit correctly. Sometimes, it may seem best to just hem the amount you want to shorten out of your pants, but sometimes shortening at the hem changes the way the pants should fall or finish at your ankle. For instance, the 145 Chinese Pajama pants are slightly tapered at the ankle, and they have a cuff that is attached to the bottom hem. So, if you shorten at hem, the taper is removed a bit and and cuff won't fit quite right.
So, it is usually best to shorten at the lengthen/shorten lines indicated on the pattern pieces. I am going to show you how to do this simple step with our 145 Chinese Pajamas.
To know if you need to shorten (or lengthen) pants, you can measure your inseam and compare it to the inseam of the pattern. You could also make a muslin of the garment, try it on, and decide if it needs to be shortened. I like this option a lot because different patterns fit in different ways, so a muslin can help with all kinds of fitting issues. You can also use Swedish tracing fabric to trace your pattern, baste together and try on. Then make adjustments right from the traced pattern.
First, you want to fold out 1/2 the amount you want to shorten the pattern piece by. For instance, if you want to shorten pants by 1", you will fold out 1/2" of the pattern piece at the shorten line. This is because when you fold out 1/2", you are actually folding two 1/2" sections that are stacked on top of each other, so 1" is taken out of the pattern piece total.
Make sure you are folding out the same amount across the whole lengthen/shorten line.

When you have an even fold across the whole pattern piece, tape the fold so it does not shift when using the pattern piece.

That is pretty much all there is to shortening a pattern piece. The only thing that might be needed is to even out the edges where the pattern was shortened. This is called "trueing" the edges. You can eyeball this, or use a straight or curved ruler, depending on what your pattern might need and what you are comfortable doing. I used the very slightly curved end of a hip curve ruler to true my lines.

You can draw the lines in or trim the pattern pieces to fit.

And that is all there is to it! You can see a shortened pants leg below.


by Esi Hutchinson
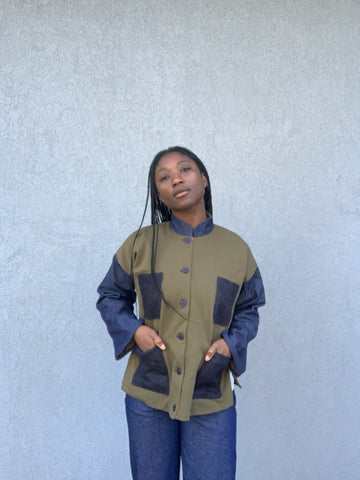
When I realized the #145 Chinese Pajamas would be the featured pattern for the month of February, I got inspired by the lines of the jacket to make a modern jacket for myself from the pattern. In this post, I am going to do a sew along, as well as show you the modifications I made for my jacket.
We also just made this pattern available as a PDF pattern you can get it here! The pattern is unisex and goes up to size 2XL, and includes the cuffed jacket and drawstring pants. The jacket is fully lined with four pockets and one inside pocket! The casual loose-fitting pants can be made with a drawstring or elastic if you prefer. To add decorative flair, the cuffs of the pants, pockets and collar of the Jacket can be made of contrasting fabric. The jacket is fully lined and if you make the full length sleeves, they are folded back to reveal the lining - so the lining can also be made of a contrasting fabric as a design feature.
While this pattern comes with the Jacket and Pants to be made into a pajama set, I'm always thinking of how to change up Folkwear patterns to fit my style, especially if it is a more westernized rendition. The true characteristics of this jacket that originated in Chinese culture is the mandarin collar and button-loop frogs front closures. The sleeves are constructed in a way that many older, traditional garments are made (compared to how most jackets and shirts are made nowadays). You will see when reading this blog post.
I'll be showing how I made this jacket using scraps from previous Folkwear projects. There are so many fabric scraps that we sewist accumulate, why not make some more garments from them?
Fabric and preparation
If you want something that is light and drape-y, use soft and flowy fabrics such as silk charmeuse, synthetics, cotton voile, linen or silk velvet (that would be fun). For a more structured look and feel, use lightweight wool, brochade, denim or corduroy, you can also use twill or other similar fabrics. Medium-weight silk and cotton would be great as well. For the Lining, use a fabric that is either similar to or lighter weight than the main fabric. Check out our fabric collection in case there is something that you might like for this pattern. Pre-wash your fabric before cutting. If you are going to use a thicker fabric, consider going up a size in the pattern for possibly a more comfortable fit, especially if you plan to wear it over other clothing.
Optional: You can buy contrasting fabrics for any of the pattern pieces. Make sure it's a similar weight and feel, as you want the structure of the jacket to remain the same. The sleeves, collar, and pockets can be made from different fabrics. For my jacket, I used denim for my pockets because I want them to be sturdy (since I often put my phone in the pocket). I also used denim for the outside of collar D (for the facing, I used my lining fabric).
I picked out some dark indigo shades of denim and green is my favorite color right now, so I was happy to see the big scrap of green twill we had left. I used a scrap of raw silk for my lining, which looks nice and also makes it warmer.

The jacket is quite long, and generally should hit the mid to upper thigh. I shortened it by about 6" (15cm).
To shorten, make a pleat along the marked adjustment line equal to one-half (for me it was 3" (7.6cm)) the amount you wish to shorten, pin or tape in place.
And if you wish to lengthen (you could definitely make a long coat from this pattern), slash along the marked adjustment line; place extra paper underneath and spread the split pattern pieces as necessary; pin or tape the added paper to the pattern pieces. Smooth the lines between the new lengths.

NOTE: If you shorten the front and back of the jacket, you will also need to shorten the front facings by the same amount (you can see the pieces I shortened above).
I also shorted the sleeves by 3" (7.6cm). The sleeves in this pattern are quite long because they are supposed to be turned up as a cuff, to show the inside lining fabric. I did not want a turned up cuff, so shortening by 3 inches made the sleeves the correct length for me. Make sure when shortening your sleeve you give enough room for the attachment to the lining. You are suppose to be able to fold ½” (13mm) to the inside and then another 1” (2.5cm) more, so be sure to keep 1½” (3.6cm) for this step. You can also see what I did to modify this when getting to the sleeves and lining below.

Cut out all your pieces. Be sure to cut out the pattern pieces from the correct fabric and lining that you choose. Follow the instructions for which pieces to cut (and how many!). For the facings, you can cut from your main fabric, or from the lining fabric to reduce bulk.

My main body pieces and facings.

My sleeves, pockets, collar, and linings.
NOTE: Pressing is as important as careful sewing. Construction goes more smoothly, and the finished garment looks better if you press as you sew. Be sure to press all seams flat to set the stitches; then press seams open or to one side, as instructed. Experiment with different heat settings and pressing cloths on scraps of the selected fabric before pressing actual garment pieces.
Lets get started! I am going to go through how I made this jacket. Similar to a sew along, but I have made a few changes to the pattern to suit my taste.
JACKET BODY:
STEP ONE:
Staystitch neckline edges of front and back outer and lining pieces.

With right sides together, sew Top Pocket to Top Pocket Lining pieces along straight edge. Press seams open. Repeat with Bottom Pocket and Bottom Pocket Lining pieces.

With right sides together, sew Pockets to Pocket Linings along outer curved edges, matching notches and leaving open between dots. Trim seam allowances, turn right side out, and press. Slipstitch openings closed. I pressed under to topstitch for the next step.


Pin Pockets to Fronts where marked on pattern pieces, and topstitch in place. Backstitch at top corners or pull thread tails to wrong side and tie off. My fabric is so dark I didn't feel the need to do that, however it does make a nicer, more professional finish in my opinion. And if you feel the pockets will get a lot of wear, you can put a bar tack at the top of the corners of the pockets.

With right sides together, sew Fronts to Back at shoulders. Press seams open.

COLLAR
Staystitch neckline edge of Collar pieces.

If you want to use interfacing do so now. Fuse or baste interfacing to wrong side of one Collar piece. I did not use interfacing since my main fabric was fairly heavy and stiff.
With right sides together, sew Collar pieces together along outer edge. Trim seam allowances, turn to right side, and press. Remember, I cut my second collar piece (collar facing) out of the lining fabric.

With right sides together, sew neckline edge outer Collar to Jacket neckline between squares at center front, matching notches at center back. Clip neckline edge as necessary to fit.

Clip neckline seam allowance to squares. Press seam toward Collar.

Turn under remaining Collar neckline edge by ½” (13mm) and slipstitch it to neckline seam, covering the stitching.
SLEEVES AND SIDE SEAMS
This sleeve design is a little different than typical modern sleeves (but it is more similar to traditional/folk sleeves). With right sides together, sew SLEEVE C pieces to Jacket at armholes, matching notches. Press seams open.


With right sides together, sew underarm/side seams from Sleeve hem to star below the square, matching notches and backstitching at star. Press seam open, clipping underarm curve as needed.

Clip to star.

INSIDE POCKET
Fold inside Pocket right sides together and stitch around outer edge, matching notches and leaving open between dots. Trim seam allowance, turn right side out, and press. Slipstitch opening closed.

Pin inside Pocket to Lining where marked on pattern piece and topstitch in place. I am right-handed so I placed the pocket on the left front lining.

FRONT AND HEM FACINGS
With right sides together, sew Right Front Facing to Front Hem Facing, matching notches and ending stitching at dots. Sew Left Front Facing to remaining Front Hem Facing, matching notches, and ending stitching at dots. Press seam open.

With right sides together, sew two Side Slit Facing pieces to each Front Facing assembly, matching double notches, and ending stitching at dots. Press seams open.


With right sides together, sew remaining Side Slit Facing pieces to Back Hem Facing, matching double notches, and ending stitching at dots. Press seams open.

Press under ½” (13mm) along inner edges of each Hem Facing assembly.

Clip side seam allowances of Front and Back lining to star. If you didn't clip to the star on the outer fabric above do it now.

With wrong side of Right Front Facing to right side of Right Front Lining, edgestitch along inner pressed edges. I suggest Basting outer raw edges together.
Repeat with Left Front Facing and Left Front Lining.
NOTE: Front edge of Facing G piece will extend beyond Lining Front edge.


Repeat with Back Hem Facing and Back Lining.

Here I am undoing what I did to edgestitch along the inner pressed edges of facings to Lining.

Left Front.

Back piece.

LINING
With right sides together, sew Front Lining pieces to Back Lining at shoulders, matching notches, as you did with fabric pieces. Press seams open.

With right sides together, sew Sleeve Lining pieces to Jacket Lining at armhole, matching notches, as you did with fabric pieces. Press seams open.

With right sides together, sew underarm/side seams from Sleeve Lining hem to star, matching notches and backstitching at star, as you did with fabric pieces. Press seams open, clipping underarm curves as needed.

With right sides together, slip Sleeve Lining over Jacket Sleeves and sew Lining to Jacket along left Front Facing edge, from square at top to bottom edge. Press seam toward Facing.
Starting at right front neckline, pin Lining to Jacket body, aligning hem edges, matching stars at Side Slit.
. 
Fold Left Front Facing along foldline. Baste, then stitch, pivoting at tops of Side Slits. Trim seam allowances.

Fold top of Left Front Facing at foldline, matching square, and sew across top from square to outer edge. Trim seam allowance, turn Jacket right side out through neckline, and press.

Turn under ½” (13mm) along Lining neckline edge, clipping curves as needed, and slipstitch to Collar seam. Sew a few extra stitches at shoulder seams to reinforce.

Pull Sleeves to inside of Jacket (wrong side out). Matching raw hem edges. If you baste the raw edges together it is helpful.

I changed up this next step a bit to work for the jacket I made (which does not have the "turned up" sleeve cuffs). I turned the outer sleeve hem under by 1/4" (6mm) (instead of 1/2") and then under again by 1/2" (13mm) (instead of 1") and pressed. Then I stitched the folded pressed edge to secure the outer jacket to the lining. You could also slipstitch the hem, catching only the folded edge and lining so the stitches won't show on the right side.

Instead of adding in the button-loop frogs front closures as the pattern calls for, I made buttonholes on the right side of the jacket front about 3/8" (1cm) away from the right front seam. I also re-spaced the buttons since I shortened the jacket so much.

To place the buttons I laid the Right front over the Left front extended facing, making sure not to overlap the collar. The end of the buttonhole is where I placed the farthest hole in the button on the left font facing. This keeps the facing from being seen when the jacket is buttoned.

Here is the finished Jacket!!! I really like the combination of colors I used. I love Jackets, and I volunteered quickly to make this one for myself, as well as to create this Sew Along. This jacket is now part of my big Jacket collection! I hope you enjoyed this sew along and please show us what you make from 145 Chinese Pajamas.


by Victoria Watkins
When I made a test sample for the 510 Passionflower Top, I quickly noticed that I would qualify for a small bust adjustment. At first I was worried that the process of fit adjustment would be too difficult, but I was able to get a nice fit with the help of Molly's guide to adjusting this top. Today I'll talk a little bit about the process of fitting the bodice to my own measurements and body.
First, Molly discussed how to find out your cup size. A difference of 1" between high bust and full bust counts as an A cup. Upon measuring, I found that my own chest was actually closer to a half inch of difference. (I wonder how you'd refer to that? A-minus cup?) However, just as a starting point, I decided to use the math and proportions for a regular A cup like described in the original guide. If it was too wide, I could bring it in later. However, I found that the ease was alright for this pattern, since it's more of a flowy, comfortable piece. For this reason, I didn't increase the width of the darts any more than outlined in the original post.
The placement, height, and direction of the bust apex is a huge factor on how this pattern will fit. In the pattern, apex is assumed to be about 1.5" above the center dart point. However, every body is different. You may need to adjust the apex point on the tissue to be where your bust fits. This may be .5" to 1.5" from the dart point.
After making the first muslin and trying it out, I noticed a few issues that needed to be corrected. It seemed like there was some slack at the center front seam of the bodice, and the cups looked very pointy and didn't conform to my body as I'd have liked it to. I consulted with Molly, and she let me know that I should shorten the darts to give myself at least a half inch of room from the dart point to the apex.

So, that's what I did with the second muslin. I kept the width of the darts the same at the bottom and drew a new point, tapering the new dart legs to that spot for each one. You can see the original darts (blue) and the new ones (purple) in the photo below. This fit was closer, but it soon became apparent that I'd have to squish my chest together unnaturally to get the cups to fit. I needed to move the darts toward the side seams a little bit in order to accommodate my wider bust points (i.e. they are not as close to each other as the pattern tissue would have them).

In order to determine how much to move the darts, I marked where my actual apex sits, directly onto the muslin. Since the centermost dart should sit directly under the apex, I was able to measure the distance between the two and move the darts in that direction. To move the darts, I simply cut into the most recent muslin, moved the cut piece to the left the appropriate amount, and taped it down.

When tracing a new piece out of the cut one, I made sure to smooth out areas of the pattern to maintain the hemline. Once I tried out this fit, I was pleased enough with the results to call it a day!
When you do this process for yourself, the measurements and proportions may be entirely different to what I've described here, or what the Small Bust Adjustment post by Molly outlines. Every body is different, so do your best to make an educated guess on how to start, then refine from the initial attempts. The custom-fitted clothing will be worth the efforts in the end!

by Molly Hamilton
About 5 years ago, I bought several meters of a beautiful wool plaid when I was in England. It was a wide fabric that was 100% raised, milled, spun, and woven in England. And, it was such a pretty fabric and was so "local" that I was smitten. Of course, it was quite expensive, but I bought some anyway thinking that I would figure out what to do with it at some point - hoping to make a jacket or coat. And so it sat in my fabric stash since then. It finally stood out to me the other day when I was looking through the fabric for something else. So I pulled it out and laid it out and thought about it for a few hours. I thought about making our 230 Model T Duster from it (we just put out the PDF version), modifying it to be shorter (and adding different fabric for the facings). But even shorter, this would have been a stretch with the small yardage I had, plus all the seams (princess seam, back seam with a pleat) would have made matching the plaid impossible with the yardage I had. And that much unmatched plaid would have driven me crazy. Plus I really wanted to show off the plaid and not cut it up too much since I think it is so pretty. Esi saw me contemplating the fabric and suggested the Basics Overcoat. Which was a brilliant suggestion. It is simple, I could easily shorten it (and make it smaller), and it has large pattern pieces so I wouldn't have to break up the plaid. But, I did make some changes to the pattern to get the results I wanted and to make the most efficient use of the fabric.
 My fabric!
I only had 2 meters (2.2yards) of the fabric. But it was 150cm (about 60") wide. So, I obviously did not have enough to make the entire, full-length, coat. But with some modifications I could make the Basics Overcoat pattern work.
 The fabric is folded in half, and you can see the pattern "as is" doesn't really fit on the amount of fabric I have available.

First, I traced a size XS for the pattern (I used Swedish tracing fabric). This is still very wide so if you needed to, you could narrow the width at the shoulder and make the sleeve a bit longer. But it worked for me as I did want to use as much fabric as possible. I shortened the pattern, taking about about 12" (30cm) from the bottom. I also decided to make the turned-under facing on the front as a separate piece. This saved a lot of fabric and I could make the facing with a linen that coordinated well. If you do this, remember to add the 1/2" (13mm) seam allowance that you will need. I also cut the back on the fold rather than as separate pieces. This kept the plaid in tact as well as save a little more fabric. I had to make sure to take out the 1/2" (13mm) seam allowance for this modification. You can see how the pattern is laid out above.
With these modifications, I could fit all the pattern pieces on the fabric! I couldn't match the side seam plaid, but it wouldn't be terrible, and it was something I could definitely live with.
I cut the front facings from a coordinating linen using the front facing from the front piece, but adding a 1/2" (13mm) seam allowance so that it could be sewn on to the fronts.
I also wanted the coat to have a bit more heft to it so I decided to fully line the coat with a winter white wool gabardine we have in stock. It is medium-weight and drapey, and coordinated well, so I thought it would be great. And it was easy to sew with and very warm and gave the perfect amount of heft to the coat.
To make a full lining, I cut the lining with the front and back pattern pieces: cutting the back on the fold, and cutting the front to where the facing folds over, and adding a 1/2" (13mm) seam allowance. So the front lining pieces were about 4" (10cm) narrower than the front pieces. I also cut the lining a few inches shorter than the outer coat.
I sewed the facings to the lining first, along the front. And I sewed the outer front and back together at the shoulder and side seams. And I sewed the lining front and back together at the shoulder (leaving the facings free) and at the side seams.
Then with right sides together (back of lining to back of outer fabric), I sewed the facing (that was attached to the lining) to the front of the outer fabric on both sides. And I turned the coat so that the inside of the lining and outer were facing each other. Now the coat is lined!
I basted the neck together. But, I also wanted some stability and for the lining to not bulge out or move too much when I wore the coat or took it on and off. So I did a technique used in the padded jacket of 112 Japanese Field Clothing and the lined coats of 114 Chinese Jacket, and I sewed the seam allowances together inside the coat. I sewed just in the seam allowances and just on one side of the seam allowance of each one. I did a few with the machine, but honestly, it was just as quick and much easier to do it by hand. I did the shoulder seam allowances too. Sewing these allowances together is more like basting. The stitching doesn't have to be precise or short. This is just to keep the lining from moving around much.
After I did this, I basted the sleeve lining and outer fabric together at the cuff seam also. I basically followed the instructions in the pattern from there on. I did baste the collar on by hand before sewing it on (this is a trick I often to with tricky collars, which in my opinion are most of them). And for the hem, I folded the outer coat up and sewed it by hand to the lining. You might notice in these photos that the back is hanging a bit funny at the bottom. I need to pick out that section of stitching and re-sew the hem to the lining. It is bagging a bit. But that is an easy fix - and something that can happen with lined coats. Just need to be a bit careful, and sometimes hang them.


I did find that this wool did not press easily. But I love the smell of the wool with a warm iron and steam (maybe that's a bit strange?). And I didn't mind the mis-matching plaid side seams. I am really happy with the coat! I need to put buttons on it, but that has always been something I usually wait on doing. I will figure out which buttons I like over the next few weeks and add them when I am ready!


I hope this coat inspires you to think about what you can do with this pattern (and the special fabric you might have in your stash)!
Let me know if you have any questions about this pattern or what I did!
 Wearing my coat in our office warehouse. Boxes and boxes of patterns behind me!

by Esi Hutchinson
This short blog post will focus on the optional lace insertion for 510 Passionflower Lingerie Top. Adding lace insertion to this pattern can really up the wow-factor. You can add lace to the bodice, on the outer layer or through both the outer and lining for a more see-through look. Folkwear has another blog post about lace insertion that you can refer to for more information and some basic instruction: How to sew Lace Insertion.
For the Passionflower Lingerie Top, you will need about 1-1⅝yds (.9-1.5m) lace. You may need less if you are just wanting to add to the front bodice pieces, or if you just want to add a small design. Before purchasing lace, you can measure the area you want to cover with lace insertion to get a more accurate understanding of how much lace you will need.
I used a synthetic black lace. Be aware when using synthetics to be careful when pressing, use a low heat setting, or else you might melt the lace (and ruin your iron).
For this demonstration, I only cut out the bodice pieces A and B as well as the Lining and followed the instructions for only the Bodice construction. Construction of the bodice goes forward as normal.
 Wrong side of my bodice pieces (outer and lining).
 Front bodice outer and lining sewn together.
 Front bodice turned right side out with lining.
Beginning of Lace Insertion
Pin the lace near the top edge of the bodice, or wherever you wish to have the lace. As you are stitching you may have to adjust the lace depending on the stretch of the lace.
Stitch the top and bottom of the lace about 1/8-1/4" (3.2-6.4mm) from the lace edge with a short straight stitch or a narrow zigzag stitch. Use a narrow zig zag stitch if your lace has a lot of stretch.

Turn to the inside of the bodice and spread the outer layer open the lining. You will cut the lace leaving about 1/4"(6.4mm) seam allowance. Be very sure not to cut into the lace or Lining.
 Here I am cutting away the fabric from behind the lace, leaving about 1/8"-1/4" (3-6mm) allowance.
 Here all the fabric has been cut away from behind the lace.
Press the seam allowance away from the lace, if your lace is synthetic press lightly and/or use a low heat setting.

Now, stitch close to the pressed edge, with a short straight stitch or a narrow zigzag. This keeps the cut edge out of the lace, finishes more cleanly and helps prevent fabric from fraying.


Now you can fold the bodice lining back down and proceed with the pattern. If you want, you can do this same process with the lace through both layers of the bodice (outer fabric and lining). This will make the top a bit more see-through which can be a fun effect. You will need to deal with both layers in the seam allowance, but careful pressing and sewing the edge can work well. A very light-weight fabric that does not fray easily is helpful.


Our new 510 Passionflower Lingerie Top expands our size range to 4XL (58" bust). And since this pattern relies so much on the bust fit, we also offer each size with three cup options (B, C, and D). We want to help you with sewing fit, so this post will show how to measure to get your correct size and how to make a Small Bust Adjustment (SBA) in case you are an A cup (as I am).
To figure out which size, and cup size, is best for you, look at the size chart. The bust measurement is going to be the most important for this pattern, but you can also look at the finished measurements to make sure the empire waist (just below your bust, or mid-ribcage) will fit. I am on the larger end of a size Small, so I usually check finished measurements and cut a size Small. If I need to adjust to add a little bit at the hips, I will grade out to the next size up, but with this pattern there is so much ease in the hips (it's basically a circle skirt) that I don't need to worry about that.
To find your bust cup measurement, you need to take your high bust measurement and your full bust measurement. The difference between the two gives you your cup size. If there is a 2" difference, cut a B cup; if a 3" difference, cut a C cup; if a 4" difference, cut a D cup. So for instance, if your high bust measures 34" and your full bust measures 37", you will cut a Medium size from the C cup front piece (37-34 = 3" and 37" bust is our size Medium).


High bust measurement

 Full bust measurement
The difference between my full bust and high bust measurement is 1", which is an A cup. So, for this pattern, the B cup will be a bit large and can have some bagginess that I might not like. So I am going to show you how to make a Small Bust Adjustment (SBA) for this bodice piece in case you need to make this adjustment also. I highly recommend making a muslin (or two or three) to make sure the fit is how you want it to be. Every body is different. Your bust apex may be different, or your shape may need other adjustments. A muslin will help you get a better fit even after this SBA.
Small Bust Adjustment for Passionflower Top
First, it helps to outline the darts in the size you are making with a colored pencil or marker. I used yellow below. Then draw a line through the center of the center dart, up through the dart point. I drew this is pink below.


 The bodice piece with seam allowance noted, darts outlined, and line through center dart (and apex) drawn).


by Esi Hutchinson
Folkwear is excited to introduce our new sewing pattern, 510 Passionflower Lingerie Top. The babydoll sewing pattern is sized XS-4XL with three cup sizes for each size. The full, above-knee skirt has an open front and drapes beautifully to a slightly lower length in the back. Instructions for optional lace applique and lace insertion are included in the instructions. I'll soon have a blog post showing how to do the lace insertion for this garment, so stay tuned!
While this pattern makes really cute sleepwear babydoll lingerie, it also can be a great casual top to wear in warm weather. For this sew along, I will be making the Passionflower Lingerie Top into a shirt you could wear casually. It has a charming character to it with the curved skirt and picot hem finish that allows it to curl at the edges - it's very cute!
Lets get started!
Fabric and preparation
Fabric suggestions for this pattern include lightweight or medium-weight cotton, cotton gauze, linen and blends, voile, batiste, rayon challis, silk, charmeuse, and very lightweight silk velvet with drape. You want something that is light and with a good drape. For lingerie, you might want to try something sheer or semi-sheer. For this top, I used an organic cotton voile in a dusty pink. I used the same fabric for the bodice lining, though you could choose a different fabric for the lining (especially if you are sewing with sheer fabrics). Folkwear has several colors of these cotton voiles in our fabric collection in case there is something that suits you for this pattern. I always recommend that you pre-wash your fabric before cutting the pattern out.
Optional: If you are doing lace applique and or lace insertion you will need 1-1⅝ yds (.9-1.5m).
Optional: If you like, you can use 1¼yd (1.1m) ribbon for straps instead of the strap pieces for the pattern. This can look really nice if you also add a ribbon applique to the top of the bodice (you'd want more ribbon then - about 3 yards).
Fitting and cutting out the pattern
You need to choose the size that best fits your bust and waist measurements, with bust being the most important. Also look at the pattern's finished measurements. The waist of the top, is an empire waist is fits just below the bust. You can measure there to make sure the fit is going to work for you at that point.
Once you choose a size, you will need to choose the bodice cup size to fit your bust. To find best cup size, measure your full bust and high bust. If there is a 2” difference, choose B cup; if a 3” difference, choose C cup; and if a 4” difference, choose D cup. If have a 1" difference, stay tuned - we will have a Small Bust Adjustment tutorial very soon. I used the B cup for this pattern. To make it easier to see the dart lines (or cutting lines) on the pattern, I use a marker to outline the size I want along the appropriate line(s).
Cut out the pattern pieces for your size, and refer to the Yardage chart for finished measurements as well if you need to adjust any of the pieces.
STEP ONE: Bodice Construction
It's helpful to highlight the darts for your size, so you don't get mixed up with the other dart placements.

Transfer the dart lines on the outer fabric and lining of the Bodice A. I used tracing paper and a tracing wheel.

With right sides together, sew the three darts on Front A pieces. Be sure to have the dart lines transferred to the wrong side of the fabric so it is easy to see where to pin and sew. It is helpful to sew each dart separately before pinning the other darts out. Instead of backstitching at the point of the dart, sew off the fabric and cut long threads then tie the thread ends together several times to secure. This makes a cleaner dart point. Press darts flat, then press toward Center Front. Repeat with Front Lining pieces.

With right sides together, sew Front pieces together along Center Front seam. Press seam open. Repeat with Front Lining pieces. You don't need to finish these seams as they will be enclosed in bodice.

With right sides together, fold Strap in half lengthwise and stitch long edge. Trim seam allowances. NOTE: As an alternative, you may use satin or lace ribbon for the strap.

Turn Strap right side out, and press.

Baste Straps to right side of outer Front (not lining) between dots, as indicated on pattern, matching raw edges.

With right sides together, sew Back pieces to Front at sides, matching notches. Press seams open.
Repeat with Lining pieces.

With right sides together, sew the Front/Back outer fabric to Front/Back lining along Center Back, underarm, and neckline edges, matching Center Fronts and side seams, and taking care to keep open strap ends clear of stitching. Trim seam allowances and clip corners. Turn right side out, and press. On Lining, press up ½” (13mm) to the wrong side, or inside.

Turn right side out, and press. If you want to add a lace insertion or applique do so now. We will have a lace insertion blog soon. If you want to applique lace, or ribbon, to the top of the bodice, place where you want it and pin in place. Use a short stitch to secure the lace or ribbon along the outside of the piece(s). You can stitch through both outer and lining layers, or you can open the bodice up and stitch through the top/outer layer only.

STEP TWO: Skirt Construction
With right sides together, sew Skirt Back pieces together along Center Back seam, leaving skirt open above notch. I finished this seam with French Seams. Press seam open, or press to one side if using French Seams, and press seam allowance open above stitching on both sides.

Press under raw edges of seam allowances by ¼” (6mm) along unstitched portion of Center Back, and press under again by ¼” (6mm) to enclose raw edge.
Topstitch close to pressed edges, pivoting at notch and crossing over seam allowances to return on opposite side.

With right sides together, sew Skirt Front pieces to Skirt Back at side seams, matching notches. Again, I used French Seams here.

Staystitch top edges of Skirt by stitching ⅛” (3mm) away from seamline, in seam allowance, using short stitches.
To create the picot skirt hem, set machine on long, wide zigzag stitch and sew along bottom and front edge of the Skirt. Work with the wrong side of fabric facing up and be sure that outer swing of machine needle encloses the raw edge. NOTE: If your fabric unravels easily, you may want to press under the raw edge ¼” (6mm) before beginning so that the swing of the needle encloses the pressed edge. Also, you may want to tighten the upper thread tension to create a scallop effect. The picot stitching gives the hem a bit of a wavy effect.
Instead of this picot edge, you could also finish the hem by serging, hand or machine roll hemming, pressing under raw edge and slipstitching, or topstitching lace edging to raw hem edge. These options all give a bit of a different effect and provide many options for the hem.


Overlap the curved Center Fronts of Skirt by ½” (13mm) and baste across overlap along top edge. Make sure raw edges of overlapped top edge are matching, so Skirt Fronts will drape correctly.

STEP THREE: Skirt and Bodice Finishing
With right sides together, sew Skirt to bodice outer fabric only, matching notches and side seams. Clip Skirt seam allowance close to staystitching as needed to ease in stitching. This can take a little bit of finaggling to get everything lined up, but the staystitching and clipping really help. Press the seam toward bodice.
Optional: Instead of sewing just the outer layer of the bodice to the skirt, you could baste the raw edges of the Outer Bodice to the Lining and sew both, as one piece, to the Skirt. You will need to finish the raw edges with a zig zag or serger like I did below on another sample I made of this pattern.


Outer layer of bodice pinned to skirt.

Press under ½” (13mm) to wrong side on Lining if you haven't done so already.

Slip stitch pressed lining edge over previously stitched seam, encasing the seam.

STRAPS
Pin Strap ends to inside of Back pieces where indicated on pattern pieces. Adjust for fit or comfort.
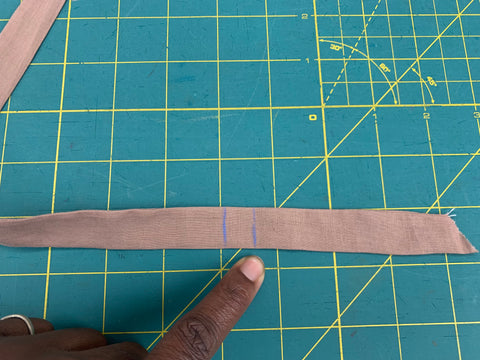
I drew a line indicating the final length, and a line ½” (13mm) below it indicating the cutting length. Where my finger is, is where I will cut the strap to fit my body.
I folded the strap into itself by ½” (13mm) and pressed.

Stitch the strap end to inside of the back bodice between the dots. I stitched very close to the edge of the bodice. You could also slipstitch this close to the edge for an invisible seam. Matching thread also helps, but I wanted the seam to show for this sew along. Another option that I tried and liked, is to finish the ends of these straps (you can do that when the sew the straps by sewing one short end together when sewing the long side together). Then, you can tie the straps behind your neck to make a halter style top.

Now just sew a bra closure, hook and eyes, or snaps to inside of Bodice at Center Back. I prefer snaps for this top, but a bra closure or hook and eye are perhaps more secure.

If you don't like the gap in the back of the skirt, you can sew on more closures, like snaps, to close it. I don't mind it at all so I left it open. The snaps provide a bit more overlap in the back also so it doesn't gape.

Now you are finished with your 510 Passionflower Lingerie Top!

Looks cute with a jacket!

And with jeans!


And I love the back!

This babydoll lingerie top is perfect in lightweight fabrics with good drape. You can sew it up with anything from cotton to silk to rayon. You can make it with sheer fabrics or seme-sheer fabrics for sexy lingerie, or you can sew it up in solids or prints for a fun summer top.
The pattern suggests lightweight or medium-weight cotton, cotton gauze, linen and blends, voile, batiste, Swiss dot, rayon challis, silk, charmeuse, or very lightweight silk velvet with drape. If you use charmeuse or another slippery fabric, we highly suggest checking out the tips for sewing with these tricky fabrics. And if you choose lace or sheer fabrics, we have another blog post with lots of tips for sewing with them too.
So, now I want to provide some suggestions for fabric that I think would be great to use for this pattern.

First, Folkwear has a few great fabric options. We have some beautiful organic cotton voiles in several colors. This one is called Alma and is very pretty. You can see others in our cotton fabric section. We've used these fabrics to make several samples. The fabric in the very top image is our teal voile.

I absolutely love a silk/cotton blend, and this one from Harts Fabrics is gorgeous with a beautiful sheen. They also have several colors of this fabric in stock!

This silk charmeuse (also from Harts Fabrics) is a unique color and very pretty! This lingerie top would feel so luxurious in this fabric.

This Nani Iro double gauze from Bolt Fabric Boutique is lovely and would make a fun top in for this pattern. There's a little metalic woven throughout this fabric.

I also love this semi-sheer burnout velvet from Marcy Tilton Fabrics. This would be so gorgeous in this pattern. Helpful hint for using fabric that is expensive - you can make the bodice lining from a different fabric (a cheaper silk or lining fabric).

Finally, this silk chiffon from Oak Fabrics is fun and pretty and would make a very sexy lingerie top!

by Esi Hutchinson
Folkwear recently made 114 Chinese Jacket into a PDF pattern as well as updating the size range to XS-3XL. This pattern features 3 jacket views with 3 different lengths (short and fingertip length for Views A and B and short, fingertip length and long (mid-calf) for View C). We are excited to be able to offer the pattern as a PDF (it has been often requested) and to have a larger size range.
This sew along will focus on View B with the fingertip length for the Jacket, but will aide you on the other views and lengths of this jacket. View B is fully lined, has facings on the outside, and incorporates all the sewing techniques all the views have to offer. I will be eliminating the piping trim as well as the embroidery embellishment since the fabric chosen for this jacket is has its own flair.
This pattern incorporates decorative facings, trims, and embroidery designs traditional to the Chinese culture, though some have also been fitted in a more western context because of history of trade, war, and peace. In addition to the research given in the pattern (historic information, lore, and traditional embellishments), we encourage you to continue to research and gain respect for what this culture and history has allowed Folkwear to share with the world.
On that note, lets begin!
Fabric
To make View B of this Jacket, you need to pick an outer layer fabric and a lining fabric. If you want to make your own frog closures or bias for contrasting piping (if you are using them - instructions for this are in the pattern, but I won't be showing that in this tutorial), you will need additional contrasting fabric.
Fabric suggestions for this pattern include silk, or silk-like synthetics, medium and light-weight cotton, or even lightweight wool. For linings you can use lightweight silk or cotton. Since the front and back are cut as one piece, it is best to not use fabric that has a one-way design or nap. If you happen to strongly desire to use a fabric like that, we suggest you use the same "hack" Cynthia did when making the 122 Hong Kong Cheongsam with a directional print.
I chose a teal brocade we had in the shop and a pink silk dupioni for the contrasting facings. For the lining I used an organic cotton voile we had in stock in a coordinating teal color.

Other than thread, no other notions are needed for this pattern, but if you are planning to embellish with embroidery or paint (or make frog closures or piping), read the instructions in the pattern for further notions.
Cutting out the pattern
One of the things that is important to do with this pattern is to tape pattern pieces A and B together at the shoulders and cut as one piece with no shoulder seam. This is typical for many traditional clothes from Asia - and it wastes less fabric.
For View B, the facings are on the outside, so using a contrasting fabric is an important design element. When cutting these facings, be sure to place them as indicated on the pattern. Most of them are placed printed side down (this will be important if your facings are one-side print). Also make sure you note which length you are cutting for the facings and for the front/back.
Also, be sure to cut the Overlap (C) with print side down when cutting the lining.
Step One: Front
With right sides together, stitch Front/Backs of Outer Layer together at center back, matching notches. Press seam open. If your fabric unravels a lot use a serger or zig-zag to finish the raw edges.

Stitch Front Overlap C to the left-hand center front edge with right sides together, matching notches. Press seam open (finish if desired).

Step Two: Armband
Instead of applying the flat piping to the armbands or facings I simply pressed under 1/4" (6mm) on unnotched edges.
Baste notched edge of Armband I in place on Sleeve D, 3/8” (1cm) from edge, matching notches, with wrong side of Armband to right side of Sleeve.
Blind-stitch or top stitch folded edge of Armband to Sleeve. I top-stitched on the folded edge.


Right sides together, stitch Sleeve D to Front/Back A/B, matching notches. Press seam toward Sleeve.
 I had to place the jacket on the floor so you could see the whole thing folded out!
Step Three: Side Seams
Fold the Jacket at shoulders, right sides together, and pin underarms and sides of Front and Back together, matching Sleeve seams. Stitch from sleeve cuff to the bottom hem, and stitch again at the underarm curve to reinforce the curve. Clip curves as necessary and press seam open.

Step Four: Jacket Lining
To make the Jacket Lining, follow the steps above (omitting the facings), but attach Front Overlap C to right-hand center front edge, right sides together. Omit the armband step.

Lay Outer Layer, turned inside out, on table (or floor), with Back up and Sleeves spread out. Lay Lining on top of Outer Layer, also turned inside out, but with Front up.

Outer Layer and Lining will be back-to-back.

TO HOLD LINING IN PLACE: Spread side and underarm seam allowances open. Pin Front seam allowances of Lining and Outer Layer together and stay-stitch by machine- or hand-basting 1/4” (6mm) from raw edges of Sleeve and side seam allowances, leaving the underarm curve free. The idea is to stitch the seam allowances together so that the lining stays in place when turned inside the jacket.


Turn the Lining right side out to the inside while turning outer layer right side out as well. Smooth layers together carefully and pin raw edges of Outer Layer and Lining together.


Machine- or hand-baste layers together at neckline, cuff, side overlap, and bottom of Jacket, stitching 3/8” (1cm) from raw edges.

Finish right-hand center front edge by turning under both layers 1/4” (6mm), turning under again 1/4” (6mm), and stitching. You are just creating a narrow hem here.

Right sides together, stitch Neck Facings E together at center back, matching notches.

Stitch left center front of Neck Facing E to unnotched straight center front end of Overlap Top Facing F. Press seams open.

Finish unnotched edge of Neck Facing/Overlap Top Facing with pressing under 1/4" (6mm) or with bias piping (instructions are in the pattern). Press seam toward Facing.

Finish Overlap Side Facing G by pressing under 1/4" (6mm), or piping, in same way on unnotched edge. Right sides together, stitch mitered ends of Overlap Facings F and G together, matching notches.

Press under 1/2” (13mm) seam allowance on either end, at neck E and at mitered bottom end of G Piece.
With right side of Facings to Lining of Jacket, pin raw edges together, carefully matching center back and front seams and notches 5, 6, and 7. Stitch as pinned, maintaining an even 1/2” (13mm) seam allowance.

TO JOIN HEM FACINGS
1. Stitch two opposite Hem Facing Pieces J at notched ends, right sides together, to form Back Hem Facing.

2. Stitch remaining J Pieces on both unnotched end of Back Hem Facing.

3. Stitch Overlap Hem Facing K to J on left-hand side (when right side up), matching notches. Press seams open.

Finish long unnotched edge with pressing under 1/4" (6mm), or bias piping, I did above. Press under notched raw short end of J by 1/2” (13mm).

With right side of Facings to Lining of Jacket, pin raw bottom edges together, matching seams and double notches. Stitch.

Step Six: Cuff Facings and Finishing
Finish unnotched edge of Cuff Facings H in same way as other Facings. Right sides together, stitch ends of each Cuff Facing together. Press seam open.

Slip Cuff Facing over Sleeve with right side of Facing to Lining of Sleeve. Pin, matching double notches and underarm seams. Stitch.

TO FINISH ALL FACINGS: Trim seam allowances of outer layer only (as you can see in the photo below), leaving full 1/2” (13mm) on Facing. Clip at curves and trim corners. Turn Facings to outside of jacket and press. Attach Facings to Outer Layer by blind-stitching under pressed edge (or with piping), or top stitch or slip stitch by hand (which is what I did). Take care not to catch Lining if you are blind stitching or slip stitching. Stitch along all inner edges and mitered corners.

Turn facing H to the outer layer, Slipstitch pressed under edge (or piped edge) to outer layers, or topstitch which I did here on the sleeve.

Step Seven: Collar
The Mandarin collar is optional. We recommend adding a layer of interfacing if you are using it to provide a bit more structure to the collar. Stitch collar L pieces together right sides together all the way around, leaving open between stars. Trim seam allowances and corners.

Turn right side out and turn in the open ends between the dots and press. Loosely slip stitch the collar onto the neckline of the jacket. Traditionally, this is done so that the collar can easily be taken off and washed (or replaced) when needed.
Step Eight: Closures
If you don't want to buy or make your own frog closures you can use snaps (as I did). Use the frog placements on the Overflap piece C to place your frogs or snaps. Transfer those marks on the right side of the jacket.

Here is the final 114 Chinese Jacket View B Fingertip Length.
 Front
Front
 Back
Back
That is all there is to it! Show us what you make with this pattern in our Customer Gallery or social media!
Folkwear owner, Molly shows off how this coat looks. I love the contrasting facings (but would choose a fabric that presses better next time!). It makes a really beautiful coat!


I want to start out by saying that at Folkwear, we are incredibly grateful for our amazing customers! Year after year, for over 40 years, people have been using Folkwear patterns to make clothing (from everyday wear to fancy dress), costumes for theater and movies, reenactments, and to connect with their cultures. From very simple garments to complex and intricately embroidered clothes, we are honored to be a part of all of these sewing adventures. And delighted by our Folkwear fans. Thank you for your support of this small business.
I always like to give our customers a little glimpse into the last year and what we accomplished (and remind us here at Folkwear). I am glad to be carrying this company on into the future.
New Pattern Releases
Patterns Re-released. These are generally patterns that Folkwear used to publish, that we brought back in a larger size range, but there are a few that were only PDF patterns for the last few years and now are available as paper patterns too!
PDF patterns released (we often up-sized these PDF patterns if the original range was small).
There were so many blog posts with amazing sewing tutorials and how-to's, histories, and garments that we made, but I'll list a few highlights below.
We also updated our website this summer. And I spent a month in England with my children. Living and working there was so very good for us and I hope to find a similar option this summer as well. I love that Folkwear allows me to travel and is a job I can often do while away.
We will now spend time over the next several weeks planning for 2023. We will likely have a few new patterns out, and will continue to develop PDF patterns, as well as provide tutorials and sew alongs for our patterns. We will also likely expand our fabric selection. We would love to hear from you! What would you like to see Folkwear do in the coming year? What patterns? What products? What tutorials or sewing information would you like us to have?


