- Home
- About
-
Shop
-
Sewing Patterns
-
Fabric
- Sewing Supplies
- Folkwear Clothing
-
- Blog
- Customer Gallery
- Contact


Our Old Mexico Dress is a favorite and part of that lure is the embroidery that can be added to the dress. We are happy to invite you to join Sarah Pedlow at Threadwritten for another on-line embroidery class focusing on the skills and techniques used in for this dress. This next class takes place May 14, 2022 and registration is open now.

This pattern also makes a really useful shirt, shown here in a mix of machine-embroidered fabrics. Note the way the shoulders are constructed, this allows for a wonderful mix of fabrics on this pattern.

Learn more about the Threadwritten embroidery class on May 14, 2022 here.
Find the PDF version of the pattern here.
Find the Print version of the pattern here.

by Esi Hutchinson
Happy spring to you all! When I found out we were featuring the 266 Greek Island Dress sewing pattern for April, I volunteered to make a sample I would wear myself. The Dress is a great slip dress that I wanted to personalize for my style. I loved the style of the Jacket as well, especially the collar that adds a dashing element to the outfit. So I am going to show you how I personalized the dress, as well as a couple of pattern and sewing tips and tricks while I created this outfit.
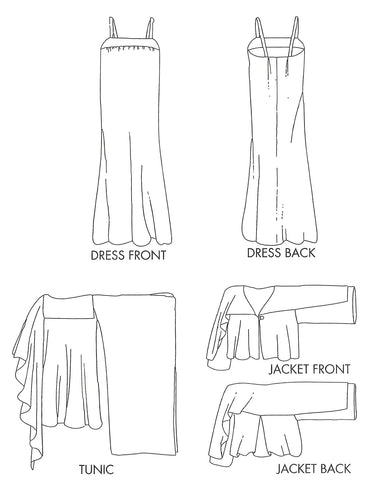
This pattern is quite formal, however if you want to make it more casual you can change up the fabric as well as what you choose to style these clothing items with. See the end of this blog for several ways I plan to style the Dress and Jacket. I did not want to make the Tunic because, while absolutely gorgeous, it was a little formal for my sense of style. You can see the line drawings of all the garments in this pattern below.
We suggest silk, crepe de chine, charmeuse, polyester to make any of the garments in this pattern. They are really great made out of lightweight (or medium weight) fabrics with good drape. We have some beautiful Tencel twill fabrics in stock that will suit the anything in this pattern. The Aqua and the Mulberry are my personal favorites.
I really wanted a white dress so I chose a rayon lyocell blend that I found, and a lilac cotton voile for a lightweight jacket.
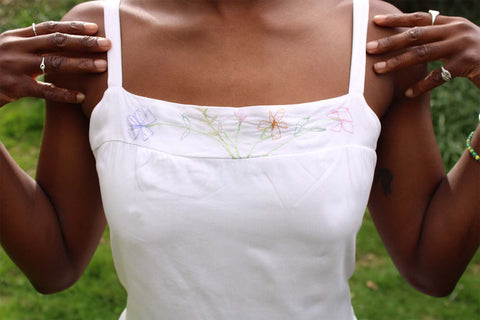
I was inspired by Cynthia's blog making the 213 Child's Prairie Dress and Pinafore. It's the cutest pinafore I have ever seen with the most lovely machine-stitched embroidery of wildflowers. You can find this embroidery pattern here in our shop. When I found out I was going to make the 266 Dress a light bulb turned on in my head and I thought that is was a great way for me to embellish this dress.
Making the Dress
I tried on one of Folkwear's samples of the 266 Dress and decided I wanted to alter it by bringing in the waist on the front and back by one inch so it would be a bit more fitted at my waist. I would not bring this dress in any more than an inch. The dress is naturally loose-fitting and bringing it in further could alter the drape in a less than flattering way. However if you know how to do it - go for it, but make a muslin first.
My waist line matched with the notch on the side seam. I made a mark 1" from the side seam at the waist notch. Then, I drew a line from 1/2" (13mm) below the top of the side seam to the 1"(2.5cm) mark. And from the 1" mark to about 5 inches below the waist mark. I used a French curve to create a gently curved line connecting those points. I drew in a new notch at this new waistline. I did the same thing for the back piece. I also shortened the dress to just below knee length. This is easy to do at the lengthen/shorten lines on the pattern.

I cut out all my fabric pieces using a white rayon lyocell blend and cut a lining with the same fabric because it is semi-transparent. I could have used a darker fabric, but I needed white drapey fabric for my vision for this dress. And white fabric with drape is often somewhat see-through. I just cut another layer of the dress portion.
It is easier to embroider the dress in separate pieces in my opinion. So I embroidered the dress before sewing it together. You can read more about that process in Cynthia's blog or in the wildflower embroidery pattern.
I transferred the embroidery design template to my dress using a washable marker, I have mentioned before in other blogs that Crayola markers are great except they are quite pigmented and it will be hard to see your progress if using the for this kind of work. You could also use a piece of transfer paper or non-permanent pen in a color that is visible and made especially for transferring a design to fabric. This blog is a great resource. Do not iron the embroidery with the non-permanent pen or marker. Wash it first, then press.
I made sure to start my design an inch and a half above the bottom raw edge, keeping in mind that I will stitch the design slightly below the hem line. I did this so that when I folded hem, the very bottom of the design will fold under and there will be no gaps between the bottom of the dress and the embroidery.

Front of Dress, transferring the embroidery design


I started machine stitching the design beginning with different shades of green on the stems and stalks. I suggest when using delicate fabrics use a longer stitch as there will be less tugging and bunching of the fabric. Stabilizer would also be helpful for some fabrics. Cynthia also mentions in her blog to double up your thread in the top needle as this can create more dimension to your embroidery as well as using different shades of a color. You can keep the bobbin thread the same color throughout the embroidering process. I used white in my bobbin the whole time to match the dress color.
 Doubled up thread in the top needle
 Stems stitched.
  Starting on the flower heads.


I decided to add a little bit of embroidery on the front yoke to tie the look together.

 Dress and lining sewn together and ready to be put together.
I put the wrong side of lining fabric to wrong side of main fabric, slipping the lining into the embroidered dress.
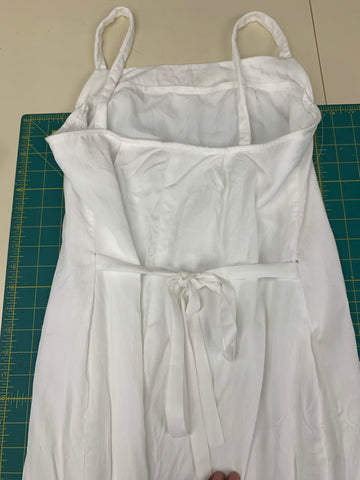
I made the dress as instructed in the pattern. And, I decided to add ties to the side seams of the dress to make it a bit more form fitting.
If you are going to add ties to your dress, think about the final width you wish your ties to be. You will fold the ties in half lengthwise wrong sides together, stitch one short end and the long edge and turn right side out. I cut two strips of fabric on the bias, if you don't have enough fabric to cut on the bias cut on the cross grain. My strips were 2"/5cm wide by 30"/76cm long.

I opened up the seam on both sides of the main (outer) fabric at my waist and inserted the short raw edge end of ties, then stitched them in.
I did this step last because I was not sure if I wanted the ties or not. If you know you want to add ties, definitely do this step when constructing the dress. Sew the ties into the side seam when you sew the side seams together. I did not include a zipper as I can slip the dress on over my head. Depending on your shoulder width and the fit you want, you may not need to have a zipper in the dress.
Jacket time!
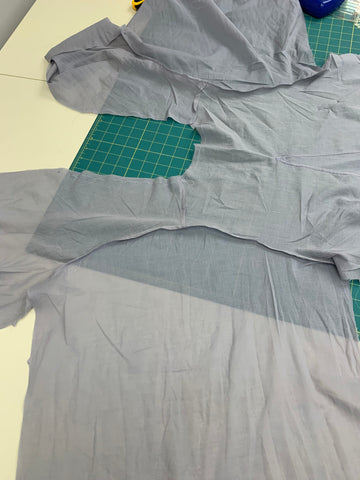
The fit of the Jacket is unconfining, it has a elegant, graceful drape to it that flows beautifully when you walk. To emulate that even more I decided to use a lightweight fabric, a lilac cotton voile which is semitransparent. I used French seams on all of the seams except the back Godet. There I used a flat-felled seam. Sometimes certain patterns and fabrics can't handle French seams in the sleeves, however the way that this jacket is assembled allows for French seams that do not disrupt the fit of the Jacket.
To create French seams. With wrong sides of fabric together, stitch seam only a scant 3/16”/4mm (fig. 1). Press to one side. Turn right sides together and stitch on seamline, taking care to include previous seam (fig. 2). Your seam edge is now enclosed inside the fabric. This is a great seam to use with lightweight fabrics and in delicate garments.
To create flat-felled seams. Stitch on the seamline, right sides together (Fig. 1). Press seam to one side (usually toward back of garment). Trim underneath seam allowance to a scant ¼”/6mm (Fig. 2). Turn raw edge of upper seam allowance over trimmed edge. Stitch down, keeping close even distance from seam (Fig. 3). This seam treatment is a bit easier to do with more structured fabrics that are medium or heavy weight, though some lightweight fabrics are good too.

Inserting the godet. Putting the godet in was not difficult, just make sure your markings and stitching is precise and correct.

Flat-felled seams on the godet.

Adding the Sleeves with a French Seam.
The fabric was too lightweight for any button that I liked and that went with the jacket and color. So, instead of a button and loop closure as the pattern calls for, I made two ties. I cut two strips of fabric measuring 1" (2.5cm) by 5" (12.7cm). I used a 1/2"(13mm) bias maker and folded ties in half and stitched along the long edge and one short edge - ending with a 1/4" (6mm) wide fabric tie. I slipped the ties under the front seam about 1/2" (13mm) and topstitched the ties down about an 1"(2.5cm) below the collar.

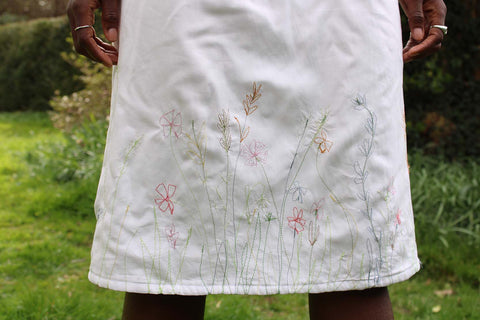
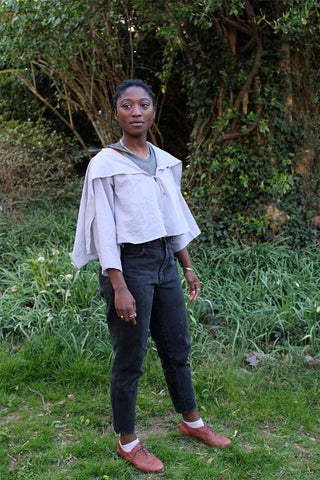
Here are my results. I loved every step of this process! Yes, the embroidery did get tedious at some points but I kept on going in hopes that it would be as beautiful as I hoped. And I think it turned out quite well! The dress is lovely and unique (the embroidery is delicate and stunning). I can wear the dress on its own, with the jacket; and I can wear the jacket with other dress or even with jeans or leggings.


You can even style the jacket with tank top and and pair of jeans for a more casual look.


What do you think of this outfit? How would you make your own 266 Greek Island Dress? What are your inspired by?

The period between the American Civil War and the Great War was a time of vast change, setting the stage for the modern world. Like any period of change it came with conflicting dynamics. When Mark Twain coined this era “The Gilded Age,” by no means a compliment, he meant that the period was glittering on the surface but corrupt underneath.

While, greed and corruption was unbridled, it also enabled developments in industry and technology that would accelerate changes in every aspect of life, including fashion.
As you will discover, the Folkwear 265 Afternoon Tea Dress and the 266 Greek Island Dress each played a part in the shifting attitudes of women who had never known life without the corset. When you think of how revolutionary this would have been for women, any thought towards shedding the corset must have seemed radical. Keep reading to find out how two garments Folkwear has patterns for influenced how the Gilded Age would unfolded, setting the stage for a tectonic shift in fashion.
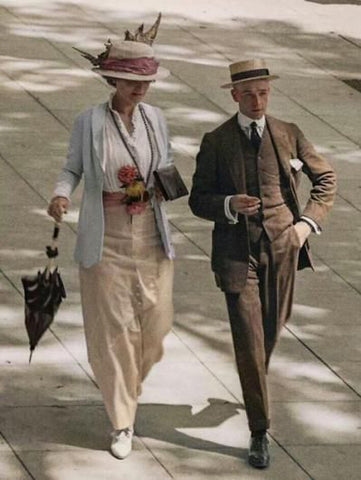
From a modern perspective, we tend to think of fashion history as “before the corset” and “after the corset.” The Gilded Age was a time that started to shift attitudes for women and what they wore. The cinched up Edwardian Gibson Girl did not give way to the liberated Flapper of the Roaring Twenties overnight, but rather she signified the beginning of a transition that would span twenty years and embodied the attitudes that gave rise to change. In essence it was the Gibson Girl that sent out the invitations and it was the flapper that eventually crashed the party.
With the Gilded Age came America’s Second Industrial Revolution, lead by the Titans of Industry. Mass production, shipping, and communications expanded business like never before. The country expanded both outward and upward due to new technologies in the steel industry, which caused the railway to boom outward and the sky scrapper was born. Urbanization exploded with immigrants and farm laborers lured by the hope of a better way of life. New technologies like the telephone made business transactions possible on the spot. Refrigeration allowed for more food varieties to move everywhere via the train, hence the modern beef industry was born. The electric light bulb enabled work to continue into the night. Cities were being built with water, electricity, gas, and sewer systems all in the promise of a modern life. Textile production increase exponentially and new types of fabrics were abundant. Department stores and mail order catalogs flogged their wares nationally, opening up reasonably priced goods and ready made clothing to the far reaches of the country. For the first time, new immigrants were able to blend in and look "American".


Textile Mill
Mass production of consumer goods exploded, which created a better standard of living and expanded the middle class. But in its wake, skilled labor was devastated, forcing the poor to work for low wages, resulting in more extreme poverty. The wealthy new American Tycoons continued to get richer, while doing their best to emulate and out-do their European aristocratic role models. This was the beginning of the country becoming an industrial world power.
Seemingly out of no where, an illustrator named Charles Dana Gibson (1867-1944) made a fictitious drawing of the ideal “New Woman.” She was known as the Gibson Girl and was featured in the popular magazines such as Scribner's Harpers, Collier's, and the Century.
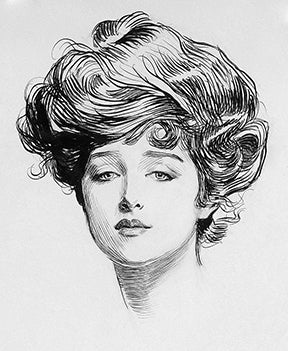
His creation resonated with Edwardian women and would serve as a role model for overlapping generations (1890’s-1914). Gibson’s illustration was not a figment of his imagination. He gave the glamorous “Gibson Girl” a fully illustrious life, with aspirations, and an aesthetic lead by independent pursuits. This illustrated young woman would serve as an icon to American women, introducing them to a new version of themselves, with a set of standards for beauty, fashion, and manners.

Charles Dana Gibson illustration entitled "The Weaker Sex."
The Library of Congress described the Gibson Girl:
“…as an independent and often well-educated, young woman poised to enjoy a more visible and active role in the public arena than women of preceding generations. They agreed [writers of the 1890s and early 1900s] that the Gibson Girl represented the visual ideal of this new phenomenon. During her lengthy popularity, the Gibson Girl appeared in varied guises that highlighted her talents and interests as well as her beauty and social skills. As her star faded, the Gibson Girl’s active, vital persona paved the way for future icons, such as the flapper of the 1920s.”
While the Gibson Girl aesthetic still employed the exaggerated hour glass shaped waist, with big puffed sleeves, a pompadour hairstyle, and large pinned hat, she embodied fresh and exciting possibilities. See our 205 Gibson Girl Blouse for a typical blouse of the time. Her rein while lengthy would not last, but her imprint would.
The veiled truth was that Gibson’s illustrated “New Woman” was an intentional marketing scheme. Jobs were opening up and an educated middle class of women workers were being primed to spend their surplus wages on a vastly expanding variety of consumer goods, services, and leisure activities.
By the mid 1910’s the S-corset stepped in, reshaping the ideal silhouette. The abdomen was pulled in, the chest thrust forward and pulled back to create an s-shape.

Even though women still held traditional roles as wives and mothers, much was beginning to change. The culture of domesticity that restricted women during the Victorian Era was snubbed by the “New Woman.” Many were earning higher educations, working in offices. Some were campaigning for the right to vote, and many were building the roots of the Progressive Era and modern day social services. A spirit for independence had been awakened. And while it might seem insignificant, this yearning for independence was exercised by what women wanted to wear. Women wanted less restrictive clothing to go along with their expanding lives. The Victorian aesthetic was fading. Dresses were less fussy, the bustle was not as common, and skirts had less drapes, layers, and ruffles. Ready-made manufactured clothing was starting to emerge, enabling women to opt away from time consuming handmade clothing. While, fashion styles did not undergo a dramatic change, the offerings and options exploded.

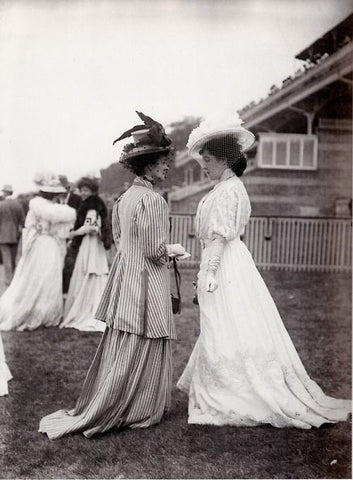
As the Gilded Age steamed ahead, Edwardian women of all classes enjoyed a simpler, less exaggerated version of dress. Soft sheer fabrics like cotton lawn, voile, organza, handkerchief linen became synonymous with the era. Designs were made of light fabrics, often multi-layered and diaphanous, creating an almost weightless effect. Blouses and shirtwaists became billowy at the waist, and white became the color du jour for blouses and summer dresses. Skirts were long and gored (see our 209 Walking Skirt), hats came varied in size for versatility, shoe styles and materials expanded. The beautiful details of the period were relegated to fine tucks, pleats, lace insets, embroidery, silk flowers, ribbons, and delicate jewelry.


The slimming corset that extended beyond the hip, creating an elongated silhouette was very much a fixture in most Edwardian ladies wardrobes. This corset had lighter construction and allowed for a wider range of motion.
Despite being corseted, long held attitudes on dressing were beginning to lighten. Social mores dictated that proper ladies follow a strict code of social rules of acceptability that would have influenced every aspect of everyday. The gracious life of an upper class Edwardian lady demanded different fashions for different times of the day.


However, it was the introduction of the Tea Gown that would gently influence the easing of restrictions and would give women an opportunity to be more comfortable and socially acceptable all at the same time. The technologies that would allow for the production of sheer fabrics made this trend for delicate fabrics more readily available. This style of dress was worn at home, during the late afternoon (tea time), marking the time between day wear and evening wear. They were immensely popular because women could put the tight corsets aside for several hours and enjoy the comfort of these loose-fitting, casual styles of soft layered fabrics, yet still be tastefully presentable for visitors. The social acceptance of not wearing a corset, if even for just a few hours in the privacy of your home may seem insignificant. However, this lean towards independence played a role in changing attitudes. The Folkwear 265 Afternoon Tea Dress while inspired by the Edwardian Era and is perfect for anyone who loves the aesthetic.
Culture and the arts were gaining influence and a much larger audience during this era. The Gilded Age, originally a derogatory term coined by Mark Twain, was taking on new meaning as a refined and elegant art aesthetic, known as the Aesthetic Movement.

Alphose Mucha. Lithograph F. Champenois Imprimeur-Editeur 1897

Art Nouveau, a product of the Aesthetic Movement was in vogue in major stateside cities, though it originated with the Arts & Crafts Movement of England and coined in Belgium and was most popular in Paris. It characterized an aesthetic consisting of long, sinuous and organic lines that Alphonse Mucha’s posters and Renee Lalique's jewelry would epitomize and proved hard to resist. Architecture, interior design, glass design, clothing, theater set design, and illustration were all influenced by this feminine and sensual aesthetic. Hardly a surface was left untouched.
American art and literature flourished during this time like never before. Wealthy patrons were anxious to exhibit their new wealth and their patronage was higher than of any previous era. They decorated their mansions and dedicated their own museums with art by Winslow Homer, Abbott Henderson Thayer, Henry Ossawa Tanner, Albert Pinkham Ryder, John Singer Sargent, Augustus Saint-Gaudens, Louis Comfort Tiffany, Mary Cassatt, and many others.

They lined their bookshelves and libraries with gold embossed leather cover books by the likes of authors such as William Dean Howells, Henry James, Edith Wharton, and even the acutely perceptive Mark Twain and his co-author Charles Dudley Warner. Much of the creativity of the era was inspired by the changes that occurred in society, holding a mirror up to the populace.

The theater and ballet was mainly patronized by the wealthy of New York City, in the early 1900’s. It was during this time that New York City cemented it's reputation as the business and arts capital of the United States. The nouveau riche lived to put themselves on display for one another. Social events provided a stage, giving the wealthy an excuse to show off and cultivate their understanding of the expensive new world they were so eager to consume. Technology in cinema provided an affordable option for the middle class and were wildly popular.

With restraints loosening creatives were anxious to make their mark on the arts and culture and women were at the forefront of this creativity opportunity. The early years of the 20th century witnessed many avant-garde innovations, as people freed themselves from the constraints of late 19th century Victorian society. Culture, fashion, and the arts were tremendously affected by new interpretations of classical styles and outright revolts against tradition.

Isadora Duncan (1878-1927) was an influential figure in the 1910’s and today is regarded as the founder of modern dance. She revolutionized dance with her free-form interpretive movements, encouraged arts education for children, and scandalized audiences by wearing non-restrictive, flowing robes that she adapted from Classical Greek vase paintings. The theater created a socially acceptable venue to introduce radical clothing to women and society. Our 266 Greek Island Dress pays homage to this unforgettable woman.


French designers Paul Poiret and Coco Chanel’s differing styles were also challenging the ideals of American fashion giving women a taste of things to come. With the opening of her Paris shop in 1912, Madeline Vionnet introduced the avant-garde and sensual form fitting effect of cutting fabric on the bias. Vionnet was called the “Queen of the bias cut” and is best known for her elegant Grecian-styled dresses.

Vionnet and many exciting and avant-garde designers and artists had put their creativity on hold once the war started. However, this extraordinary pool of creativity would not be diluted, but would keep gathering momentum that would erupt once the smoke of WWI cleared.
Due to influences both quiet and bold, society was beginning to see women in different and daring new ways. But most importantly, women were seeing themselves in ways they had not imagined before.
By the time WWI erupted in Europe in 1914, the Gilded Age as known in America and the Edwardian Era as know in England had ended, but this influential era would provided the catalyst for tectonic shift that would felt around the world with the entrance of the 1920's.
I hope after learning how both large and small acts have altered the history of women's fashion, you will be inspired to make your own history! Enjoy making and wearing the Folkwear 265 Afternoon Tea Dress, (pdf) and/or the 266 Greek Island Dress, (pdf) this spring and summer. They are both perfect for light, breezy fabrics, and cutting on the bias. Make either dress for an occasion or just to make everyday more comfortable and special. It is not hard to see how these lovely dresses made Edwardian women rethink their wardrobes and toss aside their corsets.
Have a look at the blog Tips for Sewing Tricky Fabrics: Sheers and Lace and Tips for Sewing Tricky Fabrics: Bias Fabrics and Binding to help make sewing these lovely dresses a breeze.


by Cynthia Anderson
Beautiful fabrics simply make garments more special. However, sometimes these beauties can sometimes be a challenge to sew with. Folkwear's 265 Afternoon Tea Dress and the 266 Greek Island Dress are two favorite sewing patterns that are perfect for using these beautiful, but challenging fabrics - bias cuts, slinky silks, sheers, laces.
The patterns, and many others, are perfect for using slippery silks or rayons, bias cuts, and for layering sheer and/or lacy fabrics to achieve a filmy, flowy, and romantic look. In this blog series you will learn tips and techniques on how to achieve success in sewing fabrics that can be tricky to work with. Today we are focusing on bias cuts and bias binding.
Bias-cut dresses were first made famous by designer Madeleine Vionnet in the early decades of the 20th century, and nearly every fashion designer since then has used a fabric’s bias to create a fluid and sensuous effect. Bias is any diagonal direction on woven fabric, and is thus stretches more than the lengthwise or crosswise grain of the fabric. The "true" bias is along the 45- degree angle (see below) and has the most elasticity. This stretchy, flexible quality is what gives bias garments their sensuous drape.

While any diagonal direction on woven fabric is considered "bias," the fabric's true bias is along the 45 degree angle.
Bias garments can also cling to the figure, so a looser fit at the waist and hips is often figured in at the cutting stage. Wider seam allowances provide extra room for fitting adjustments (so if you want to add a little extra to your seam allowances when working on the bias, consider that when cutting your fabric). Garments cut on the bias use up more fabric and require additional care in handling, fitting, and finishing, so be patient with yourself and the garment.
These tips can help you sew successfully on the bias.
Planning & Layout
• Bias-cut garments require more fabric. Large pieces, such as the front and back of a circle skirt, may not fit completely on the fabric width when you lay them out for cutting. You may have to split the pieces, add seam allowances, and stitch them together before proceeding with garment construction.

• If the pattern you've chosen does not provide required yardages for the bias cut, lay the pattern pieces out on a cutting surface as if you were laying them out on fabric. Keep the pieces between the imaginary selvages of a standard fabric width, such as 45” (115cm) or 60” (150cm). Then, measure the length the pattern pieces extend—this is the yardage you will need.
• If you are cutting the garment out of folded fabric and are nervous about keeping the bias correctly aligned on both layers, cut out the pattern pieces one at a time on a single layer of fabric. In this case, remember to flip one of the pattern pieces over so you'll have both left and right pieces where appropriate (for example, cut right front piece or right sleeve with printed side down against the fabric, and left front piece or left sleeve with printed side up).
• As bias relaxes, it stretches along lengthy vertical seams, such as side seams, so you may want to add more generous seam allowances, up to 1 1/2” (4cm). The extra allowances also facilitate fitting adjustments, if needed later on.
Cutting & Marking
• When cutting out, keep the fabric on the cutting surface and try to prevent any extra yardage from hanging over the edges, because the weight of the fabric will cause the bias to stretch and the finished garment could be misshapen. You might want to prop up extra fabric on an adjacent table, stool, or countertop.
• If you're using a lightweight or slippery fabric, such as crepe de chine or georgette, place the fabric on top of tissue paper and pin the two together before cutting out the pattern. When assembling the garment, you can even stitch through both layers and then tear the tissue away. Some sewers make a fabric sandwich, with layers of tissue paper on both top and bottom.
• Because bias-cut fabric is so easily distorted, mark all notches and dots, and trace stitching lines (if desired) BEFORE moving the pattern pieces on the cutting surface.
• After cutting out the pattern pieces, hang them up by their top edges (e.g., sleeve cap, shoulders, waistlines) for one to three days, so the vertical seams can relax as much as possible before you begin stitching. The best way to do this is to baste the pattern pieces to a strip of scrap muslin or other fabric; attach the scrap fabric to a hanger with pins, tape, or clothespins. Before you start constructing the garment, replace the printed pattern on the cutout pieces and readjust markings if they have relaxed or stretched out of position.
Stitching
• Baste garment pieces together before stitching, to make sure they stay matched up correctly! You'll be amazed at how much the layers can shift if you don't baste first. To allow the seams to flex when you machine stitch them, baste short stretches of the seam at a time and leave long, unknotted thread tails hanging.
• Work on a flat surface as much as possible. Use a terry cloth towel on the sewing machine table to keep the bias fabric from slipping and sliding.
• Stitch opposite seams in opposite directions, to keep the bias from hanging or stretching unevenly from one side to the other. For example, stitch the left side seam from top to bottom, and the right side seam from bottom to top.
Making Bias Strips
Many of the 266 Greek Island Dress seams are finished with bias strips. And actually, many Folkwear patterns have bias finishes or use bias binding in the construction of garments. You can purchase ready-made bias binding, but it comes in limited colors and fabric types. If you want your bias binding to match the garment perfectly, or contrast with it creatively, make your own—it’s easy.
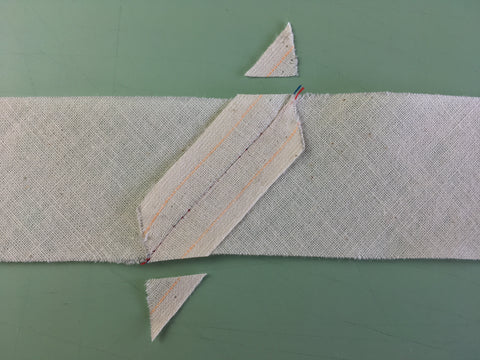
• To make bias strips, fold corner of fabric over to form a square and cut off excess. The diagonal edge of the folded square is the true bias.

• Open out the fabric square, using the crease line as a guide and draw out the strips. Cut the width of the bias strip according to the pattern instructions.

• Cut diagonal strips of equal width, parallel to the bias.

• Stitch ends of the strips together if necessary to obtain desire length of strip.

Finishing
• Bias doesn't unravel very much, so you can be light-handed with seam finishing. Overcasting or trimming seams with pinking shears may be enough. For edges that will show, such as necklines, use bias bindings to hide the raw edges and provide a decorative finish as well.

• Hang up bias-cut garments for at least one full day (and up to several days) before hemming, so the fabric can relax. The more drapey the fabric, the more the garment will stretch. Then, trim the hemline evenly before stitching it.
• Because bias continues to relax, the side seams may stretch over time. You may have to re-level the hem periodically during the life of the garment.
• Don't hang bias garments in your closet because they may continue to stretch. Instead, store them folded or rolled up in drawers or on shelves.
Yes, some beautiful and enticing fabrics have a tricky side. But that does not mean they have to get the best of you. Once you master a few simple tips and techniques you can easily tame unruly fabrics, conquer their fussy side, and enjoy the luxury feel and drape that every sewist deserves.
One of the pleasures of sewing is trying new things with confidence and we are always here to offer you guidance. If you have ever been inspired to make Folkwear's 265 Afternoon Tea Dress (xs-3xl) and/or 266 Greek Island Dress (xs-xl), now is the perfect time. Each of these patterns are on sale through the month of April and both are available as a printed pattern or pdf version. Celebrate Spring, yourself, or a special occasion by making and wearing one of these beautifully flattering and comfortable dresses. Hope you find these tips helpful.

by Cynthia Anderson
Beautiful fabrics simply make garments more special. However, sometimes these beauties can sometimes be a challenge to sew with. Folkwear's 265 Afternoon Tea Dress and the 266 Greek Island Dress are two favorite sewing patterns that are perfect for using these beautiful, but challenging fabrics - slinky silks, sheers, laces.
These patterns, and many others, are perfect for using slippery silks or rayons, and for layering sheer and/or lacy fabrics to achieve a filmy, flowy, and romantic look. In this blog series you will learn tips and techniques on how to achieve success in sewing fabrics that can be tricky to work with. Today we are focusing on sheers and laces. To learn more about working with bias cut fabrics or bias binding, go here.
Sheer fabrics like chiffon, georgette, voile, organdy, and organza are challenging to work with because they're so soft and delicate. Silk charmeuse can be slippery and unruly to handle. However, there is no denying the beautiful drape and effect that only these fabrics can provide. There is no need to shy away from these fabrics and every sewist is eventually lured by such temptations. Before you begin cutting, review these tips for working with slinky fabrics, sheers, and lace to ensure success!
Layering sheer materials and lace over each other or over heavier-weight solid fabrics is a creative and easy way to achieve beautiful effects. However, the lightweight filmy quality of sheer and lacy fabrics can be troublesome and exasperating to sew. If you take just a little extra care and follow these tips, you'll get great results from these beautiful fabrics.
Planning, Layout, and Cutting
• If the pattern calls for interfacing, choose light weight, sheer fabrics for interfacing, such as organza, organdy, or other sheer fabrics that match the fashion fabric or are flesh-colored. For materials other than lace, you can even use the fashion fabric itself, as a self fabric interfacing.
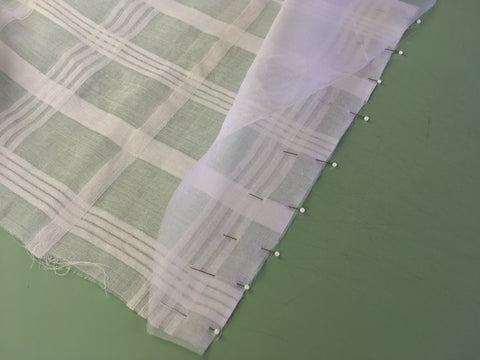
In the photos below silk organza provides a light-weight yet stable interfacing to a sheer gauzy cotton fabric.

• If the sheer or lace fashion fabric is a bit too transparent for your taste, simply underline the pattern pieces with a matching or flesh-colored sheer. To underline, cut the pattern out a second time from the selected underlining fabric. Baste the underlining pieces to the fashion fabric pieces, wrong sides together, and then handle as one during garment construction.
• If neckline, armhole, front opening, or other facings will show through the fabric, omit them altogether. Instead, bind the edges with bias strips or line the entire garment with a compatible sheer fabric.
• Cover the cutting surface with muslin, flannel, or an old sheet to keep sheer, slippery fabrics from sliding around. You might even want to baste the fabric to the muslin underlayer around all edges, before pinning and cutting pattern pieces.
• Instead of cutting pieces on the fold, make a full size pattern piece and cut from a single layer of fabric. For example, the FRONT pattern piece is usually just the right front section of the garment and is cut on the fold. Make a mirror-image drawing of the FRONT piece, which will be the left front section of the garment, and cut the whole piece from a single layer of fabric.
• Cut the pattern pieces out one at a time, from a single layer of fabric. This will prevent the underlayer from shifting out of position. Be sure that you cut both left and right pieces, where appropriate (see Planning and Layout in Bias section here).
• Insert pins in the seam allowances only, so you won't have pinholes showing in the finished garment.

Sewing
• If you baste seams before sewing, baste only in the seam allowance.
• Start sewing with a brand new sharp needle, and choose an appropriate size for lightweight fabrics, such as 60/8, 65/9, or 70/10.
• Experiment with different threads (cotton, silk, polyester, or blends) on swatches of the fashion fabric, to determine which you like best.
• If the fabric is too slippery and hard to manage while stitching, place a layer of tissue paper on top of the fabric (between fabric and presser foot), and then tear away the tissue after stitching.


• To keep fabric from being pulled down into the hole of the sewing machine needle plate at the beginning of seams, begin stitching on a small square of self-fabric. Be sure to hold the thread tails taut for the first few stitches, then let them go. When you’ve finished stitching the seam, cut away the square of fabric.


• Don’t back stitch at the beginning or end of seams. Instead, turn the stitch length to O (zero) for a few stitches, to knot the threads. Alternatively, tie the thread tails in square knots at the beginning and end of the seam.
• Don’t overload a lightweight, filmy garment with bulky seam finishes and hems. French seams are ideal for sheers, because they are self-finished and end up being quite narrow. For hems, it’s usually sufficient to turn up 1/8” (3mm) twice and edge stitch.
Special Notes For Lace
• If lace has a specific directional design, be sure to lay out the pattern pieces so they face in the same direction (a "with nap" layout). Also try to match the design motifs as closely as possible at obvious places, such as center front and center back. The "with nap” layout will probably require extra yardage, and matching the design motifs may also require a bit extra.
• Try to position the lace design motifs in a balanced way, so they won't look off center when the garment is complete. For example, if the lace has a prominent floral motif, try to position that motif in the center of the pattern piece.
• Take advantage of the pretty scalloped selvage edge of lace by using it as a shaped hemline on the sleeve and garment front/back. Simply lay out the pattern pieces so the finished hemline (not the cutting line) runs along the edge of the lace. When the garment is finished, it will already be "hemmed" by the scalloped edge, and you won't have to deal with turning up or facing a hem.

• Be careful not to snag the lacy fabric with the sewing machine presser foot while stitching or with the point of the iron while pressing.
• For a ready-made applique embellishment, carefully cut out one of the design motifs from the leftover lace fabric and hand stitch it to the finished garment where desired.
Again, once you master a few simple tips and techniques you can easily tame unruly fabrics, conquer their fussy side, and enjoy the luxury feel and drape that every sewist deserves.
One of the pleasures of sewing is trying new things with confidence and we are always here to offer you guidance. Celebrate yourself, or a special occasion, by using these beautiful fabrics to make a garment that is special. Hope you find these tips helpful!

We are excited to present our first Children's Pattern Contest Winners! And I wanted to show some of the "runner ups" who had some amazing makes. There were so many great children's outfits and I hope you are inspired by what they made! Thanks to everyone who participated!
Runners Up
First, this gorgeous Victorian Christening Gown made from our out of print 228 Christening Gown. Melissa has this to say about the pattern: "The outer layer was cotton organza, the lining was cotton batiste. All laces were cotton. I used the ‘one piece fabric panel’ method to construct. Although thoughtful in layout, this pattern was fairly easy & enjoyable to construct."

Next, this adorable dress made from our 225 Childhood Dreams, but made in the largest size for a woman who is expecting! Her mother-in-law says this: "I made Childhood Dreams in size 12 as a maternity dress for our tiny daughter-in-law. I altered it so it opens on both sides so she can later use it for nursing."


There were a couple of cute 110 Little Kittel dresses.
First, this cute grey kittel made for a granddaughter.

And this one made for a daughter: "I used your Little Kittel pattern to make the best Kiki's Delivery Service costume this past Halloween. My girl is bonkers for studio Ghibli stuff, and this was at the top of her list when I asked her what she would like to build for her first time out trick or treating since the pandemic started. I shortened the sleeves to 3/4 length to match the anime costume, and made the dress out of fabric that was in my stash that came from a thrift store, so I can't tell you what it's made of. I added a patch on the shoulder to jazz up the dress and make it a little bit more obvious who the character was."

Contest Winners
This beautiful flannel 221 English Smock, the child's version, is incredible. Lori made it for the Missouri State Fair: "It has not been gifted to a child as of yet. I have had the pattern for years! It was just time to see it made up. I love it! I've had an adult version, in a different material, started for a couple of years. I really enjoy all English Smocking, this the reason I purchased the pattern years ago. The tips and embroidery history were great fun to read as well!"


This adorable Mexican Shirt from the 109 Little Folks pattern. Dianne made it twice, once for her son and now for her grandson: "It is sewn all by hand. No machine stitching! It was a joy to make both times!"


And finally, this beautiful 141 Korean hanbok made by @the.pomegranate.witch on Instagram for their toddler who "wears it to family events and loves it". Also, "The chima will get hemmed just before the family event it was made for, and if I have time after other mending and the like I’ll offer decorations at the hem. Colour corrected to try to show true colour - it’s a peppered cotton, so the jeogori is mostly a gold made by weaving orange and yellow threads, and the red is two shades to make a more vibrant red."


by Victoria Watkins
My latest (completed) sewing project at Folkwear has been the 225 Childhood Dreams pattern. Unmodified, the original sewing pattern serves as a re-creation of nightgowns from the early 1900s. However, I wanted to take the foundations and create a casual day-to-day dress that wouldn't be out of place on a modern day child.
My thought process for this was to remove all of the extra ruffles, and choose the view with the higher hemline. This is straightforward in theory, but in doing so, I learned that the dress is finished with these ruffles. Removing them required a little consideration on how to finish raw edges around the neckline and sleeve hems. So, I am going to show you how I did this so you can use this very sweet pattern to sew up a modern-ish dress or the ruffle-y nightgown.
 Neckline finished with narrow bias binding.
To finish the neckline, I chose a bias binding to replace the ruffle. There are a couple things to keep in mind when doing this. I was definitely winging it when constructing the dress, so being mindful of when to do this step is helpful. My advice is to complete the back and side back pieces of the dress first, then do the bias binding before attaching the center front. Be sure to have binding that extends past the box where the front neck placket gets sewn down. Then continue the dress as normal. I do wish I used a slightly wider binding, but it worked fine for this sample.

The cuffs in this pattern are also finished with ruffles. And when it came to the that point, I let myself go on autopilot before realizing how I'd done it without the ruffles. Last week I was working on a blouse cuff for an upcoming pattern we're developing which has a wrist placket, and so I sewed the cuffs on this dress in a similar way. I sewed the cuff pieces right sides together, along 3 sides and left one long side end open. Then I turned under about two inches of the sleeve side seam allowance and topstitched them to form a simple placket. I encased the gathered wrist edge of the sleeve into the cuff assembly I'd sewn. This works fine (though necessitates a closure like a snap or button at the wrist), but I think you could also create cuffs without a placket for a child since their hands and wrists are usually quite small (and don't necessitate a placket). There are several ways to finish the cuff without the ruffles. One way to do this would be to sew the short ends of each cuff piece to themselves, then sew the cuffs together right sides together along one long side, and encase the finished sleeve end with the open ends of the cuff. Turn under the seam allowance on the long sides of the open end of the cuff and topstitch or hand stitch the cuff over the sleeve end.


Clothing plays a special role in our lives and knowing that our patterns can mean so much to so many, truly drives what we do. The 213 Child’s Prairie Dress & Pinafore has the magic of harking back to the simple pleasures of childhood. We hope you enjoying creating for a special child in your life.

A yearning for romantic clothing and lifestyles has been reawakened in the past few years. Just type in the tagline “cottage core” on social media platforms such as Instagram or Pinterest, and romantic-inspired clothing for women and children alike is hard to miss. It would seem that wearing and sharing romantic clothing is never far from our hearts and desires. Folkwear's 213 Child’s Prairie Dress & Pinafore and, the adult version, 201 Prairie Dress are the perfect patterns to add a touch of "cottage core" to any wardrobe. If you like the idea of matching dresses with a child in your life, we have the patterns to get you started.
With Spring just around the corner, its the perfect excuse to get a fresh start on your sewing. And what better project than the easy-to-construct Child's Prairie Dress & Pinafore. This is a versatile pattern that can be changed any number of ways.
Pattern Info
The dress and pinafore are offered in two lengths, but can be made any length you like. You can even shorten the dress to make a smock-length top. To extend the life of the dress and/or pinafore add tucks to the lower skirt portion of either piece to allow for letting the length out as your child grows taller. Depending on the season, you could make the sleeves any length. Make the sleeve cuff as suggested in the pattern or insert an elastic band to the sleeves, or simply hem. You can change up, or omit, the collar. You can add trims and details or keep it simple. The pattern size range is designed to serve an entire childhood of effortless making and wearing.


The dress and pinafore both offer so much potential wearing and enjoyment, especially if made early in the season. This would be an adorable Easter dress. Both the dress & pinafore could be worn layered on the first chilly days of spring or even on an Easter egg hunt when paired with a cardigan and tights. The pinafore would be adorable interchanged with skirts, shorts, bloomers, t-shirts, tops, other cute dresses, or worn alone as a sundress all summer long. The dress is perfect all on it's own, especially in bare feet or sandals for summer. Plus, the dress has pockets - perfect for collecting treasures.
Embroidery and Design
I started with the idea of spring gardens and flowering meadows for my inspiration in making this project. I made the Child's Prairie Dress out of the sunny Merchant & Mills Marmalade Check Cotton and the pinafore out of a soft cream linen (sorry sold out). In this blog, I will focus on how I got creative with the pinafore, in hopes to inspire you to reconsider this practical and charming addition to a child’s wardrobe. Pinafores are not only cute, but they have always served as a protective layer, extending the life of the clothing underneath. Besides, for most romantically-spirited little girls two twirly layers are always better than one.
The wildflower design I created for this project is available for you to use in any way you like. Purchase it here. Simplify it, use it in a different way, add it to the hem of another dress or shirt, come up with your version, or let it inspire you to think up your own totally unique design. Of course, you can add the entire design or just a sampling of it, to the dress and/or pinafore. Don't feel like you have to do as much as I have to make this a fun and special piece. I chose to decorate this pinafore in hopes it becomes a favorite piece that gets worn with everything, making it a special piece in the childhood of a certain little girl. I covered the whole pinafore in flowers because I was having too much fun to stop.
Preliminary Construction
I wanted to make something that would go rather quickly and easily, but would have a charm all it’s own. I love the idea of embroidery, but my mindset was not to make something overly precious and time consuming. The idea of machine stitching was really appealing.
I made a quick sketch of my wildflower design idea on paper, using the pattern pieces as guides for how large the design would need to be. I kept it loose and open to interpretation that would lend itself to the nature of stitching on the sewing machine. I did not want overthink it's execution, and I wanted to go with what the machine and my ability would allow. The flower sketch served as a guide for stitching without it needing to be perfect. My hope was to avoid the seam ripper as much as possible.


You can approach this project how ever works best for you, but I will share with you the two approaches I considered and why. First, I made a muslin of the pinafore to use as my trial and error testing ground. This was my very first attempt at machine stitching embroidery designs to this extent. I thought it would be wise to experiment to see not only how the stitching would go, but how much of it I (and hopefully you) would actually end up enjoying doing. I traced a portion of the design using pencil on one panel of the already constructed muslin pinafore. Use a water-erasable pen for tracing the design on a final product.
At first, I thought maybe I would approach this project using a completely constructed pinafore in order to make the embroidery across the seams continuous. But that was not really important and could wait to be added later if necessary. I did realize it would be best to work with the seams pressed open and with unfinished seams. The embroidery going over the seams would be adequate enough to keep the seam allowance held in place and prevent the raw edges from fraying too badly.
I found stitching on the fully constructed muslin pinafore to work just fine. But, it did prove cumbersome trying to maneuver a completely constructed pinafore, because of so much fabric. To be honest, I decided it was too much bother to continuously rearrange the pinafore and constantly check to be sure I was not about to accidentally catch the fabric in the stitching.
My second plan was to make the stitching on each individual panel of the pinafore separately, prior to construction. I thought it might go easier if I worked on one panel at a time; and it was. The only real reason to work with the pinafore panels separately, is because less material is easier to maneuver.
I was feeling confident on my decision on how to proceed. But because, I would be handling each panel individually meant that this could lead to fabric instability. The linen I had chosen to use might become misshaped. More tightly woven fabrics are less prone to instability. I suspected the linen I was using would benefit from a bit of extra care so I took a couple of preventative measures in preparing each individual panel. It is probably best to stabilize your fabric before doing embroidery stitching. There are several options, depending on your fabric.
First, instead of cutting out each panel on the cutting line as I normally would, I positioned each pattern piece with extra fabric surrounding it. This extra surrounding fabric provides more stability and helps to prevent the fabric from distorting from use. Once the pattern was pinned to the fabric, I used the non-permanent pen to trace out each pattern piece on the cut line. Then I baste-stitched the traced cut line with a black thread on the right side of the fabric and used a cream color thread on the wrong side (in the bobbin). This provided extra stability, outlined the panel on the cut line, and made it clear which was the right side of the fabric. Adding serge edges to all the raw edges of the fabric helps with stability too. This is just another level of precaution I did add to some panels and forgot to do on others.

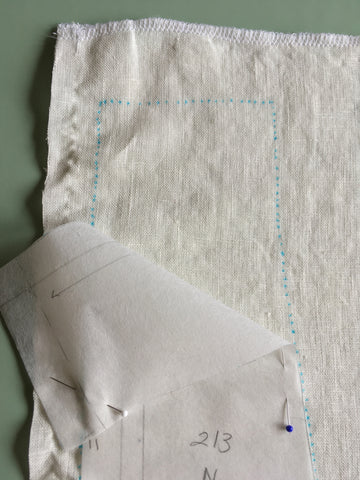
Note: Be sure to transfer the notches as marked on the pattern. I simply made heavier pen dots just inside the seam allowance so I could see them when needed.

My only deviation in working with separate panels was with the side panels. Because the side panels were relatively narrow, this made them less stable and prone to more warping. I did stitch them together as the pattern instructions dictated, treating the two pieces as one. I pressed the seam open before beginning the design stitching.

Transferring the Design to the Fabric
I created a separate design for each panel, with the panels coming together for an overall meadow/wildflower design. Now that I know how I am going to place the design, I am ready to begin transferring the design to my final fabric. Because the linen was light in color and thickness, I could trace the design through the fabric. A light box made it even easier. You can use a window/sliding glass door if you do not have a light box or light table. Of course, this will only work if you can see through your fabric.
If your fabric is opaque and you cannot see through it to trace well, then use a piece of transfer paper or non-permanent pen in a color that is visible and made especially for transferring a design to fabric. This blog.... is a great resource that is most helpful.

I weighted my fabric to the design drawing for tracing. If you use a window to back light your project, use masking tape to hold everything in place to make tracing easier.


Note: Be sure to test your pen to make sure it will remove from the fabric and won't be set with an iron.
Thread and How to Use ItThis project is a great way to use up bits of extra thread on spools and bobbins just lying about. We have a pretty large thread collection at Folkwear, and I purchased a few more colors and thread thicknesses to round out my palette. Depending on what you like and how you work, I recommend thinking about a basic thread color palette and be sure you have enough of the main colors you intend to use or just use what you have on hand. You can use regular all-purpose thread, silky embroidery thread, or a thicker buttonhole thread, or a combination.
Below is my collection of thread colors.

Due to the amount of stitching my design would require, and to add visual interest and texture I decided to try using more than one thread at a time and to use top-stitching or buttonhole twist. Doubling up the thread helped to beef-up the thickness of the stitches and allowed the stitching to stand out more than if I used only a single thread stitch. If you are not familiar with stitching with two threads at the same time, it is really easy. Put a spool of thread on each of the spool holders (most machines have two) or use two loaded bobbins added to one spool holder. Be sure each spool or bobbin is positioned so the tread will unwind and feed properly. Then pull tails out in equal lengths, joining the two threads as one and thread your machine as normal.
Another thread option is button-hole twist, also known as top-stitching thread. Even though buttonhole twist or top-stitching thread is thicker than regular thread it is still threaded on the machine just like a regular weight thread. Thicker threads are often too heavy when it comes to bobbin function, so use a regular weight thread in the bobbin instead. You may need to play around with adjusting the top thread tension depending on your stitch length and fabric when using thicker thread. I did not find adjusting the bobbin tension necessary. I did use a longer stitch length when using this heavier thread, and the stitch laid down flatter as a result.
Note: In the photo below the regular weight thread is on the left and the heavier weight is on the right. Note the different color of the plastic spool for each thread thickness. Keep in mind that button hole twist or top stitching thread comes in a limited selection of colors.

If you have trouble threading your machine with the heavier weight thread, you could try using a larger needle with a larger eye or using a needle threader. A needle threader also makes threading two strains of thread much much easier too.
Since I would be changing the color of my top thread often I opted to use a off-white thread in the bobbin at all times. The off-white blended into the fabric of the pinafore fabric on the wrong side and eliminated having to worry constantly about the bobbin thread color. This helped the wrong side of the pinafore stitching from looking overly messy too.
I backstitched at the beginning and end of each stitching section. You could not do this and pull all tails to the back and tie off, but backstitching looked fine and it was a heck of a lot quicker and easier. Keeping the wrong side of my work trimmed and tidy was still necessary. Every so often or when I changed the top thread color, I took the time to trim the underneath loose threads.
I experimented making the stems of the flowers and leaf/grass shapes without hesitating to experiment with stitch length to see what would happen. I made some stitches long and others shorter. For smaller details like the flower petals I shortened the stitch length to give me better control around tight curves. It was nice to try different stitching methods with the attitude that it did not matter if things did not go just so. Due to the nature of machine stitching, my drawing was also becoming more of a compositional guide, than a strict template. If I did not stitch directly on the drawn line I did not worry about it.
Hint: I was not strict about how close I stitched near or into the seam allowances. I knew that I could fill-in later as needed or as a final touch. As it turned out, only one seam ended up with a flower being cut off, which was easy to remedy.
I was really not sure about how far to stitch beyond the hem line. Because this would be the starting and sometimes the end point for stitching the foliage and stems, with a back stitch, I knew this would cause the stitching to build up and become rather thick. I guess I just instinctively went slightly over the hem line approximately 1/4-inch (6mm) or so and hoped that was OK.

I knew the tighter and smaller flower petal details would go slower than the foliage portions. This was also a reason I made the foliage stitching first. It went quicker and worked well with a less controlled approach. I did not hesitate to make another pass over the stitching if I felt a stem or leaf needed beefing up or definition. I used different colors of green haphazardly too, even when making a second pass. I rather liked the unstudied look it produced. I was glad I completed the foliage portion of the design first, leaving the actual flowers for last.

Because the flower petals were smaller and more defined, I had to slow down and ended up turning the hand wheel and lifting the presser foot to maneuver the tighter curves. This is where designing with color came into play. I just picked a flower color and used it in maybe three places on each panel and then filled in other colors as it suited me. This is something that really cannot go wrong. I kept reminding myself that flowers in wildflower fields do not arrange themselves just so.


Below the final bit of stitching the flower design over the seam.


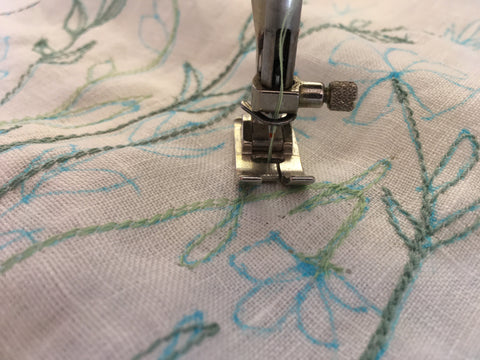
What Presser Foot to Use?
I originally, thought the regular straight stitch presser foot would prevent me from seeing my stitching, but I quickly got used it. I kept stitching till I liked the look of the flowers. Over-stitching the flowers had the serendipitous effect of looking like delicate pedals, which I thought looked charming.
Once the panels were all complete, I rinsed each in cool water to remove the blue water soluble ink, then air dried overnight. The next morning I pressed each panel on the wrong side to ready for the pinafore construction.
If you are like me, this is when your excitement fuels the anticipation of seeing your project come together. Before assembling the pinafore, I cut each panel out using the black stitch line that indicated the cut line I had made early on in the process, being sure not to cut off the hem.
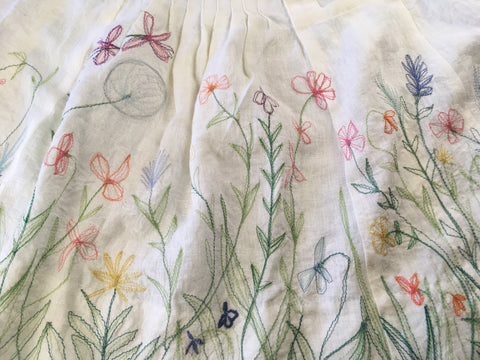
I cut out each panel as I was about to work with it. Much to my relief the panels held their shape and the panel pieces went together as expected. I constructed the pinafore according to the pattern instructions and as each panel was added the more pleased I became. Once the pinafore was all together, all that remained was the hem. I went ahead and serge the bottom raw edge of the pinafore. The black stitch line I had made for the hemming purpose served me well. While the hem line did not match up exactly along some portions, the fact that I had stitched beyond the hem line allowed for a bit of fudging. Once the hem was all tidy, aligned and secured with pins, I made a stay-stitch close to the folded edge of the hem to securely hold the thickness caused by the abundance of stitching. I use a single thread in cream, which was barely viable. Then, I carefully removed the black hem line stitching to create a clean finish. In looking back I might have zig-zag stitched the raw edges of each panel before assembly... just to keep the raw edges from fraying.


Not only was this project fun and stress-free to make, the results are charming and I am quiet pleased. I am so glad I made myself purchase the orange thread used on the pinafore flowers. It was just the right touch to make the 213 Prairie Child's Dress & Pinafore come together.


I hope this project will inspire you to see what fun possibilities you can have with the often overlooked pinafore. The Folkwear 213 Child's Prairie Dress & Pinafore is such a lovely pairing that will delight the maker as well as it's fortunate recipient. Don't forget there is a version for grown girls too. The210 Prairie Dress (and PDF version) is now sized XS-3XL. Get a head start on a comfortable and enchantingly romantic warm weather project now!


by Esi Hutchinson
When we talked about featuring our children's patterns this month, the 109 Little Folks pattern caught my eye. It has the cutest folk clothes for children six to eighteen months old. These patterns are perfect for making gifts for dear family members expecting. The pattern is only available as a PDF pattern, but because these are tiny patterns, they are really easy to print at home and assemble. You can read more about that here.
I made the Mexican Dress from this pattern for my cousin who is expecting a girl in a few months. I also liked the idea of making it totally unique by adding the optional embroidery. Almost every piece in this pattern has some embroidery that can be added to it. You can even see a little about one of the designs here, and you can see how to remove the waste canvas.
I am so excited! Although baby girl will have to wait a few more months to wear this little dress, I loved making it.
I made this dress from white handkerchief linen and DMC embroidery floss, with a section of 1/8" red ribbon.
Embroidery
I did not do all of the cross-stitch embroidery that comes with the pattern. But I did embroider the sleeves and center front of the dress. The pattern has options for adding embroidery to the hem as well.
It helps to print out the cross stitch pattern to decide what colors you would like to use. You can color right on the print out to see what you like. I used green, yellow, blue, and red.
All the embroidery is done before construction, and is worked on the fabric after it has been cut into the pattern pieces.


I basted a section of waste canvas to my cut out front piece (and sleeves) so I could apply the embroidery/cross-stitching. Make sure to give yourself some room on the outer edges of the canvas so you have plenty of room for the stitching.

I did not follow the instructions about where to start, and I started wherever I pleased. It is probably wise to start from the top dot where stated it might make it easier to pay attention to what direction you will be going and to center the design on your piece.

 Finished what I think is grass, and now starting to stitch the flower.


This is what the inside of the dress with embroidery looks like so far.
 I really liked making the chicken, I'm glad there are two of them.
 I finished the front embroidery for the Dress, I am very pleased with it so far.
Next, I worked the embroidery on the sleeves. This went very quickly and I just did a couple rows of cross stitching with the waste canvas.

I finished with the amount of cross-stitching I wanted to do for this dress. Once embroidering is done, the waste canvas can be removed.

It is helpful to cut as much as you can away, just make sure to not to cut the fabric or the stitching.


I soaked one sleeve with the scrim still attached just to test it out. It loosened the waste canvas threads and made it easier to pull apart in my opinion. A pair of tweezers works well too.

I am not used to working with gussets, so the assembling of the sleeves was a little confusing for me, but I figured it out. Just pay attention to where the stars and dots are on the gusset and on the sleeves and body of the dress and you are good to go. It is a good idea to mark them with a washable marker, Crayola markers are perfect.

Hem the sleeves and the bottom of the body of the dress and you are finished with the cutest Mexican Dress!
I am so excited to gift this dress, it quite easy to make and the cross-stitching is a perfect activity to keep busy and creative, watch a good show/movie and stitch away. It really doesn't take that long, especially on a tinydress like this. Enjoy making! Please show us what you have made from the 109 Little Folks patterns.


Folkwear has a surprising number of children's patterns. Some are perfect for making a cute dress or nightgown, some are perfect for dress up or costume, and some are used for traditional dress or ceremony. Many of our children's patterns have an adult counterpart, such as 218 Child's Frontier Shirt and 212 Five Frontier Shirts, or 213 Child's Prairie Dress and 201 Prairie Dress, and 110 Little Kittel and 148 Black Forest Smock, etc.. Some occur in the same pattern - 141 Korean Han Bok and 120 Navajo Blouse and Skirt. These two, in particular, are often made for special events and traditional ceremony by people of the cultures. But there is also the 221 English Smock (so very cute) that includes a children's pattern. And, then the very popular 154 Child's Scottish Kilt and Jacket (to go with 152 Scottish Kilts).
I want to highlight a few of these great patterns that I made because they are often overlooked. They are mostly fairly easy and quick garments to sew They also can be made with fun and cute fabrics and usually don't take a lot of fabric to make anyway.
Sewing for special children in your life is rewarding and fun.


by Esi Hutchison
The Basics patterns are a great for novice sewers and we really encourage our customers to have fun with these patterns (and all of our patterns in general of course). However, the Basics are especially non-intimidating in terms of the construction which can allow easier alterations, options for finishing, and embellishing that can make these pieces fit your style. This blog post will focus on the Basics Pants but altering them into shorts. Warmer weather is coming, so get ready and start making some summer outfits with this great pattern. I was wanting a pair of simple and comfortable shorts so I decided to show how I altered the Basics Pants in shorts for myself.
Fabric Suggestions:
For casual and formal looks one could use light to medium weight fabrics such as linen, wool, gabardine, twill, lightweight denim, nylon, polyester. We recently have gotten a batch of beautiful raw silks that would be perfect for these shorts. Check out our fabric. Hopefully something will inspire you.
For bedtime you could even make these out of flannel or lightweight, soft fabrics of silk, cotton, rayon, synthetics, or blends such as crepe, challis, batiste, voile, or satin. Even a soft jersey would work.
There are so many options for different occasions, casual, formal, bedtime, outdoor activities . . . for making the shorts and or pants.
I am also going to show you how to add a drawstring instead (or in addition to) the elastic waistband in this post.
Making the Shorts
If you are not confident in diving straight into making the shorts from your final fabric I advise you to make a muslin first. If you haven't read our blog post for sewing these pants, please refer back to that for altering the rise of the pants because I will be using the same technique for the shorts that I made for myself. This post also has all the basic constructions details.
Measure how long you would like your shorts to be, I went with 15½" (39.4cm) which includes the ½" (13mm) seam allowance at the top. They will sit approximately around your natural waist. Include the final waistband width which is 1¼ (3.18cm) and the length or your desired hem, for me I decided to go with a 1½" (3.8cm) hemline, my idea is to fold under ½" (13mm) then fold under 1" (2.5cm) for my hem .
With the measurement of the front/back pieces and your hem take away your waistband width and that is the length you will cut the front and back of the pants to make your shorts, my total length will be 17" (43.2cm) You can also just decide how long you want the inseam to be, and cut your shorts that length, plus a hem allowance. If you do this, be sure to take into account the 1/2" (13mm) seam allowance at the top of the inseam.

Draw a line across the pattern pieces at the length you want your shorts to be on the Front and Back pattern pieces. Those will be the pieces for the Front and Back of the Shorts.
Sewing the Shorts
Lets get started. The instructions are still the same as for making the Pants, except they are shorter!
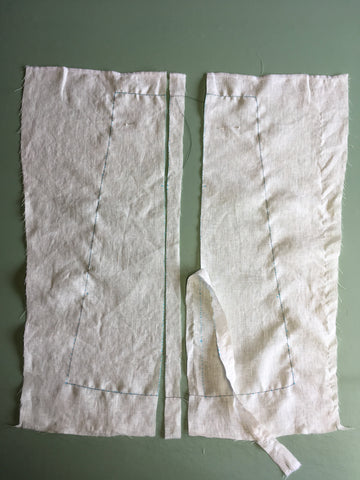
Pattern pieces cut out.

With right sides together, sew one POCKET C to FRONT A between boxes, matching notch 1. Don't forget to clip ⅜" (1cm) into seam allowance to boxes. Trim corner and seam allowance between boxes.

The key detail of these shorts are these sweet flap pockets, which could easily be embellished with an embroidered pattern or a button sewn on the keep the pocket down.

Inner leg seam stitched.

Waistband pinned.

Adding a Drawstring
If you want to add a drawstring, mark where you would want the tie to come out after the waistband has been sewn to the shorts, but before you fold the waistband down and stich to the inside of the shorts. The drawstring holes can be hand or machine sewn eyelets or buttonholes. In this case I have decided to go with buttonholes. Mark them an inch away from each other from the center front (or wherever you have chosen to place them). I used a visible thread on this muslin so you can see exactly where I put the openings for the drawstring. Cut the buttonhole or eyelets open before moving forward.

After you have made your drawstring holes, fold the waistband to the inside along the foldline, stitch in the ditch or slipstitch on the inside of the shorts.

Insert your drawstring through one hole, around the waistband, and out through the other hole. You can use a safety pin or bodkin attached to your string to do this. You can use a sturdy ribbon or string for your drawstring.

Hem your shorts hand sew your pocket flaps down if you haven't already. And you are done!

Once I made the muslin I knew for sure what I liked and what I didn't like from the fit of the shorts, the style and length. And, I made my final shorts from my fashion fabric with the adjustments I wanted.
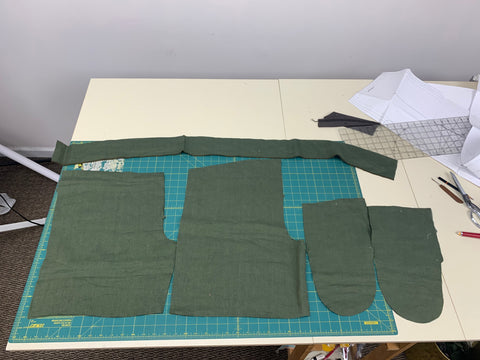
I chose a less casual look for the shorts and used a green herringbone wool for my final pair.
These are my fabric pieces.
And, here is the result! I love these shorts. They are very comfortable and will be easy to wear in the spring with a pair of short boots or trainers.


Join us for a CONTEST! We are so excited to announce a Children’s Pattern contest here at Folkwear. We want to invite you to enter your favorite children’s item created with one of our patterns. We will pick three winners, who will each receive a $30 Folkwear gift certificate. Make something adorable for a cutie you know and show off your sewing by joining our contest.
You can enter by tagging your post on Instagram or Facebook (with #folkwearchildren or #folkwearpatterns), or you can email your entry to us at info@folkwear.com. The contest starts March 1st, 2022 and goes until March 31. Detailed contest rules are below.
Be sure to note, all of our Children’s patterns will be on sale for the whole month of March, so don’t wait, add your favorites to your collection today and get sewing!
THE RULESOur suggestions for the best photos:
NOTE: All images submitted become eligible for Folkwear promotions and marketing. Submission implies permission to use images in promotion and marketing.
Enter today! Visit our Children's Pattern page to get started with an adorable children's pattern to make for the special child in your life!


