- Home
- About
-
Shop
-
Sewing Patterns
-
Fabric
- Sewing Supplies
- Folkwear Clothing
-
- Blog
- Customer Gallery
- Contact
by Esi Hutchinson
Happy spring to you all! When I found out we were featuring the 266 Greek Island Dress sewing pattern for April, I volunteered to make a sample I would wear myself. The Dress is a great slip dress that I wanted to personalize for my style. I loved the style of the Jacket as well, especially the collar that adds a dashing element to the outfit. So I am going to show you how I personalized the dress, as well as a couple of pattern and sewing tips and tricks while I created this outfit.
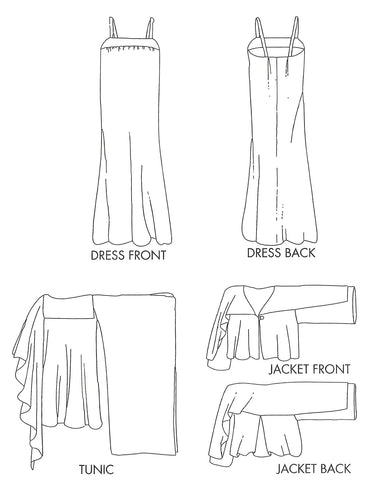
This pattern is quite formal, however if you want to make it more casual you can change up the fabric as well as what you choose to style these clothing items with. See the end of this blog for several ways I plan to style the Dress and Jacket. I did not want to make the Tunic because, while absolutely gorgeous, it was a little formal for my sense of style. You can see the line drawings of all the garments in this pattern below.

We suggest silk, crepe de chine, charmeuse, polyester to make any of the garments in this pattern. They are really great made out of lightweight (or medium weight) fabrics with good drape. We have some beautiful Tencel twill fabrics in stock that will suit the anything in this pattern. The Aqua and the Mulberry are my personal favorites.
I really wanted a white dress so I chose a rayon lyocell blend that I found, and a lilac cotton voile for a lightweight jacket.
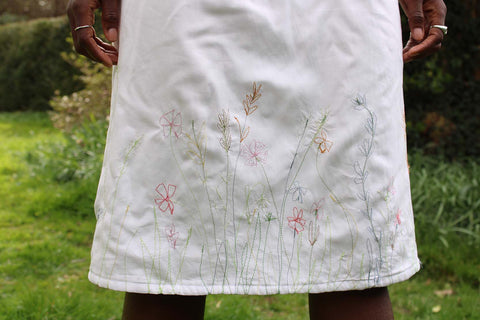
I was inspired by Cynthia's blog making the 213 Child's Prairie Dress and Pinafore. It's the cutest pinafore I have ever seen with the most lovely machine-stitched embroidery of wildflowers. You can find this embroidery pattern here in our shop. When I found out I was going to make the 266 Dress a light bulb turned on in my head and I thought that is was a great way for me to embellish this dress.
Making the Dress
I tried on one of Folkwear's samples of the 266 Dress and decided I wanted to alter it by bringing in the waist on the front and back by one inch so it would be a bit more fitted at my waist. I would not bring this dress in any more than an inch. The dress is naturally loose-fitting and bringing it in further could alter the drape in a less than flattering way. However if you know how to do it - go for it, but make a muslin first.
My waist line matched with the notch on the side seam. I made a mark 1" from the side seam at the waist notch. Then, I drew a line from 1/2" (13mm) below the top of the side seam to the 1"(2.5cm) mark. And from the 1" mark to about 5 inches below the waist mark. I used a French curve to create a gently curved line connecting those points. I drew in a new notch at this new waistline. I did the same thing for the back piece. I also shortened the dress to just below knee length. This is easy to do at the lengthen/shorten lines on the pattern.

I cut out all my fabric pieces using a white rayon lyocell blend and cut a lining with the same fabric because it is semi-transparent. I could have used a darker fabric, but I needed white drapey fabric for my vision for this dress. And white fabric with drape is often somewhat see-through. I just cut another layer of the dress portion.
It is easier to embroider the dress in separate pieces in my opinion. So I embroidered the dress before sewing it together. You can read more about that process in Cynthia's blog or in the wildflower embroidery pattern.
I transferred the embroidery design template to my dress using a washable marker, I have mentioned before in other blogs that Crayola markers are great except they are quite pigmented and it will be hard to see your progress if using the for this kind of work. You could also use a piece of transfer paper or non-permanent pen in a color that is visible and made especially for transferring a design to fabric. This blog is a great resource. Do not iron the embroidery with the non-permanent pen or marker. Wash it first, then press.
I made sure to start my design an inch and a half above the bottom raw edge, keeping in mind that I will stitch the design slightly below the hem line. I did this so that when I folded hem, the very bottom of the design will fold under and there will be no gaps between the bottom of the dress and the embroidery.

Front of Dress, transferring the embroidery design


I started machine stitching the design beginning with different shades of green on the stems and stalks. I suggest when using delicate fabrics use a longer stitch as there will be less tugging and bunching of the fabric. Stabilizer would also be helpful for some fabrics. Cynthia also mentions in her blog to double up your thread in the top needle as this can create more dimension to your embroidery as well as using different shades of a color. You can keep the bobbin thread the same color throughout the embroidering process. I used white in my bobbin the whole time to match the dress color.
 Doubled up thread in the top needle
 Stems stitched.
  Starting on the flower heads.


I decided to add a little bit of embroidery on the front yoke to tie the look together.

 Dress and lining sewn together and ready to be put together.
I put the wrong side of lining fabric to wrong side of main fabric, slipping the lining into the embroidered dress.
I made the dress as instructed in the pattern. And, I decided to add ties to the side seams of the dress to make it a bit more form fitting.
If you are going to add ties to your dress, think about the final width you wish your ties to be. You will fold the ties in half lengthwise wrong sides together, stitch one short end and the long edge and turn right side out. I cut two strips of fabric on the bias, if you don't have enough fabric to cut on the bias cut on the cross grain. My strips were 2"/5cm wide by 30"/76cm long.

I opened up the seam on both sides of the main (outer) fabric at my waist and inserted the short raw edge end of ties, then stitched them in.
I did this step last because I was not sure if I wanted the ties or not. If you know you want to add ties, definitely do this step when constructing the dress. Sew the ties into the side seam when you sew the side seams together. I did not include a zipper as I can slip the dress on over my head. Depending on your shoulder width and the fit you want, you may not need to have a zipper in the dress.

Jacket time!
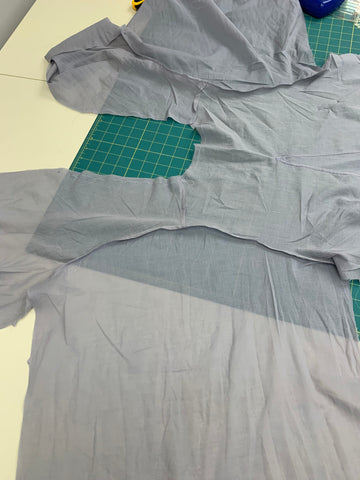
The fit of the Jacket is unconfining, it has a elegant, graceful drape to it that flows beautifully when you walk. To emulate that even more I decided to use a lightweight fabric, a lilac cotton voile which is semitransparent. I used French seams on all of the seams except the back Godet. There I used a flat-felled seam. Sometimes certain patterns and fabrics can't handle French seams in the sleeves, however the way that this jacket is assembled allows for French seams that do not disrupt the fit of the Jacket.
To create French seams. With wrong sides of fabric together, stitch seam only a scant 3/16”/4mm (fig. 1). Press to one side. Turn right sides together and stitch on seamline, taking care to include previous seam (fig. 2). Your seam edge is now enclosed inside the fabric. This is a great seam to use with lightweight fabrics and in delicate garments.
To create flat-felled seams. Stitch on the seamline, right sides together (Fig. 1). Press seam to one side (usually toward back of garment). Trim underneath seam allowance to a scant ¼”/6mm (Fig. 2). Turn raw edge of upper seam allowance over trimmed edge. Stitch down, keeping close even distance from seam (Fig. 3). This seam treatment is a bit easier to do with more structured fabrics that are medium or heavy weight, though some lightweight fabrics are good too.

Inserting the godet. Putting the godet in was not difficult, just make sure your markings and stitching is precise and correct.

Flat-felled seams on the godet.

Adding the Sleeves with a French Seam.

The fabric was too lightweight for any button that I liked and that went with the jacket and color. So, instead of a button and loop closure as the pattern calls for, I made two ties. I cut two strips of fabric measuring 1" (2.5cm) by 5" (12.7cm). I used a 1/2"(13mm) bias maker and folded ties in half and stitched along the long edge and one short edge - ending with a 1/4" (6mm) wide fabric tie. I slipped the ties under the front seam about 1/2" (13mm) and topstitched the ties down about an 1"(2.5cm) below the collar.

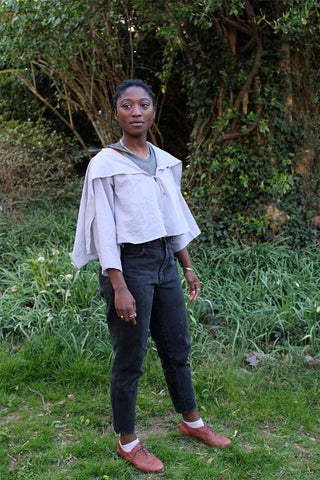
Here are my results. I loved every step of this process! Yes, the embroidery did get tedious at some points but I kept on going in hopes that it would be as beautiful as I hoped. And I think it turned out quite well! The dress is lovely and unique (the embroidery is delicate and stunning). I can wear the dress on its own, with the jacket; and I can wear the jacket with other dress or even with jeans or leggings.


You can even style the jacket with tank top and and pair of jeans for a more casual look.


What do you think of this outfit? How would you make your own 266 Greek Island Dress? What are your inspired by?
April 18, 2022
This is seriously beautiful the way you made it work for you. You really have a remarkable talent!
April 18, 2022
How lovely! You are so innovative and elegant in your style!
April 04, 2025

Dawn Vickerstaff
April 25, 2022
Aww! You made me cry with how beautiful you look! Ethereal and elegant!