- Home
- About
-
Shop
-
Sewing Patterns
-
Fabric
- Sewing Supplies
- Folkwear Clothing
-
- Blog
- Customer Gallery
- Contact
What is a placket, you might ask? You have seen them and used them before! A placket is an opening or slit in a garment at the waist, neck, or sleeves to help the user put the garment on and off easily. It usually contains some kind of closure for the garment (like buttons, snaps, zip, etc.). The slip of fabric must be contained, or faced, so it looks good and the fabric does not unravel or fall apart. Plackets can vary depending on application - there are plackets used for shirt neck openings, vents, sleeve openings, pant and skirt openings. Plackets are commonly found in tailored shirt sleeves.
Here I am going to show you how to make the placket that is in our 203 Edwardian Underthings Pattern. This pattern has a petticoat and drawers that result in a beautifully finished opening. The plackets make the petticoat and drawers easy to get in and out of, and are authentic to the time period when zippers were not used or common. The petticoat has a placket in the center back seam. The drawers have plackets at each side seam of the waist for added easy accessibility.
This type of placket creates a continuous binding to the raw edges of the seam opening, resulting in a clean tailored finish that can be used on shirt sleeves also. This design results in a neat-crisp tailored-looking finish that is well worth the effort. This placket design is a handy skill to learn, and the more skills you know, the more options your sewing will have.
It can help to make a practice placket or two before you attempt the placket on your final project. When practicing, and to help with eliminating any confusion, use a fabric with an obvious right and wrong side. This will help prevent getting tangled up.
Take time to prepare the placket so construction will go more smoothly. The placket should be cut precisely on the grain to ensure the fabric folds as crisply and accurately as possible. Carefully mark the fold lines, stitch lines, and the dots for the clipping lines as indicated on the pattern. Use a fine pencil, or other marking tool, to create all the necessary marking on the practice piece to help guide the construction and accuracy. See photo below.

It also helps to use a fabric for the placket that will not fray easily. Try using a finely woven cotton batiste or muslin for your practice fabric.
For these plackets, I prepared the center back of the petticoat and the side seams of the drawers according to the pattern instructions. In getting started it is helpful to know that when the placket is finished, the wider back section with the point will lay and fasten over the front or narrow section of the placket. Have a look at a tailored shirt sleeve as an example.
To add the placket to the petticoat get oriented first: Pin the wider section of the placket to the left-hand side of petticoat or skirt back.
To add the placket to the drawers get oriented first: Make the placket on the right-hand side first, which is identical to the petticoat instructions. Pin wider section of placket to Back of drawers.
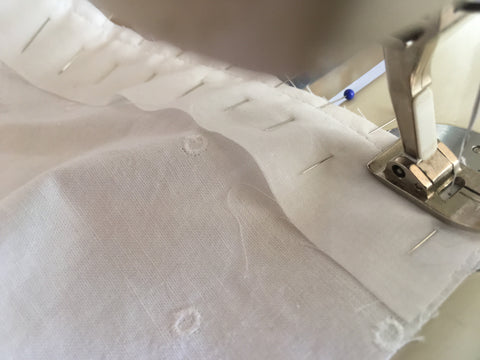
Pin the wider section of the placket to the back piece of the garment opening only (as seen below). Place the right side of the placket to the wrong side of the back garment piece, match the box, notches and waist edge. Notice the straight edge aligns with the waist edge. Stitch from the waist edge to the center of the square, using a 1/4" (6mm) seam allowance. Be sure to back-stitch at the waist edge and carefully at the square.
Clip the seam allowance of the garment to the square. Do not clip into the placket. Clipping the seam allowance of the garment fabric, releases the fabric so it will open up and lay flat for easier construction. See the photo below.
Press the seam open or to the back of the garment depending on how you choose to finish the garment seams.

With the garment seem allowance clipped the fabric should relatively flat. Pin and stitch the narrower section of the placket to the other or front side of the garment opening. Be sure to pin the right side of the placket to the wrong side of the main fabric as seen in the photo below. Stitch using a 1/4" (6mm) seam allowance from the square center to the waist edge. Be sure to back-stitch at the waist edge and carefully at the square.


Press the seam towards the placket. Notice that the right side of the placket is facing up and the wrong side of the garment is facing up in the photo below.

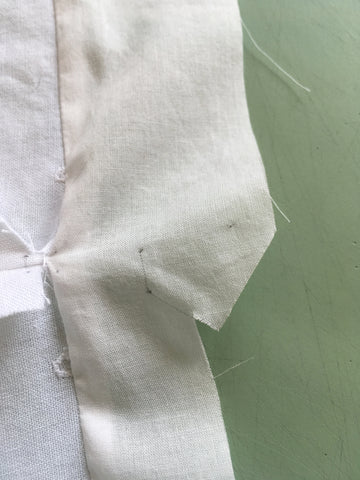
On the wider section of the placket, clip the inside of the point to the small dots indicated on the pattern. See the drawn guide line in the photo below.

Carefully clipping the guide line, Avoid cutting beyond the dot and into the fabric.

Press the point edges under 1/4" (6mm) creating a crisp and clean finish.

One point edge pressed tuner 1/4" (6mm).

The other point edge pressed under 1/4" (6mm) creating a clean point.

Now, press under the long edges of both sections of the placket using a 1/4" (6mm) seam allowance.
Helpful Hint: To make turning the edges under easier, make a folding guide by sewing a long stay-stitch. Leave thread tails on each end. Once the edge is turned and pressed, the stay-stitch can be easily removed by gently pulling the thread tails. See photo below.

Pressing the edges under 1/4" (6mm).


Turn the narrow section of the placket to the right side to the garment fabric at the seam line and press.

To secure the narrow placket to the garment fabric, pin and top-stitch in place from the waist to small dot on the turned under edge, as indicated on the pattern. Note, the folded outer edge does not require top-stitching.
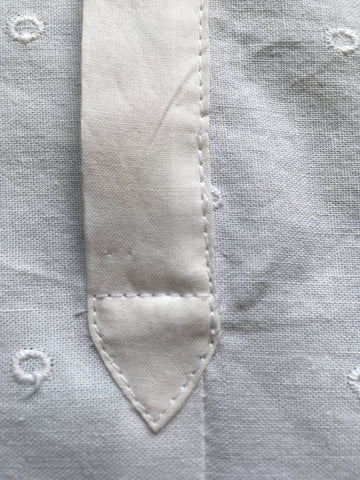
The two sides of the placket should naturally fold and lay into place as seen below. Note, that the narrow section of the placket falls to the inside of the opening. The wider section with the point falls to the outside of the garment, covering and laying on top of the narrow section. Be sure the edges are aligned as they should be. Adjust the turned edges if needed.


Fold the remaining wider section of the placket, wrong sides together, on the lengthwise center fold line as indicated on the pattern and press creating a clean crisp edge. Pin the turned-under edge over the seam line, using the seam line as a guide. Top-stitch from waist edge to star (as indicated on the pattern), taking care not to catch the stitching in other side of narrow placket underneath.


Pin the pointed end of the placket, over the narrow side of the placket (point will extend below). The idea is to securely stitch the two sections of the placket together at the pointed end.


That's it! Placket beautifully made. While learning to make plackets may take a bit of practice, the results are well worth the effort. Plackets are useful and beautiful elements that will elevate any sewing project. Plus, Folkwear has many patterns that are made even more special due to their beautiful plackets. If you need more placket sewing inspiration Folkwear has it covered... check out the 102 French Cheesemaker's Smock, 116 Shirts of Russia & Ukraine, 117 Croatian Shirt, 120 Navajo Blouse & Skirt, 124 Bolivian Milkmaid's Jacket, 128 Russian Settler's Dress, 130 Austrian Bush Outfit,
I hope you found this blog tutorial helpful and please keep as a reference for the next time you need to make a placket.
April 10, 2025 3 Comments on How to Sew a Placket - from the 203 Edwardian Underthings

Norma Malinson
October 07, 2024
Not very clear when talking about right side and left side.Looking for a book on plackets.What deters the wide of a placket, more info on mens and ladies opening plackets.Any help out there.Wanting more info on short polo shirt plackets working out the different in wides and how and why.