- Home
- About
-
Shop
-
Sewing Patterns
-
Fabric
- Sewing Supplies
- Folkwear Clothing
-
- Blog
- Customer Gallery
- Contact
December 06, 2023 2 Comments on Free Pattern - Holiday Napkins

Cloth napkins are a classy and elegant (not to mention, environmentally friendly) way to set a holiday table. These napkins are easy and quick to sew and we have several motifs to add a handmade touch to your napkins - embroider a poinsettia or paint a holly leaf motif. This project will show you how.
Materials Needed:
Suggested fabrics: Medium to lightweight cotton or linen is best; poplin, voile, percale. A solid color is good if you are planning to embroidery or paint, but patterns can be fun also. A holiday-themed fabric would also be fun; quilting cottons come in many holiday patterns.
Notions: Thread. If embroidering, you will need embroidery needles, embroidery floss (DMC or perle cotton #5 or #8) and waste canvas (if doing the cross-stitching). If using fabric paint, fabric paint in your color choice and small paint brushes.
Yardage Requirements
For four luncheon napkins (finish at 15”/38cm wide), you will need 7/8 yard (.8m) of 45” to 60” wide fabric (115-150cm).
For four tea napkins (finish at 10”/25.4cm wide), you will need 3/8 yard (.34m) of 45” to 60” wide fabric (115-150cm).
Cutting
Be sure to wash your fabric before cutting. This will insure that the fabric does not shrink, and you end up with smaller napkins than you expected. Also, if you are embroidering the fabric, you can end up with distorted embroidery if it is not washed first. Press fabric well before cutting.
Cut your napkins with your fabric spread flat. This way you will be most likely to cut on the grain and connect straight edges. Note: to find the true grain and to be sure you are cutting on the grain, pull a few threads from the fabric to show the grain and cut along pulled thread lines. Cut four napkins in the sizes below:
For luncheon napkins - Cut 16”x 16“ (40.6 x 40.6cm) square
For tea napkins - Cut 11”x 11“ (28 x 28cm) square
You can choose to make different napkin sizes. For a cocktail napkin, cut 7” (17.8cm) square, for a dinner napkin, cut 19” (48.3cm) square, for a formal dinner napkin, cut 25” (63.5cm) square. Or cut square napkins at the size you desire, adding 1” to the length and width to account for hem allowance. You will need to adjust your yardage required if you change the napkin size. You could also increase the hem allowance by up to 1/2” (13mm) if you want, for a 1” (2.5cm) hem. Be sure adjust yardage if you are making fewer or more napkins, or making them larger or smaller.
Sewing Instructions
These napkins have 1/2” (13mm) hem allowance on every side.
Press under 1/4” (6mm) along all raw edges of napkin. Turn again on 1/2” hem line and stitch along pressed edge by hand or machine. You can do square corners or mitered corners. For square corners, just press up each edge overlap corners with a square edge.

Square corner. Hem is sewn with contrasting red thread.
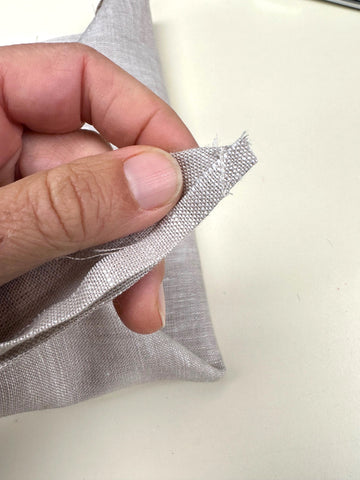
For mitered corners, only press under 1/4” hem to start, and place right sides of napkin together at the corners, forming a diagonal, matching folded edges. Stitch a line that is perpendicular to the folded edge of inside of the napkin and goes to the hem edge. Back stitch at beginning and end.

Fold down 1/4" (6mm) on all sides.

Fold napkin at corner so hemmed edges are together and stitch at 90 degrees to the folded edge (as shown here in red).

Stitching is shown here (90 degrees to folded edge), backstitched at each end.
Cut off the extra fabric, cutting at a 90 angle to the hemmed edge.

Clipped corner of napkin.
Open the napkin up, adjusting the corner fabric and press the mitered corner. Then press on all sides 1/4" more.


Do this to all corners and stitch close to the folded inner edge to secure the hem.
You can stitch around the hem with a contrasting colored thread for a festive look. Or, stick with a thread that matches the fabric. For sewing the mitered corners, I do recommend using matching thread.
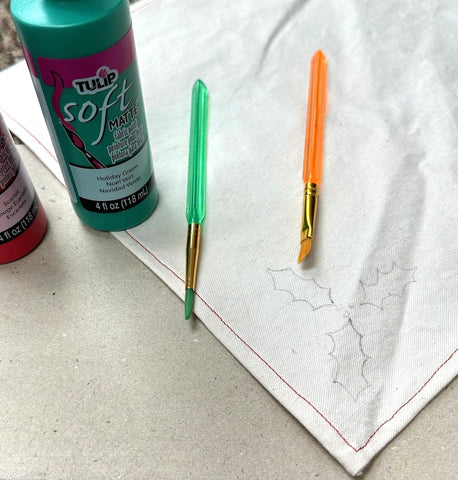
Now you can embroider, paint, or stencil a design on napkin. And/or add lace, tatting, or other edging to napkin edges for a more Victorian vintage look. See our instructions below for cross stitch embroidery, embroidery, and fabric painting.
For Embroidery
Materials:
Pattern (from our Christmas embroidery pattern):

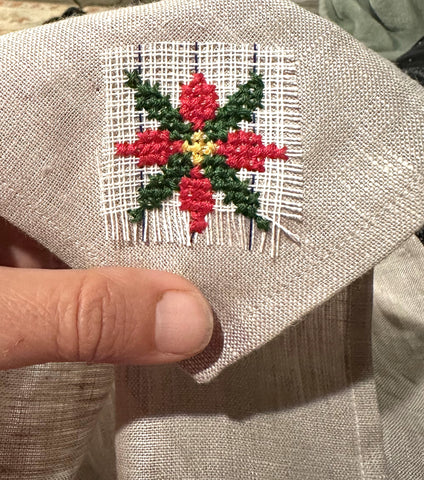
Cut scrim larger on all sides than design area. Pin scrim in place, matching the angle you want to stitch your design. It can be on grain or on the bias. Baste to the napkin.
Begin stitching
Start at the top, center of the design and work down and outward. Holes in scrim correspond to + on graph, as needle passes through the hole only, and must not catch threads of the scrim. Each graph square represents one Cross Stitch, 10 sts per inch = 10 holes per inch. Use a #10 crewel embroidery needle, and take great care not to catch threads of the canvas, but to pass through the fabric below. Pull stitches up snugly to compensate for removal of scrim. Begin and end threads by running 1”/2.5cm tails under completed stitches on wrong side of fabric.

Stitching
Cross Stitch as indicated on graphs on the design, starting at the center top of the design. It is important to cross the stitches in the same direction, however, you can see in mine that I don't always do that. So it's ok if you miss a direction. Unless someone is going to carefully study your napkin and understand that some stitches are crossed a different way (which they won't do), noone will notice! It is helpful to take each stitch so that on the back of the work so there are only vertical stitch lines (so just go up or down with stitches in the back of the work). This will keep the work neater on the wrong side, which is great for a napkin where the wrong side might be seen. But, again, not a huge deal.
You may work the first half of the stitch in vertical or horizontal rows, crossing on the return course. In small areas it is generally easier to cross each stitch individually (figures on left below).
Remove scrim
When the design is completed, remove basting and fray edges of the scrim so you can grasp the ends one at a time and carefully pull the threads straight out. Pull shorter edges first, holding embroidery near pulling place to avoid distortion. Any scrim threads which have been caught by embroidery must be delicately cut out.


December 21, 2023
I like to iron, our daughter does not and she teases me about ironing sometimes. I think your finished napkins would have a much nicer look it they were ironed. The napkin is lovely, but looks undone because of the wrinkled look. It looks like it has already been used, the re-folded and placed back on the table. Just a thought for a nicer presentation look. Years ago, when our youngest was in 4-H, she competed in a table setting competition. I’m pretty sure she would have lost points if her napkins were all wrinkled. Thanks for letting me express my thoughts. Please forgive if I come off “rude”.
Elyind Baker

Brandy
December 23, 2023
The napkins are lovely! Looks like a fun project for next holiday with plenty of time to finish.
I too noticed the minor wrinkle but my first thought was, how nice it is to not look perfect. It felt relaxed with room to breathe. Recently I finished my first quilted table runner that took me 5 years to complete, all because I am new to quilting, and was trapped within my fear of free motion quilting for the first time. The quilt sandwich looked so beautiful and I didn’t want to mess it up. Finally, I said who cares?! and just went for it. Exciting! Liberating! and such a fantastic feeling to finally finish it.
So I full heartedly embrace your beautiful and well loved napkins. Be gone with self imposed perfection! Well done! And thank you for sharing the pattern.
Happy holly days!