- Home
- About
-
Shop
-
Sewing Patterns
-
Fabric
- Sewing Supplies
- Folkwear Clothing
-
- Blog
- Customer Gallery
- Contact

I spent a week in Guatemala earlier this month with my oldest daughter. I have been wanting to travel to Guatemala to see and experience the textiles for a long time, and I realized her spring break would be a great time to do this trip. She was very excited to travel with me and see this beautiful country. I am going to share some highlights in this post, particularly focused on textiles, but if you have other questions, please leave them in the comments and I will try to answer them.
First, we only had a week (really, with travel times, less than a week) to explore so I decided to pick one place and venture out from there. I chose Panajachel on Lake Atitlan due to the beauty of the area, ability to make day trips out, and it has a lot of textiles to explore. It is also a great place for young people - there are young backpackers, nomadic workers, etc. everywhere and it was easy for my daughter to connect with other young travelers. If I had to do this trip again, I would spend a few days in Antigua instead of the whole time in Panajachel. But, now I have an excuse to go back. There are lots of places to explore in Guatemala!
I highly recommend the book A Textile Traveler's Guide to Guatemala by Deborah Chandler. I bought it over a year ago and it was helpful to plan this trip and understand what I was seeing. This book came out right before (or maybe during) the pandemic, so some things have changed since then, but for the most part, it was a great resource, especially if you are coming to Guatemala for the textiles.
As I said, my daughter and I stayed in Panajachel which is a small town located on the shores of Lake Atitlan, a large and beautiful lake, about 4 hours drive west from Guatemala City. The lake is surrounded by mountains and dormant volcanoes. And there are small towns around the lake, each one with its own feel (or vibe) and its own textile scene. We explored a few of these towns, but not all.
Panajachel
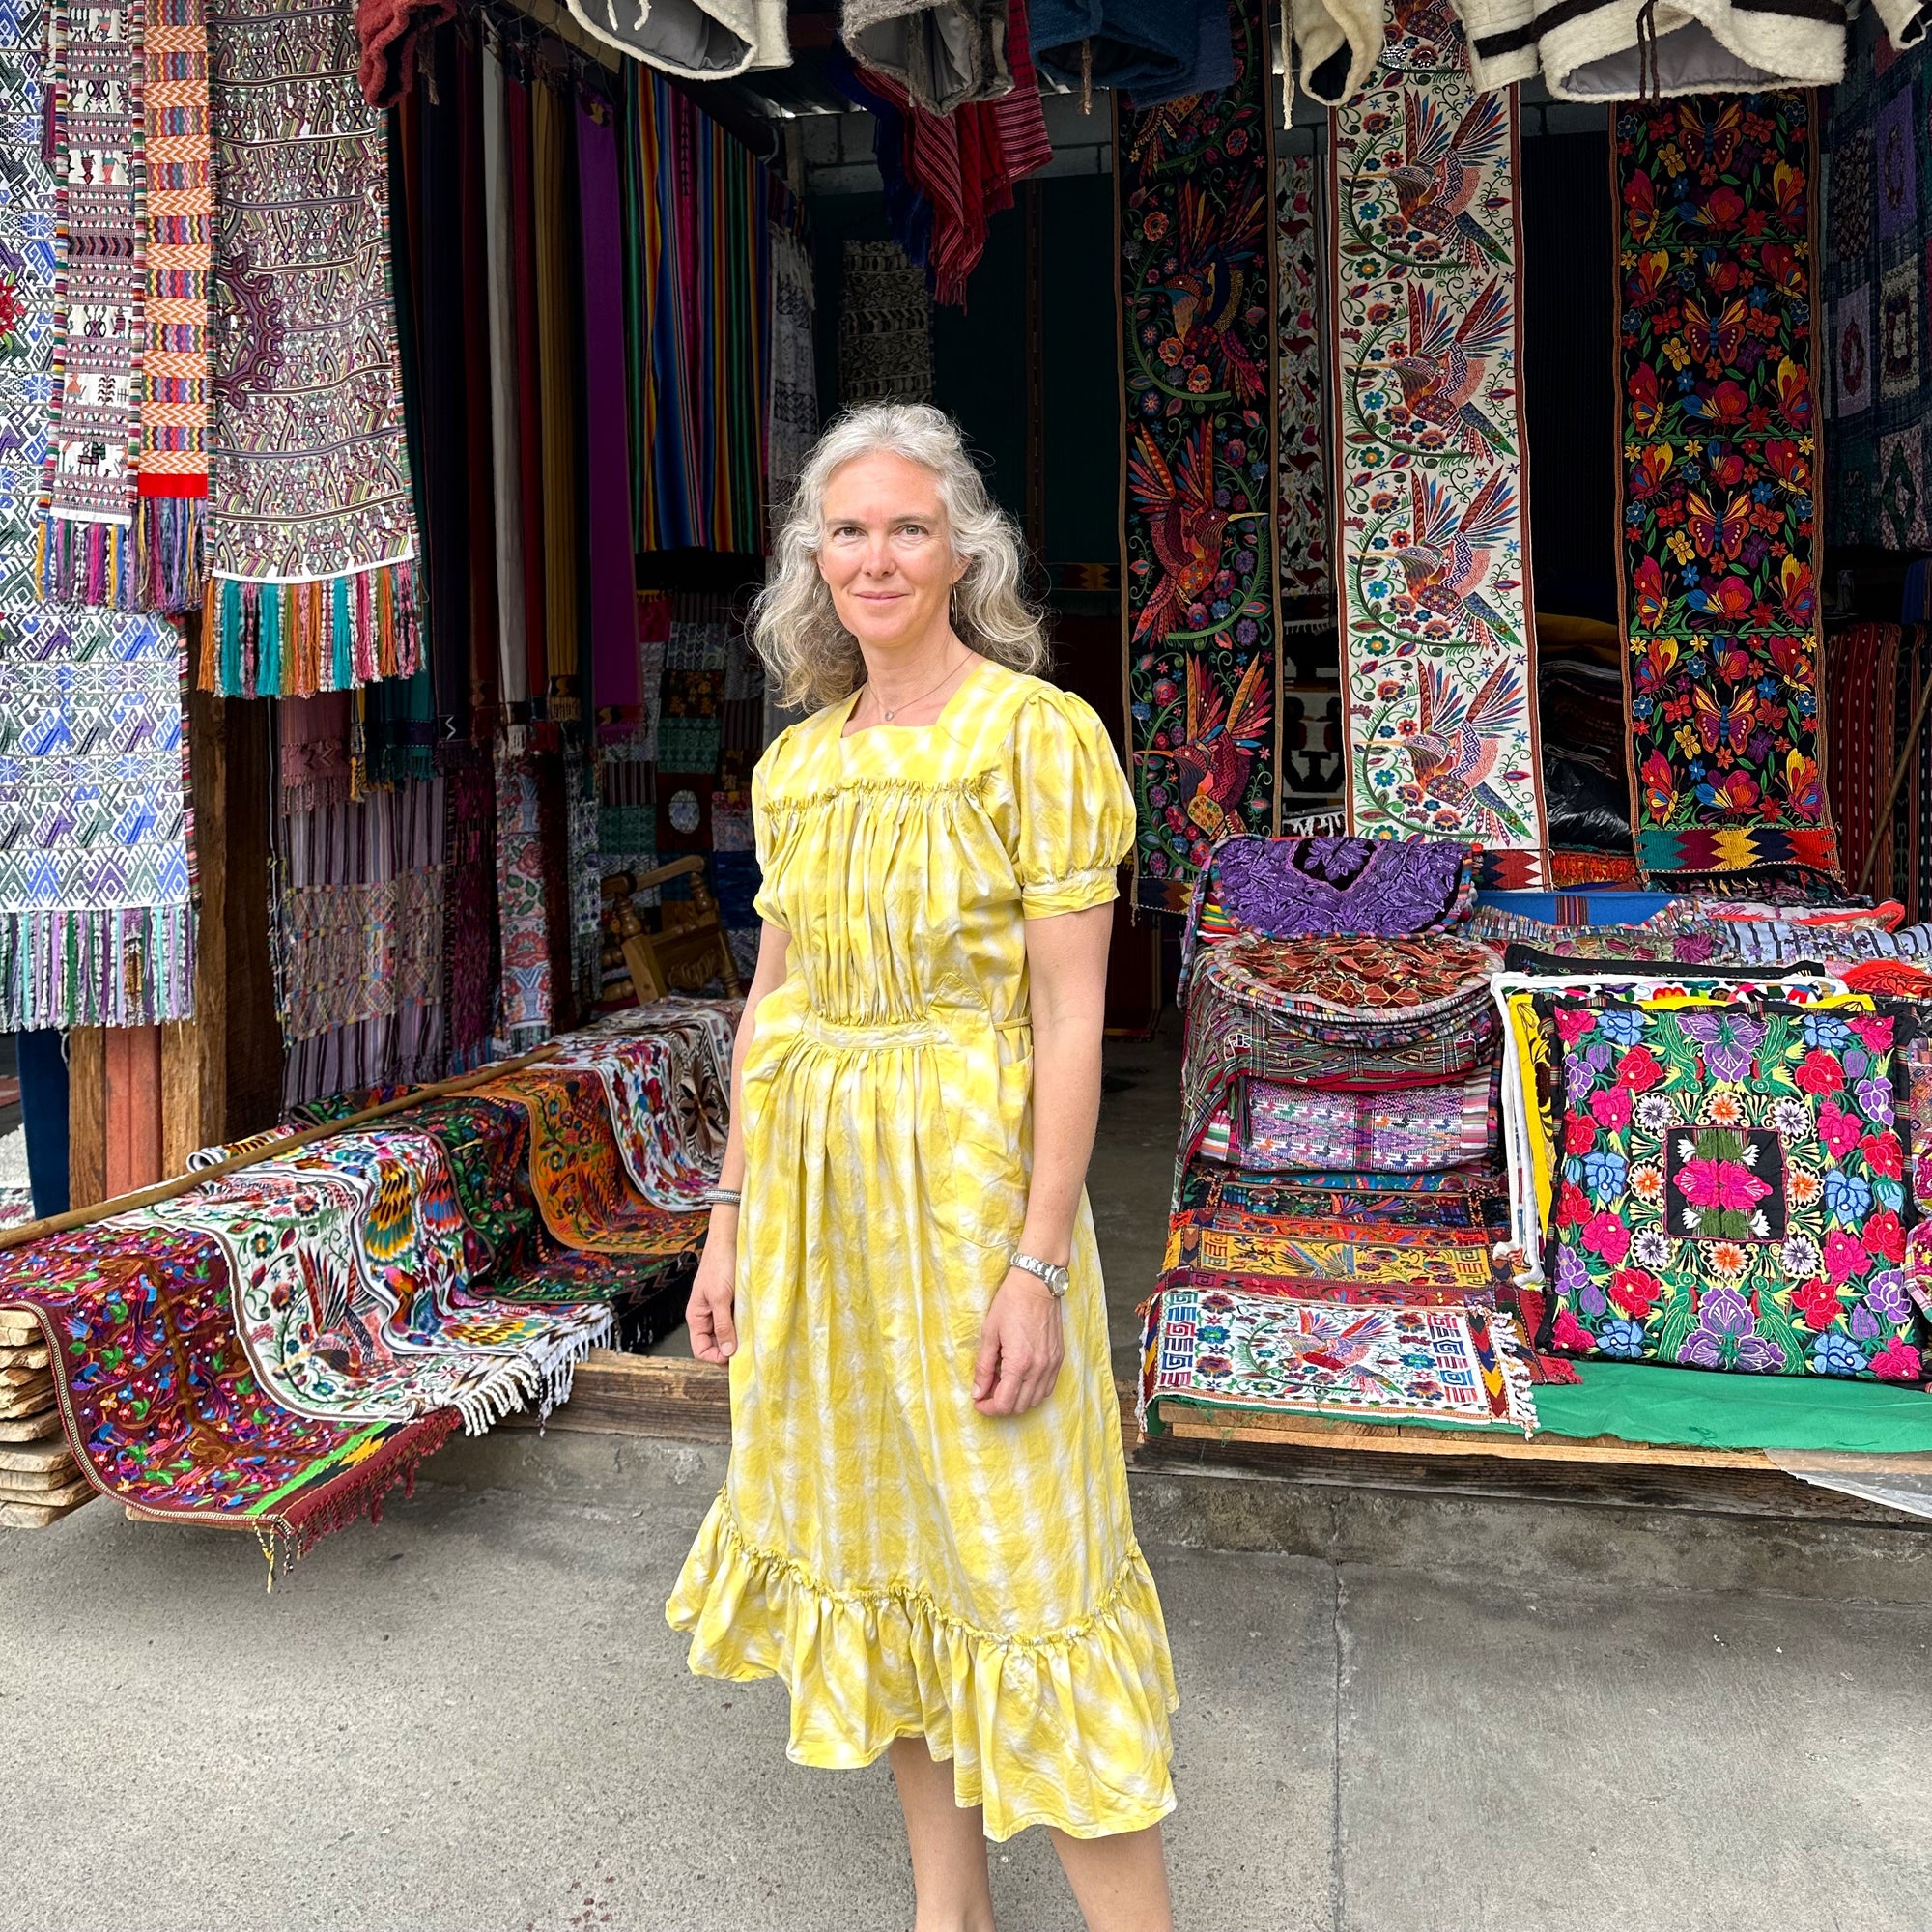
Panajachel seemed like the busiest, and perhaps grittiest, of the towns. It is a central place for tourists to come before going on to another village or town around Lake Atitlan. It is the largest town on the lake, busy with workers, businesses, and traffic. But it is still very small. The main street, Calle Santander, is lined with shops and restaurants, going from the edge of the lake (where there is a beautiful view) back about .75 miles. We really enjoyed walking up and down this street, and "window" shopping. There were very few windows as almost every store and restaurant is open-air, and the shops ranged from trinket shops with cheap souvenirs to high end shops with beautifully made one-of-a-kind garments and bags. There is a small "market" that goes away from the main street in a U shape and is lined with textiles from rugs to huipils to bags and belts and cheap t-shirts. This was a fun place to look through and the sellers are quite pushy. I am not a great bargainer, but we did get a few deals without meaning to and I bought a few items that I am sure were overpriced (but still felt like a fair price to me). The wool rugs in this market were beautiful and there were lots household items.

Wearing my 121 Guatemalan Gabacha at the market stalls in Panajachel.

More market stalls in Panajachel.

Some of the pretty rugs in Panajachel market stalls.
There are also some good restaurants along Calle Santander as well as some popular street food stalls that pop up after dark.
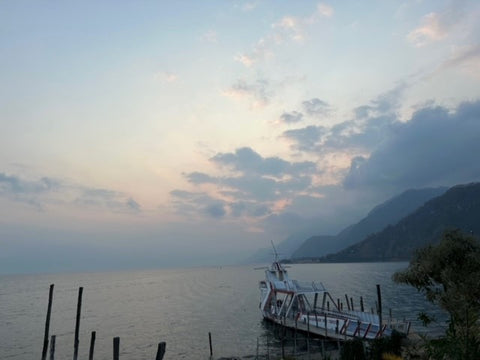
Panajachel is also a good place to get on a boat to just about any town on the lake. There are several public boat docks that have boats leaving every 10-15 minutes to the other villages.
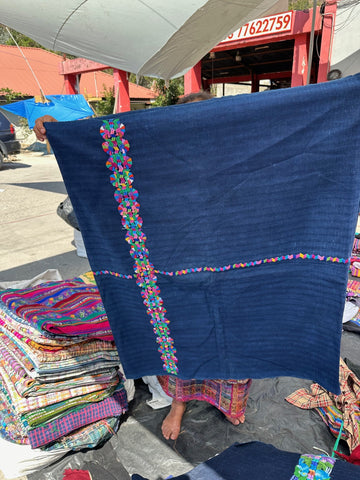
Finally, there is a small textile market that happens at the fire station (Bomberos) every Tuesday and Friday morning. I walked to it on Friday morning and saw about 10 women selling huipils (traditional shirts), cortas (traditional skirts that is a large tube made of cloth), tablecloths (or things for the table) and a few other items. These were mostly older textiles, which I found out are highly sought after by many textile enthusiasts. These are always handspun, hand dyed, handwoven (usually on a back strap loom), and hand embroidered. They are very beautiful and exquisitely made, though sometimes their age shows with stains or faded colors. You can see in the photos below the front and back of hand embroidered band on a corte and how good the back side of the embroidery looks! The women who make these textiles are truly artists.


And, I heard (and saw) that most of the textiles in Guatemala are still handmade. There are some factory made, but most are still woven in homes all over. They are often now using factory spun and dyed threads, but the weaving still happens in the homes. Many of them are woven on back strap looms, but some on larger looms. Each village has their own type, or specialty, of textile - whether it is in the color scheme, pattern, or way of weaving. There is a type of ikat dyeing and weaving that is done in Guatemala, called jaspe, and it has different forms and colors. Some of it is very intricate and used on finely woven cloth and some is simpler and used in more coarsely woven or heavy cloth.
Santa Catarina Palopó
We took a boat over to the village of Santa Catarina one morning. From Panajachel, you should probably just walk (1.5 miles) or take a tuktuk (small taxi on 3 wheels). But, I didn't know, or think things through very well, and we took a private boat and it was actually a very beautiful ride over. Santa Catarina is a tiny town and is most know for its blue painted walls and the blue/aqua/teal weavings that the women in the village produce. From the docks we walked through a pretty avenue where women were selling textiles, and weaving them.

The street coming up from the lake in Santa Catarina.

Weaving at a stall in Santa Catarina.
There was also a small textile cooperative that was beside the school. The profits from this coop go to support this local school. I found some very pretty things there and they were very willing to sell me yardages of fabric also.
We wandered through the village on the many steep and windy foot paths and admired the walls and views. We came across a small "house museum" where there was a little bit of information about the village, weaving, and the lake. It took about 10 minutes to see everything, but it was interesting. Red used to be the traditional color of Santa Caterina's weavings and huipils, but in the 1940s someone told the women that blue would be better, to match the color of the lake and to create some interest in their textiles from tourists. So they changed their main color! And the whole village embraced it.


 The blue walls of buildings of Santa Catarina.
San Juan
On another day, we took a boat across the lake and explored San Juan. In the morning we did a big hike and the hike ended in the village of San Juan. San Juan is a pretty little town with a nice church, good views of the lake, and some interesting small attractions. One of which is a small bee farm and museum. We got a small tour (no photos allowed) of the Mayan bees and their hives as well as a honey tasting. Very interesting.

Lake Atitlan from a point overlooking San Juan (on the right).
There is also a wonderful women's weaving cooperative in San Juan, Casa del Tejido y Tours. We stopped by and got a personal tour of the process - from ginning cotton by hand (pulling out the seed and processing the fiber), to spinning, to dyeing, to weaving. Many of the colors they use are natural dyes, made with the plants and insects (cochineal, for example) that they have in the area. They use banana stem charcoal for mordant. It was a beautiful stop and inspiring. The shop was also impressive, and not cheap, but after you see all the work that goes into making one item, you can understand the cost.

Being shown how to process cotton for making thread (all the colors in the background!).

Demonstration of spinning the cotton on a drop spindle. She could do this very quickly to make a uniform, fine thread.

Anne got to try her hand at spinning cotton on a spindle!

Small dye vats with banana stem charcoal as mordant. You can see some of the dye materials in the background.

And finally, the backstrap loom weaving. This loom is low-tech, yet intricate, and the weaving is fine. In the background, you can see the stool where the thread is wound and overdyed to make the jaspe, or ikats.

Chichicastenango
The largest Mayan market in Guatemala happens in Chichicastenango every Thursday and Sunday. We took a shuttle from Panajachel on Thursday to Chichi for the market -- only 14 miles, but it took an hour of winding over steep mountains to get there.
As suggested in the book, A Textile Traveler's Guide, I hired a guide right when we got off the shuttle at the beginning of the market. Carlos took us through the market, the churches, the cemetery, the Mayan sacred sites, and to his mother's stall who was selling old woven textiles. Again, you are supposed to be able to get amazing deals on textiles at this market. I am sure you are, but I am not a great bargainer and the older textiles, tablecloths, huipils, etc. are more expensive than the more recently made garments and cloth. They are antiques and are treated as nicer quality.
The typical colors of textiles in Chichicastenango are red and orange in zig-zag patterns on the huipils and black cortes with bright red/orange crosses embroidered in. And bright belts, or fajas. There were many stalls full of these garments and they were gorgeous!
The churches and cemetery were also good places to visit on market day and we learned a lot about Mayan traditions and ceremonies and how the Catholic church and traditional Mayan beliefs exist hand in hand here. I found the church and the offerings very moving.
We ended up at a fiesta for one of the town's minor saints (San Sebastian), where we drank atole and were blessed by a Mayan shaman (for a small fee). Atole is a thick corn masa and water drink. I've heard it is sweet and often flavored with cinnamon, but I think ours was just masa and water, served in a small gourd. That was another special moment and so very interesting.
My impressions of Chichicastenango were that it was a lot smaller than I expected. It may be the largest market in the country, but the market in Accra, Ghana was maybe larger than the whole of Chichi. I think it is a function of population (Ghana's population is much larger) and geography (Chichi is situated in the middle of steep and rugged mountains). I loved the colors, the activity, the churches, and the people. It was an interesting visit and we learned a lot. I would highly recommend a guide - it made the visit so much more interesting and informative. And they are not expensive.

The church of Saint Tomas in Chichicastenango with a Mayan alter in front (lower right).


Part of the Chichi market - inside with lots of vegetable, fruit, and herb/medicine booths.

Lots of fajas, or belts, hand embroidered and handwoven. The zigzag, or chevron, design is common in Chichi.

Rows and rows of the traditional cortes in this part of the market - dyed black with the bright red/pink/orange crosses embroidered on.


Old (antique) huipils in the Chichicastenango market.

A seller of backstrap looms (and all the pieces for one) at the Chichi market, right outside the main church. She was carving the loom pieces right here!
Overall, we thoroughly enjoyed this trip! I highly recommend Guatemala if you are interested in textiles. There are several tour groups that organize textile-based tours, and I nearly booked our own itinerary with Anywhere Guatemala which came up with a trip for us which was customized (and I felt it was at a decent price). Again, I would also visit Antigua if I went again. I heard lots of great things about Antigua from its beauty to great restaurants to amazing textiles.
The weather was really wonderful - it was warm during the day (you need sunscreen) and it was cool at night (you need a jacket). But the afternoons got hazy, and one guide told us that is typical of this time of year. December through February it stays very clear, and May through July/August is rainy. The food was great, and very fresh. People were nice and friendly. And, there were interesting views everywhere! While we focused on textiles during this trip, we also did a wonderful long hike, did yoga most days in front of the lake, danced salsa one night, and had one day of rest by the pool (interspersed with the "window" shopping mentioned above).
And if you have more questions about this trip, let me know in the comments! If you have been to Guatemala, also feel free to leave suggestions in the comments also!
Folkwear has a 40+ year history in pattern making. And, some patterns from certain eras of the company are only available in a limited range of sizes. While we work on grading up our patterns when they come up for re-printing, there are some patterns that are easy to grade up on their own (and some that are truly uneconomical to grade up). Some of our traditional patterns that have very simple geometric shapes - are easy to add width or length. This pattern, 256 At the Hop, is not one of those patterns at first glance. The shirt would take quite a bit of adjustment (so we did add two more sizes to this pattern recently for the PDF version!). But the skirt is actually quite easy to grade up (or down). And I'm going to show you how in this post.
This skirt pattern is a circle skirt which you can make very simply, or embellish with embroidery, applique, etc. (check out the amazing RBG skirt that one or our employees made). First, this skirt is really only fitted at the waist. Your hip measurement is not really important for this skirt (though you may want to make sure the zipper opening is large enough to pull over your hips -- double check to be sure, and install a longer zipper with a little more room for the zipper if needed). Your hips will definitely fit in the skirt if you fit it at the waist.
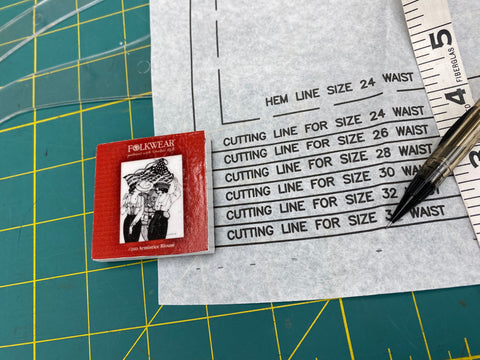
The skirt is only graded for a 22" waist to a 34" waist. For this example, I am going to show you how to grade up one to two sizes. However, you can keep going with this technique to just about any size you need. You can also use this same technique to grade down a size or two. If grading down more than that, you can probably use the child's sizes also provided in the pattern.
Start with the Skirt Front/back
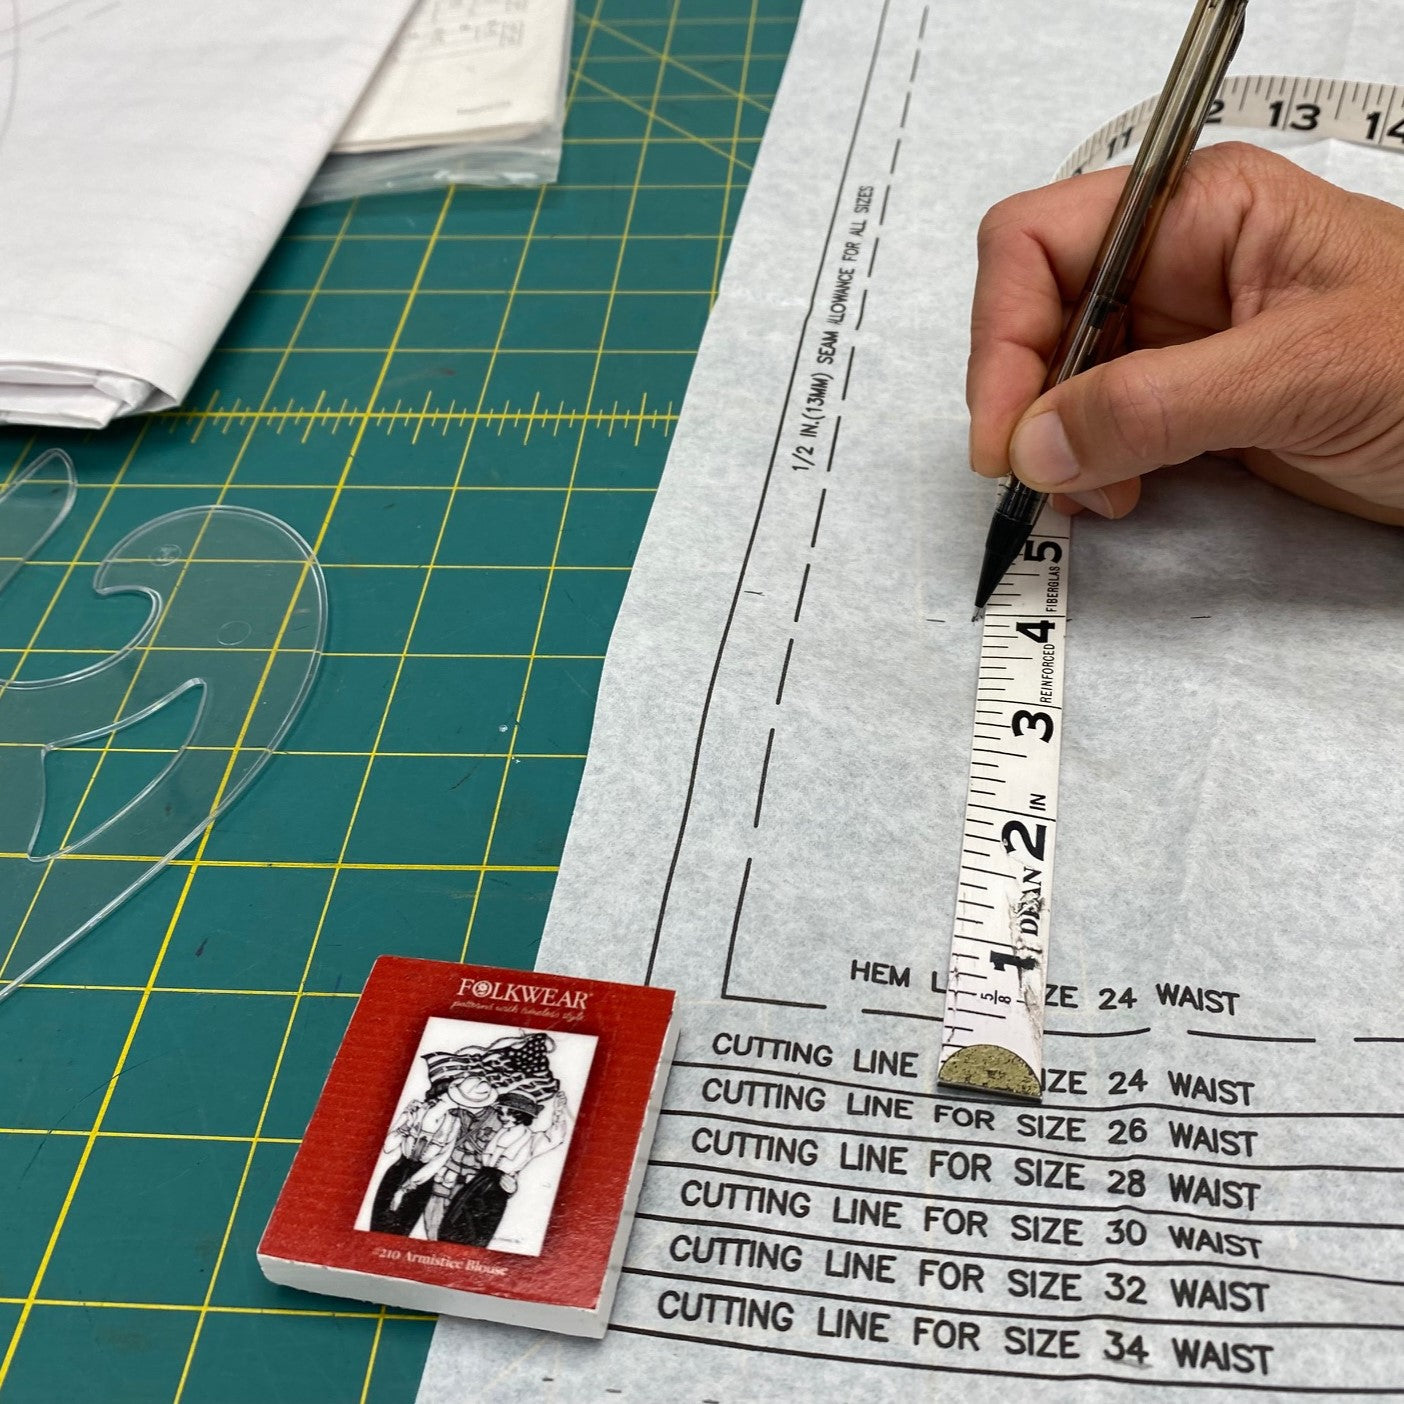
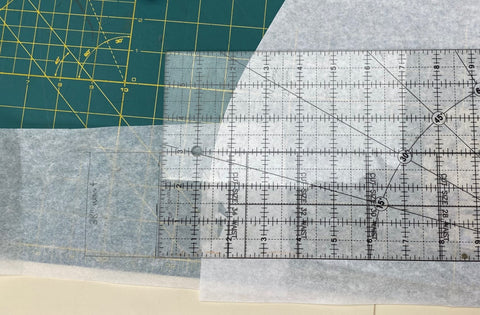
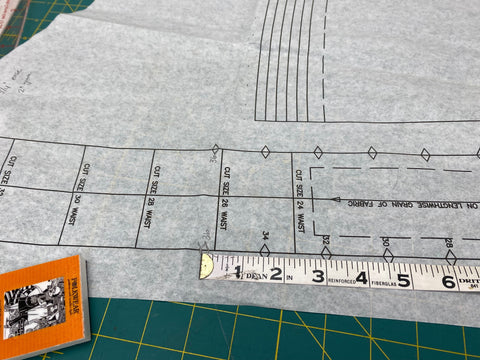
The skirt is cut on the fold: one front, one back. The waist of the skirt is graded at 5/16" between each size. So, to grade up one size, you will add 5/16" to the largest size, and increase in 5/16" increments for each size larger you wish to make.
I marked 5/16" from size 34, all the way around the waist to make size 36 using a regular measuring tape and marking between the 1/8" increments on the tape. You could use metric measurements/rulers for even more accuracy.

Then I connected all my marks with a curved ruler to make the cutting line for size 36.
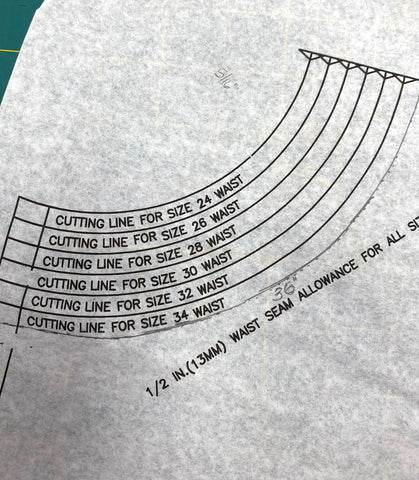
If you want to make size 38, add 5/8" (5/16"+5/16") to the size 34. To make larger sizes, just keep adding 5/16" for every size up you wish to make the skirt.
Then, because we have taken away fabric at the top of the skirt, you want to add it to the bottom of the skirt (unless, of course, you want a shorter skirt!). Again, add 5/16" for each size up you are grading, marking along the curved edge and connecting with a line to create the new size.

You can see the new pattern line at the bottom for new size 36.

Close up of the new size line (for 36). I used a clear plastic curved ruler to help connect the markings.
This is also a great place to adjust the length of the skirt. If you want a shorter skirt, measure up from the cutting line for your size to however much shorter you want the skirt. For instance, if you want to make the skirt 4" shorter, measure up from the cutting line by 4" all the way around the hem curve, marking, then connecting the marks with a line.

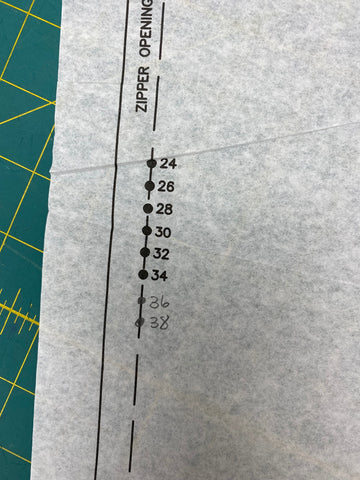
The last thing to do on the skirt is to mark new a new notch for the bottom of the zipper. Mark 5/16" down from size 34 for each size up you are grading.
Waistband
You will also need to adjust the waistband of the skirt. The waistband is straight which makes it very easy to adjust, and you only need to adjust one side of the waistband, plus the notches. You'll only add length to one side of the waist band because the other side has the overlap. The waistband is graded 2" between each size. So, to make a size 36" waistband, add 2 inches to the graded end of the waistband. To make a size 38" waistband, add 4 inches to the graded end of the waistband. A clear plastic rectangular ruler is helpful here to keep right angles and make measuring easy. I taped some Swedish tracing fabric to the pattern to have enough room to add the extra inches to my waistband end.
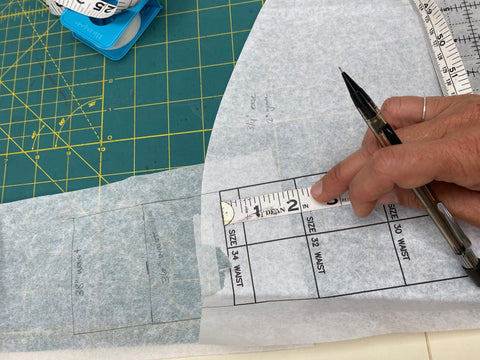
A clear plastic ruler can help you see the lines underneath when measuring straight lines and adding to the waistband end.
You probably also want to adjust the notches on the pattern. The square notches are set 1" apart for each size and are for marking where the side seams of the skirt connect to the waistband. Just mark notches for the new size by going up 1" for each size up you are grading up.
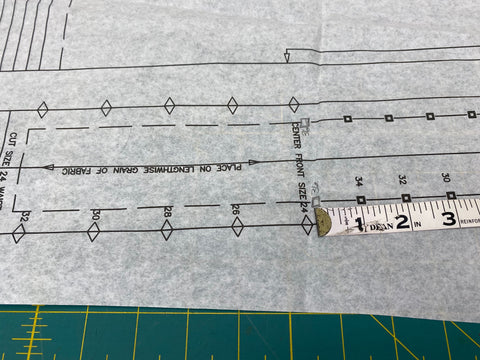
The triangle notches are graded at 1.5" between each notch and mark the center front and center back of the skirt. So mark new triangle notches 1.5" from the notch for size 34 for each size up you are going.
That is all there is to it! Just a few adjustments to make to get this skirt made into larger sizes. This pattern is an easy sewing project and a fabulous canvas for your creativity!

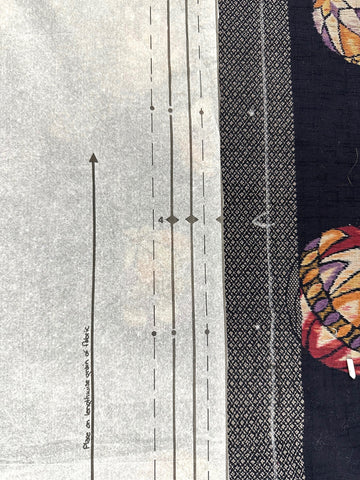
Our 106 Turkish Coat is one of the first patterns Folkwear released in the late 1970s. The pattern is still true to the original - providing instructions for creating a fully quilted coat with quilted or trapunto borders, plus all the information (and designs) need for doing so. And the pattern also instructs how to make a coat with pre-quilted fabric.
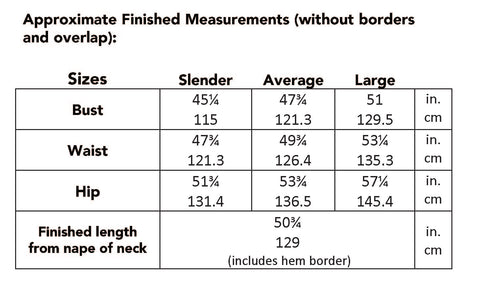
The pattern also stays true to the original sizing, which is labeled as "slender", "average", and "large". These aren't very precise sizing labels and I think that is exactly what the pattern designers had in mind. There is a lot of ease in this coat as it is meant to go over clothes, even outerwear, as a final outer layer. I recently went back to this pattern and calculated the approximate finished measurements as well as assigned sizing labels for the size chart to the original sizes (slender, average, and large). This gives an idea of how large the coat is and can help you decide what size you want to make.

We occasionally get requests to size this pattern up as we have done with many other patterns we have in our collection. However, this one is difficult, not because of the actual pattern pieces that need to be graded, but because of the designs and traditional nature of the pattern. It is not as straightforward as some of our vintage patterns that have regular sizing and grading; and would change the instructions and detailing in complicated ways that a simple tutorial doesn't do. Plus, this pattern is extremely easy to make in larger sizes due to the simple geometric shapes of the pattern pieces. And really only one part needs to sized up to get to most sizes that would be desired.
So in this blog post I am going to show you how to easily increase the sizing of the 106 Turkish Coat.
Front and Back
First, the front and back of this pattern are cut as one piece. You tape them together so the shoulder seams meet. And then lay them out as one piece on your fabric.
If you have a directional print or napped fabric, you can cut the front and back separately, but be sure to add in the 1/2" seam allowance (it is included on the pattern piece). It will take likely take more fabric than the pattern calls for.
This Front/Back piece is the only piece you really need to make larger to expand the sizing of the whole coat.
The finished measurements for the largest size is approximately 57-1/4" (not including the borders and overlap section). This provides approximately 12"-13" of ease at the hips. So if we were to go up to a 52" hip (our current grade rule size of 2XL), you would want the coat to finish at 64" at the hip (52" hip + 12" ease = 64"). So we would want to add about 7 more inches to the pattern to get the desired width (I am disregarding the 1/4" on the finished measurement for these calculations); 57" (current finished largest size) +7" = 64". So we need to divide 7" by 4 because we are going to add width to each side of the front and back to get to 7". So, we are going to add 1.75" to each front and back side. To do this, you just need to draw a line 1.75" wider than the largest pattern size on each side of the Front/Back.
For this example, I am going up to XL, adding 5" to get a finished measurement of 53" (finished largest size)+5"=58" (48" hip + 12" ease) finished hip. So I am going to add 1.25" to each side. You can use these calculations to get whatever size and fit you want. If you want more ease, add more width to the sides of the Front/Back pattern piece.
I use a straight clear ruler to do this, but you can use any kind of ruler to mark the new cutting lines.
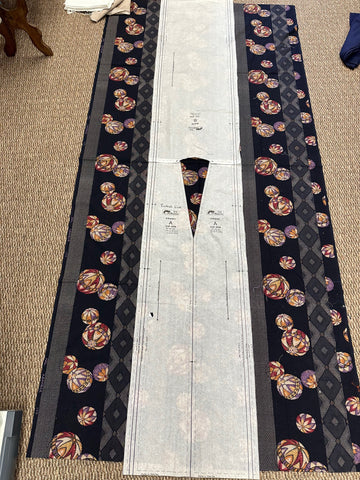
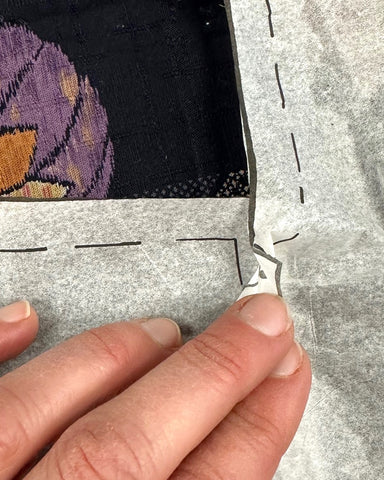
You can see here that I am laying this pattern out with the front and back taped together at the shoulders. I am using a Japanese cotton with a fun print. I have centered the Front/Back over the center printed part of the design. My fabric is slightly shorter than the pattern pieces, so I am going to make the coat a little shorter than the pattern calls for. It is easy to shorten or lengthen this coat, but it important to note how much you are shortening the coat so that when you cut the front borders, you cut the correct length.
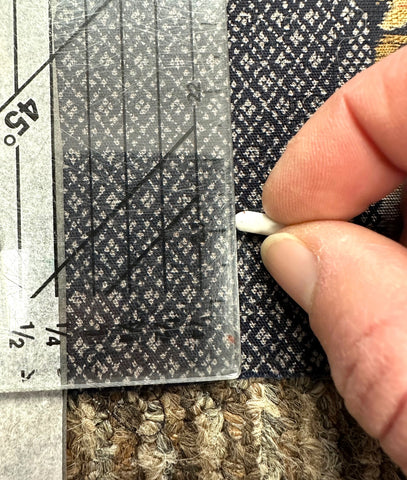
Marking 1.25" on each side of the Front/Back pattern piece.
Be sure to put in the notches and dots where they are on the pattern, just transposed to the new seam allowance that you have drawn in.
You will need to do this for the main fabric, lining fabric, and batting. And if you are expanding the sizing of this pattern, you may need more fabric than what the pattern calls for. Be sure to have extra fabric. For this coat, we made it as an unlined coat so did not need to cut out the lining or batting.
Borders
As the pattern instructs, do not cut out the border pieces until you are instructed. You will follow the directions in the pattern to get the border pieces that will fit your new Front/Back. Be sure NOT to cut out the border pieces until you are instructed, and follow the instructions in the pattern. You will need to a measuring tape to take a few measurements on the coat once the main body has been put together.
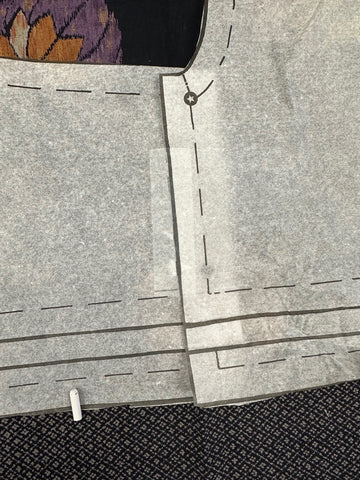
When I cut out the border pieces, I had to add some length to each of them (except the front borders), and I added the length to the side of the pattern piece that had markings.
Also, you basically don't use the notches on the borders for placement of any of these pieces. They are mainly there to tell you which side is going to go against the main body of the coat. So it does help to have them, just don't bother trying to line them up with anything, especially if you have changed the sizing of the coat.
Finally . . .
We also highly recommend making a muslin for any pattern that you are adjusting. This with help you know if you need to make further adjustments before cutting out your garment fabric. A muslin for this coat would not need the borders or cuffs to make sure the fit is what you want.
This is pretty much all there is to expanding the size of this pattern. There is a lot of ease at the shoulders due to the underarm gusset (which adds 4") and the side panels). The sleeve itself also has a lot of ease. But, if you are wanting to make the sleeve larger, add the extra you want to expand it by to each side of the underarm of the sleeve. Then you will also need to adjust the dots on the Front/Back that indicate where to attach the sleeves by the length you increased one side of the sleeve width. Your side panel may be slightly longer than the Front/Back, but you will just trim off the extra at the end of body construction and before you add the borders to the coat.
I hope this has helped you figure out how to easily expand the sizing of this coat to fit you. It is simple! And the 106 Turkish Coat is so fabulous!
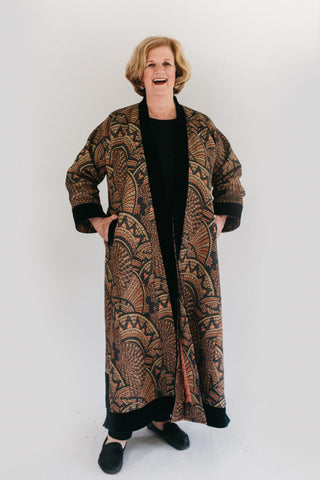
The 106 Turkish Coat was one of the first patterns released by Folkwear in 1970s. And, it is one of our most popular patterns, as well as a favorite with quilters and clothing artists due to the options for quilting the borders or the entire coat. It is also a great pattern to add artistic fabric panels (since the coat is put together in panels) -- such as a hand-painted back panel or using that special, or handwoven fabric, in the different panels. There is an incredible amount of room for creativity, individuality, and artistry.
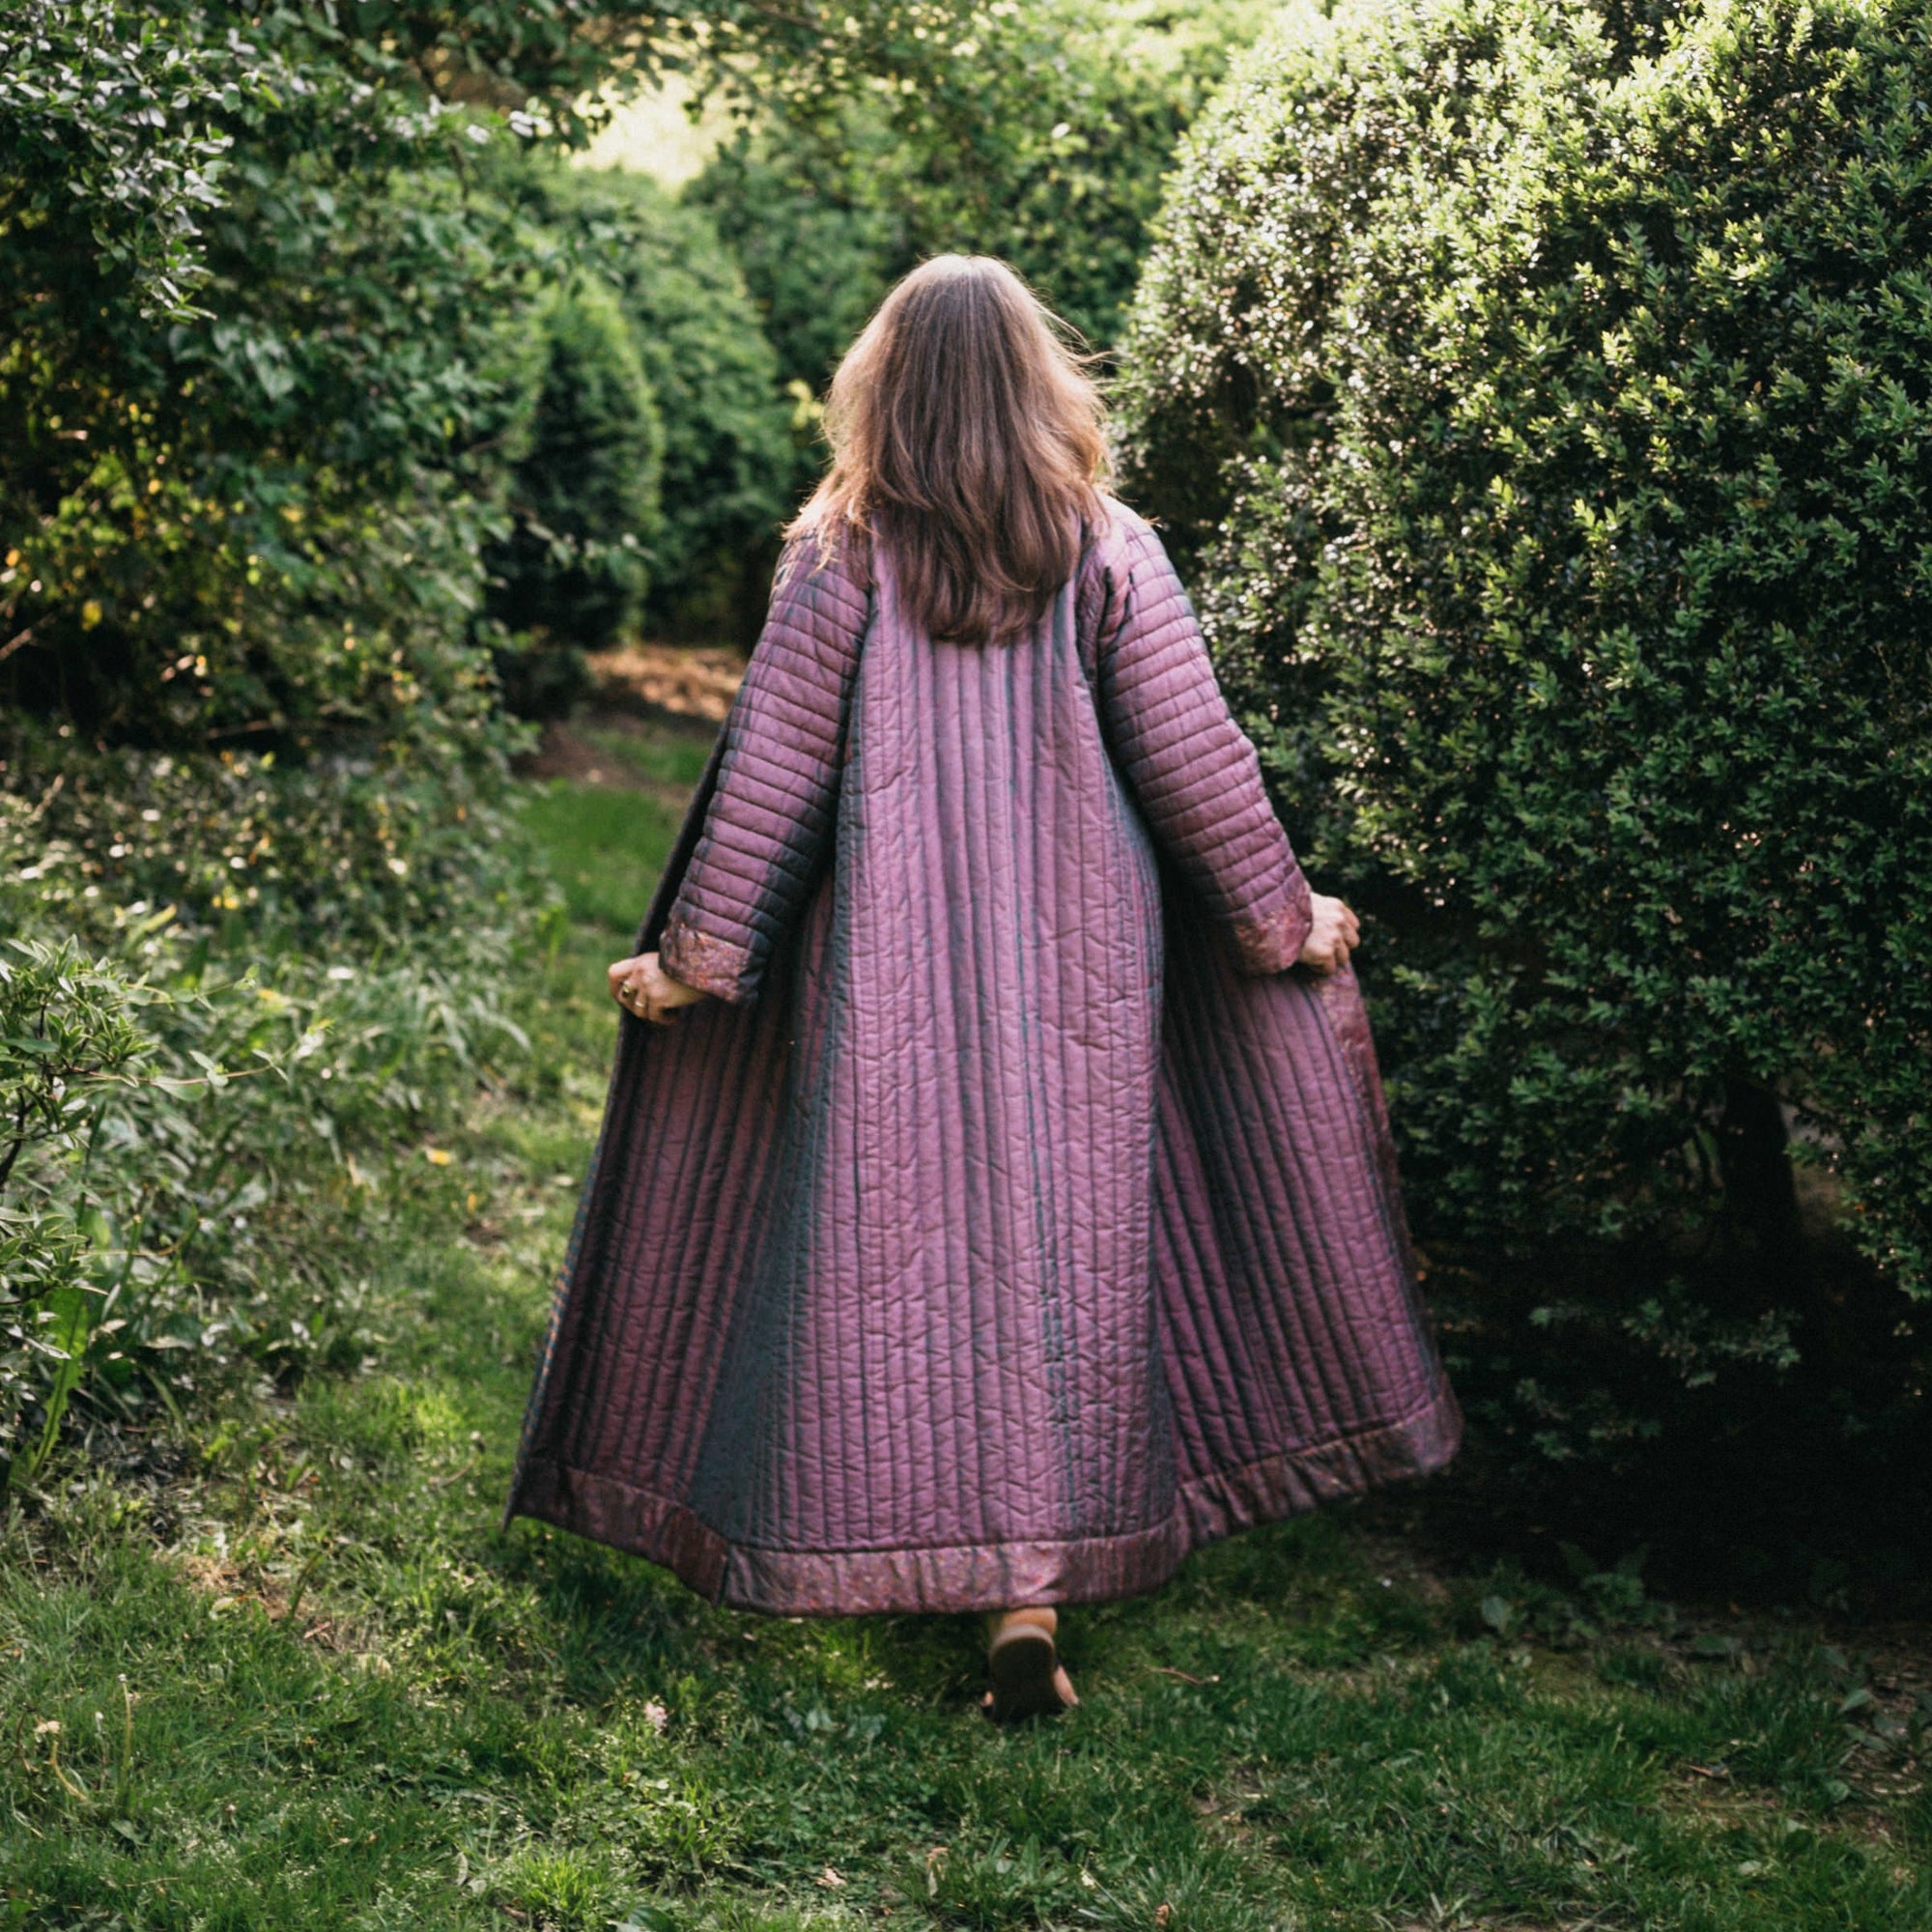
This coat originated in Central Asia, where it is made in brilliant silks and floral cottons. It is often made with handwoven and hand-dyed ikat fabrics as well. The borders and cuffs are often made from different fabrics than the body and even the lining or inner borders in different fabrics so there is a beautiful combination of inventive and coordinating fabric throughout the coat. The pattern creates a coat that is boot-length and reversible. Perfect for cool weather of the Central Asian plains.
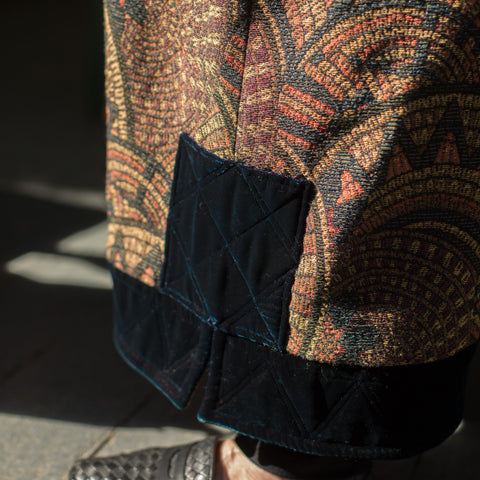
The coat hangs closed in the front without fastenings (though you could add buttons, toggles, frog-and-loop, or ties), and it features a quilted or trapunto border at the hem, neckline, and front opening. The border finish is typically echoed in the cuffs and welts over hand slits, which are common in traditional Turkish outerwear instead of pockets. They are for keeping hands warm, not storing things as pockets would do. The sleeves are roomy and slightly tapered and the coat has underarm gussets and side panels.
Included in this pattern are detailed instructions for trapunto and hand or machine quilting, as well as the designs for all borders and for a decorative square patch at the side hemline (which can be extended over the entire coat if desired). The body of the coat can also be hand or machine quilted.
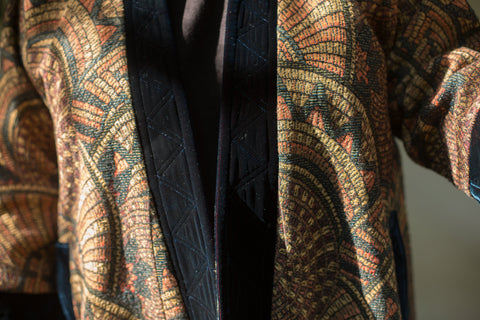
You can see the quilting in the front borders of this coat.
The pattern also includes a lovely simple-sew version of the coat that can be made with pre-quilted fabric. You can even make it as an unlined coat using any kind of fabric with border facings. It would make a fantastic raincoat! And I will show you how to make an unlined version of this coat with some fabulous fabric I found in our stash next week!
Also note that there is no shoulder seam on the coat - the front and back pieces are cut as one. However, if you have a napped fabric or one-directional fabric, you can put in a shoulder seam for the front and back panels and add 1/2" seam allowance.
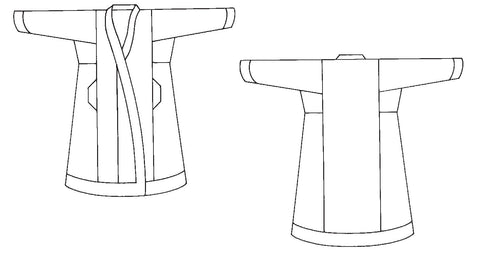
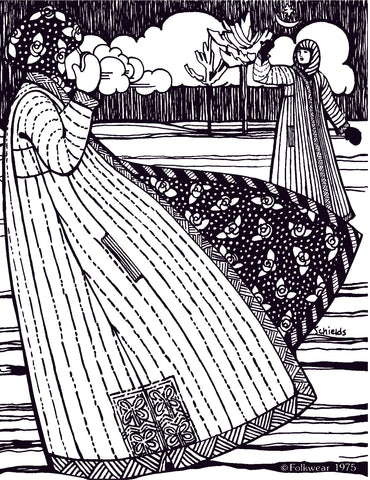
Flat drawings of the front and back of the 106 Turkish Coat. You can see here the different panels that make up the coat - perfect for different fabrics.
The sizing for this pattern is basically small, medium, and large. On the pattern pieces, the sizes are called "slender", "average", and "large". As one of Folkwear's oldest patterns (and similar to other early-Folkwear patterns), the sizing is not conventional since it is based on a traditional garment. There is no sizing chart; there is only a yardage chart. So, I recently made a sizing chart just for this pattern along with the finished measurements (also pictured below). One of the most common requests we get for this pattern is to size it up. However, the original drafting (based on original garments) and instructions does not lend itself to sizing up as we have done for our more recent patterns (such as vintage patterns). The traditional aspect of the pattern pieces and construction of the coat are simple enough to expand sizing on your own. In other words, there are not any curves or odd shaped pieces that need to be graded by a professional to get a larger sized coat. And I will have a tutorial in the next few days to show how to easily increase the size on the coat.
Sizing and Finished measurements chart:

As for fabric, as mentioned before, this is a great coat to use a mix of fabrics. Medium weight fabrics that are soft, such as broadcloth, silk, linen, or a lightweight wool, are all great choices. And, this pattern is great for using special pieces of fabric in the panels, borders, cuffs, etc. Use vintage pieces, handwoven pieces, or those special scraps you've been saving. There are a lot of places to make advantage of creativity in fabric choice.
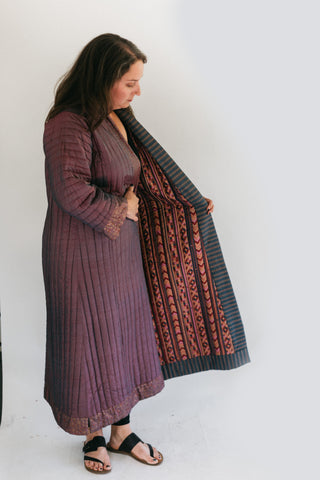
You can see here all the different fabrics that make up this quilted 106 Tukish Coat.
Our 106 Turkish Coat is an incredible pattern - full of detail, full of options, and ready for your creativity! Tell us if you have made this pattern before and what you loved about it (bonus for telling us about the fabric you used and how you made it!).
By Esi Hutchinson
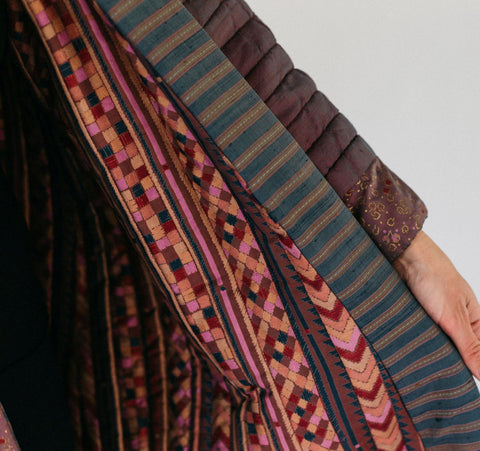
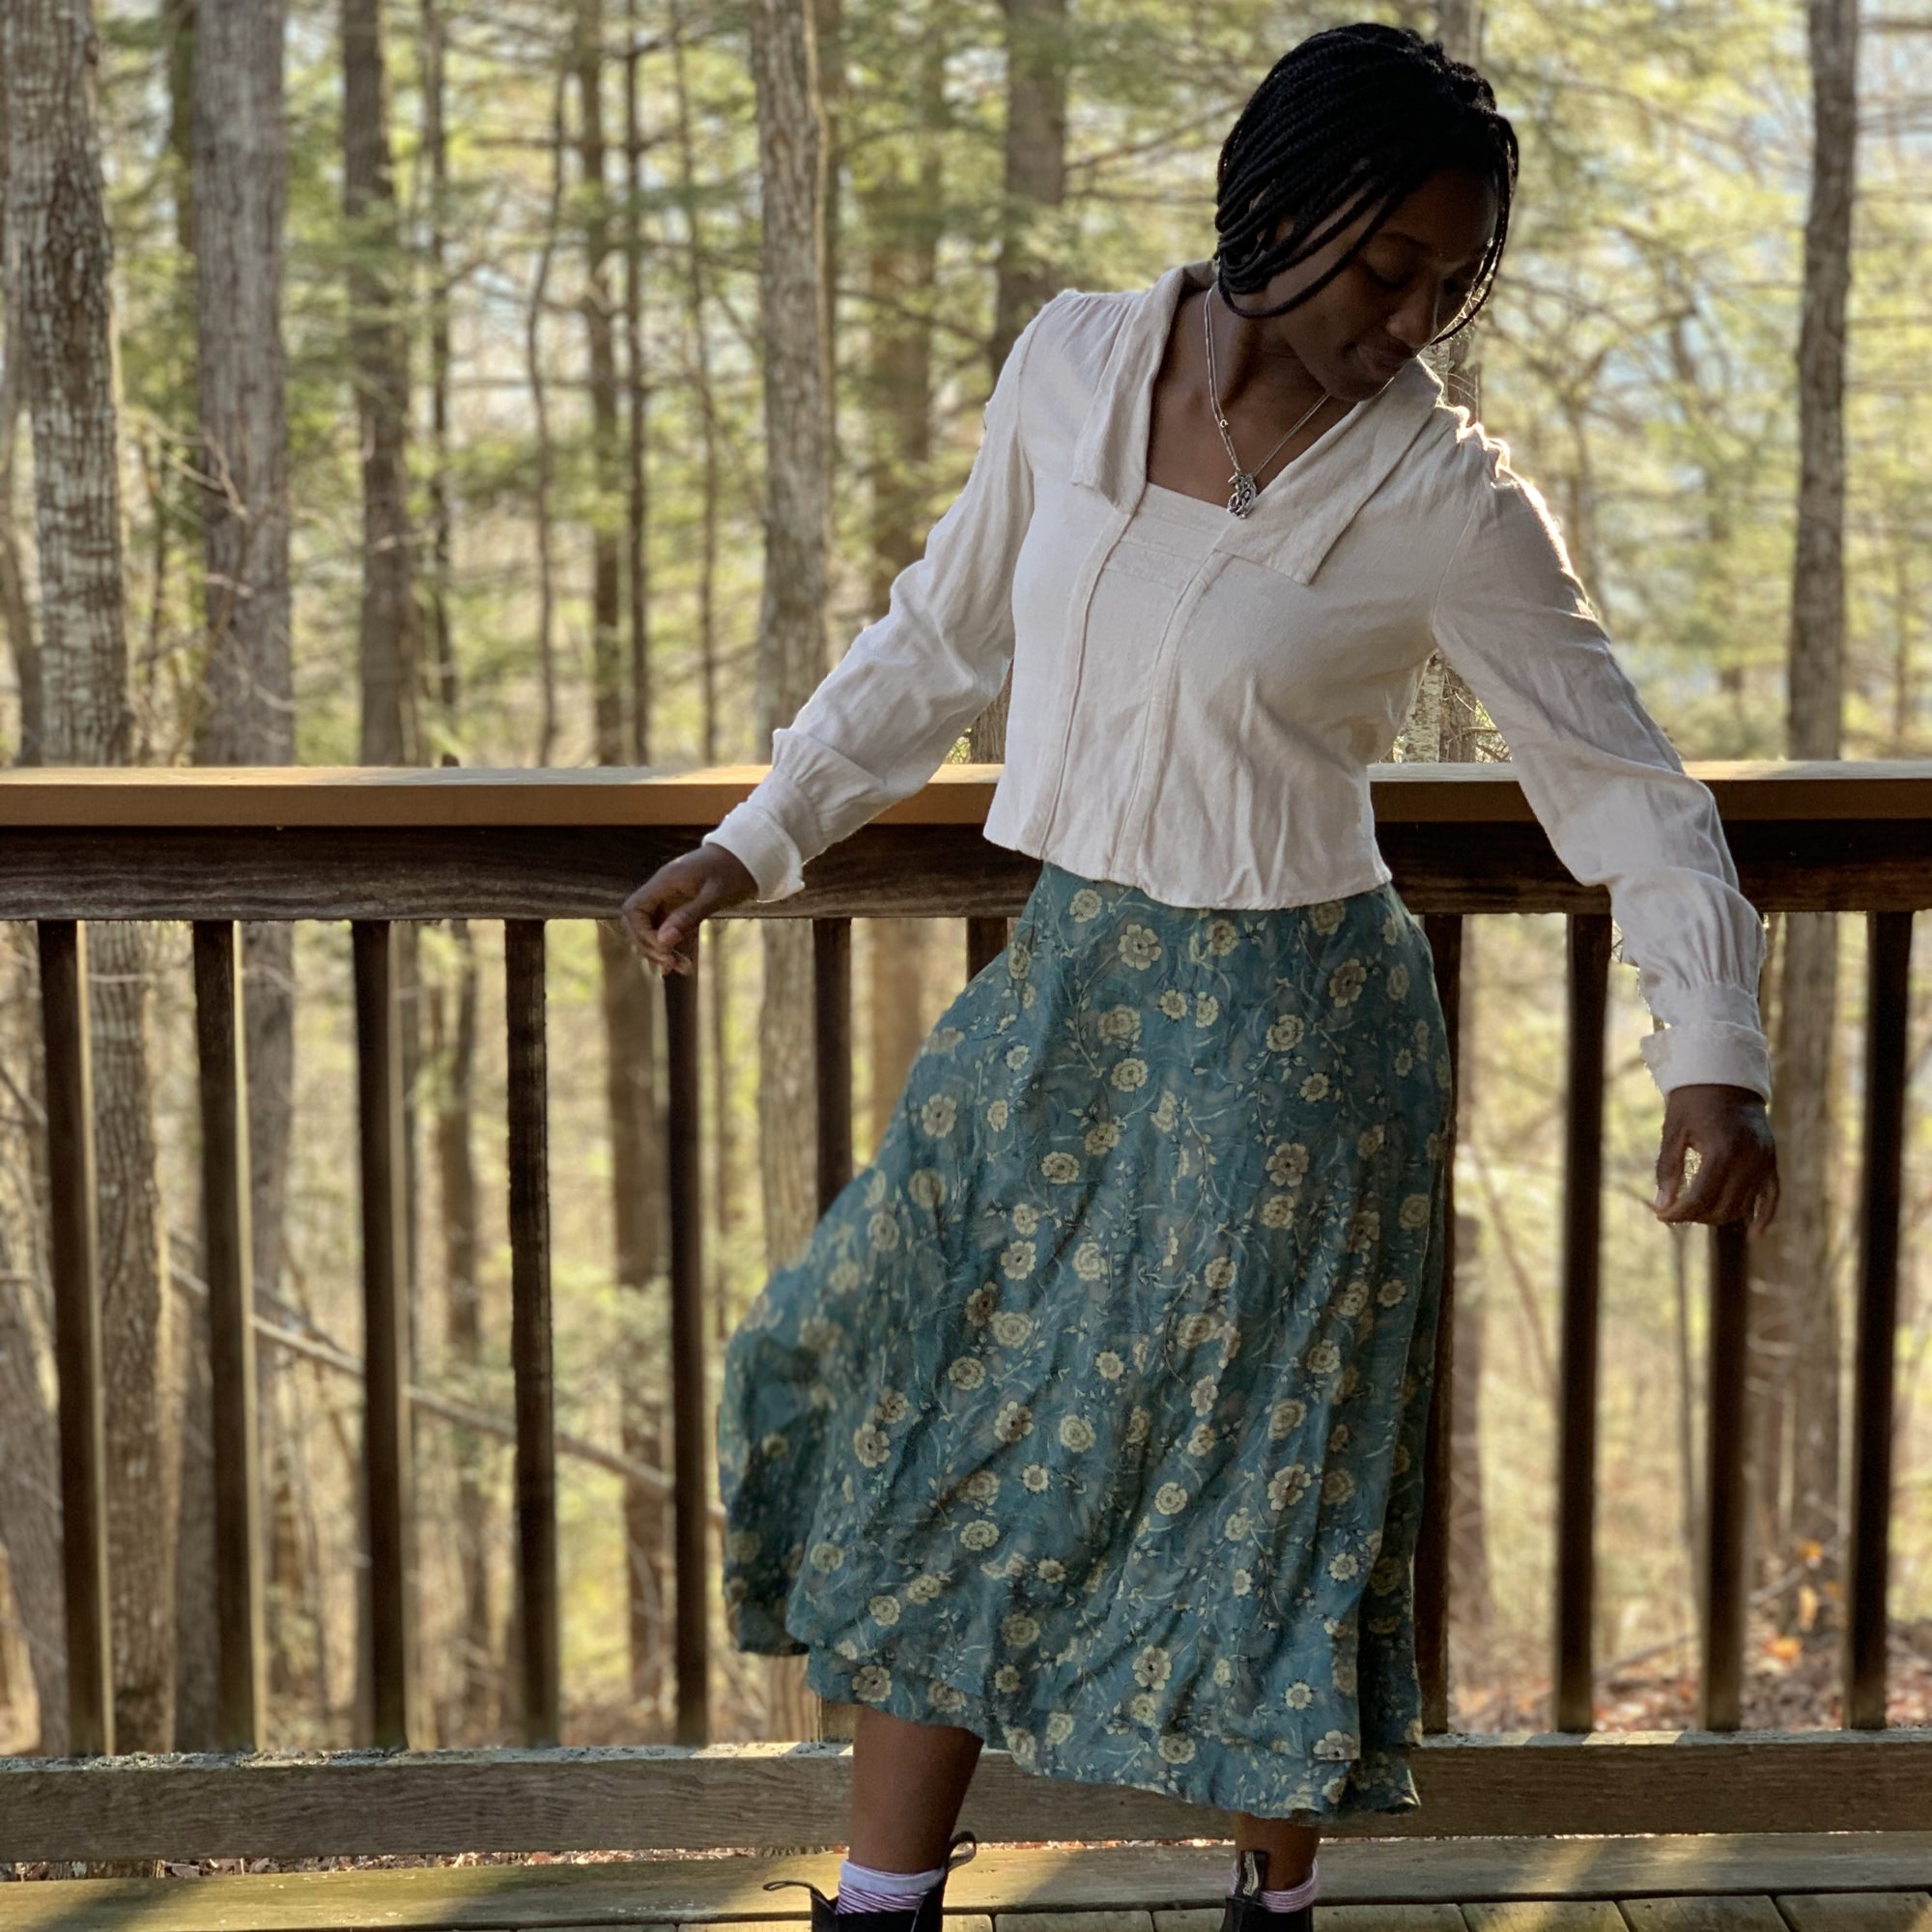
If you read my previous blog post, I wrote about the sizing adjustments I made for my own 209 Walking Skirt. I also wrote a tutorial on how to make the back placket of this skirt, since plackets can be tricky. In today's post I am going to show you what other modifications I made to my skirt as well as some things you can do when making your own Walking Skirt. I added a zipper and a decorative hem flounce. Again I think this skirt would be flattering on everyone, and we always love to see what you make from Folkwear so please share when you can (social media or review a pattern).
Adding a Zipper
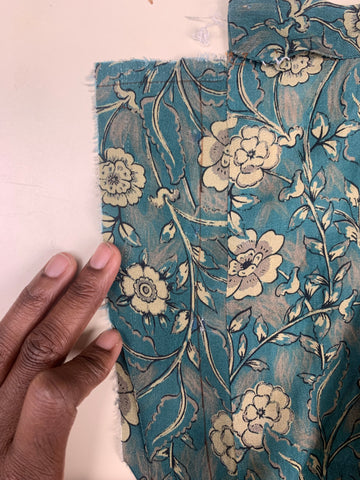
The back placket of 209 Walking Skirt is perfect for medium to heavy weight fabrics and fabrics with some structure, but I wanted to make my skirt from a lightweight rayon. This floral rayon did not have the structure to hold up to a simple placket and stay closed. I loved the feel of this fabric and the colors work really together in my opinion. I really wanted to use this fabric for this pattern, however I decided that for a fabric like this, a zipper would work much better as a closure. I made a sample placket on the skirt to test it, but, as expected, it turned out to be floppy and didn't keep closed even with a hook and eye closure secured at the top. So even if you have the placket, it is easy to add a zipper closing in the placket placement. It is basically a lapped zipper.
I unpicked the waistband seams about 3 inches on both the left and right side of the skirt (it's always a drag to have to unpick your seams).
Starting with the lefthand side of the back of the skirt (as you wear it), I unpicked the folded over edge of the facing that I topstitched to the right side of the back and pressed it out. The length of my placket was 9" (22.9cm) long. I purchased a zipper slightly longer than that just in case I needed more room. Once I decided I only needed 9", I made a couple of large zig-zag stitches to make a new zipper stop about 9" (22.9cm) down from the top of the zipper.
I drew a line 5/8" (1.6cm) away from the seamline of the facing and the skirt back and a line 1/2" (1.3cm) from the top short edge of the facing (lefthand side of skirt).
I placed the right side of the zipper tape onto the right side of the facing. The top of the zipper should be right below the 1/2" (1.3cm) line and center of zipper teeth should be right next to the line I just drew that is 5/8" (1.6cm) from the seamline. I sewed the zipper to the facing using a zipper foot. I stitched twice - once close to the zipper teeth then again close to the edge of the zipper tape.


Then I pressed under 1/2" (1.6cm) of the raw edge. And I pressed the facing to the wrong side of the skirt along the facing and skirt seamline. I topstitched on the folded edge through all layers.

Next I sewed the left side of the zipper to the placket on the righthand side (as you wear it) of back skirt. First, I zipped up the zipper and see where the edge of the left side of the zipper tape would meet the placket and drew a line to indicate where I would sew this side of the zipper.
I put the zipper stop 1/2" (1.6cm) below the top of the placket before stitching the zipper down.

I then attached the waistband and added hook and eye to secure the waistband. You could add a button or snap instead.

It looks like a zipper that you would see on a pair of pants - similar to a fly, but much simpler.

You could also eliminate the placket all together and sew in an invisible or lapped zipper, cutting the skirt back straight at the center back and eliminating the placket and facing pieces. Or, you can add the zipper into the placket while you are making the skirt!
Decorative Hem
I also added a decorative hem flounce to my skirt. The fabric I chose moves so beautifully, it's bouncy and flows really nicely, and the decorative hem I made adds to its character even more. The extra weight at the hem adds great movement.
I wanted my decorative hem flounce to be 4" (10.2cm) wide, and to end 2" (5.1cm) above the main skirt hem.
My hem flounce pattern piece would need to be 4" wide, but also needs 1/2" (1.6cm) at the top to fold over and be topstitched to the skirt. And, the flounce would also need an extra 1" (2.5cm) at the bottom edge so that it could be hemmed (turned under 1/2" twice - same as the hem of the main skirt).
I used the same 209 Walking Skirt pattern pieces to make my hem flounce pattern pieces so that it would match the skirt. Basically cutting a strip from each skirt gore pattern piece to make the flounce so it fit the skirt. First, on the skirt pattern pieces I marked a line 2" (5.1cm) above the bottom cut line of the skirt pattern pieces. This is where my flounce piece would end before it is hemmed. Then I marked a line that was 5.5" (14cm) above that (4" for flounce, plus 1" for the hem and 1/2" for the seam allowance).

Measuring up 2" (5.1cm) from the cutting line of the skirt hem takes into account the skirt hem will be 1" (2.5cm), and the flounce hem will be 1" (2.5cm) so it will still finish at 2" (5.1cm) above the finished skirt hem.
I did that for all the skirt pieces, making sure to add the notches (or label the pieces) to know what part of the skirt gores they match to. I cut the pieces out as I did for the main skirt and sewed them together in the same way - sewing them end to end.


I hemmed the bottom of the hem flounce by folding under 1/2" (13mm) and another 1/2" (13mm) and stitching near the fold. I serged the top raw edge of the hem flounce because the fabric frayed a bit, and then I folded under 1/2" (13mm) to the wrong side at the top of the flounce.

I drew a continuous line 6" (15.2cm) above the hem of the main skirt around the whole skirt for my placement line (4" for width of flounce and 2" above the skirt hem line). I topstitched the flounce to the skirt at its top edge with the wrong side toward the skirt.


By Esi Hutchinson
Folkwear's pattern for this month of February is the 209 Walking Skirt. I really appreciate the shape of this skirt and I personally think it would be flattering on anyone. When we decided we would feature this pattern, I knew I wanted to make a skirt for myself. And, I made some alterations to this skirt to fit my style more. I'm always altering my sewing patterns, and you should too if that means you'll wear what you make more often.
For the Walking Skirt, the gathers in the back of the skirt gives a slight fullness in the back that is reference to the overlapping of the Victorian and Edwardian era and the S-curve shape that was popular then. The skirt is finished with a buttoned placket. However, I did not want the gathers in the back (I have a nice bum and don't need extra fabric there, nor was I wanting to go for the period look).
I took out the gathers in the back of the skirt, and added a zipper to the placket. I also added a decorative hem flounce similar to the hem on the skirt in the 216 Schoolmistress' Shirtwaist & Skirt pattern. I thought the fabric I used (a rayon challis) suited these alterations. In my next blog post I will show you how I added the zipper and the decorative hem flounce. But today I am going to show you how I took out the gathers and adjusted for my size.
Note that in the photos below I am mostly using our Swedish tracing fabric to make my pattern adjustments. I usually trace my pattern, then make adjustments to the tracing fabric. I can write on this sturdy fabric/paper as well as fold it, tape it, and even sew it. Since this fabric/paper is not cheap (but it's not terribly expensive either) and we hate to waste things at the Folkwear office, we often tape used pieces of this paper fabric together from past projects to get enough to have whole pattern pieces. So that is what you are seeing in the photos below! Find this Swedish tracing fabric here.
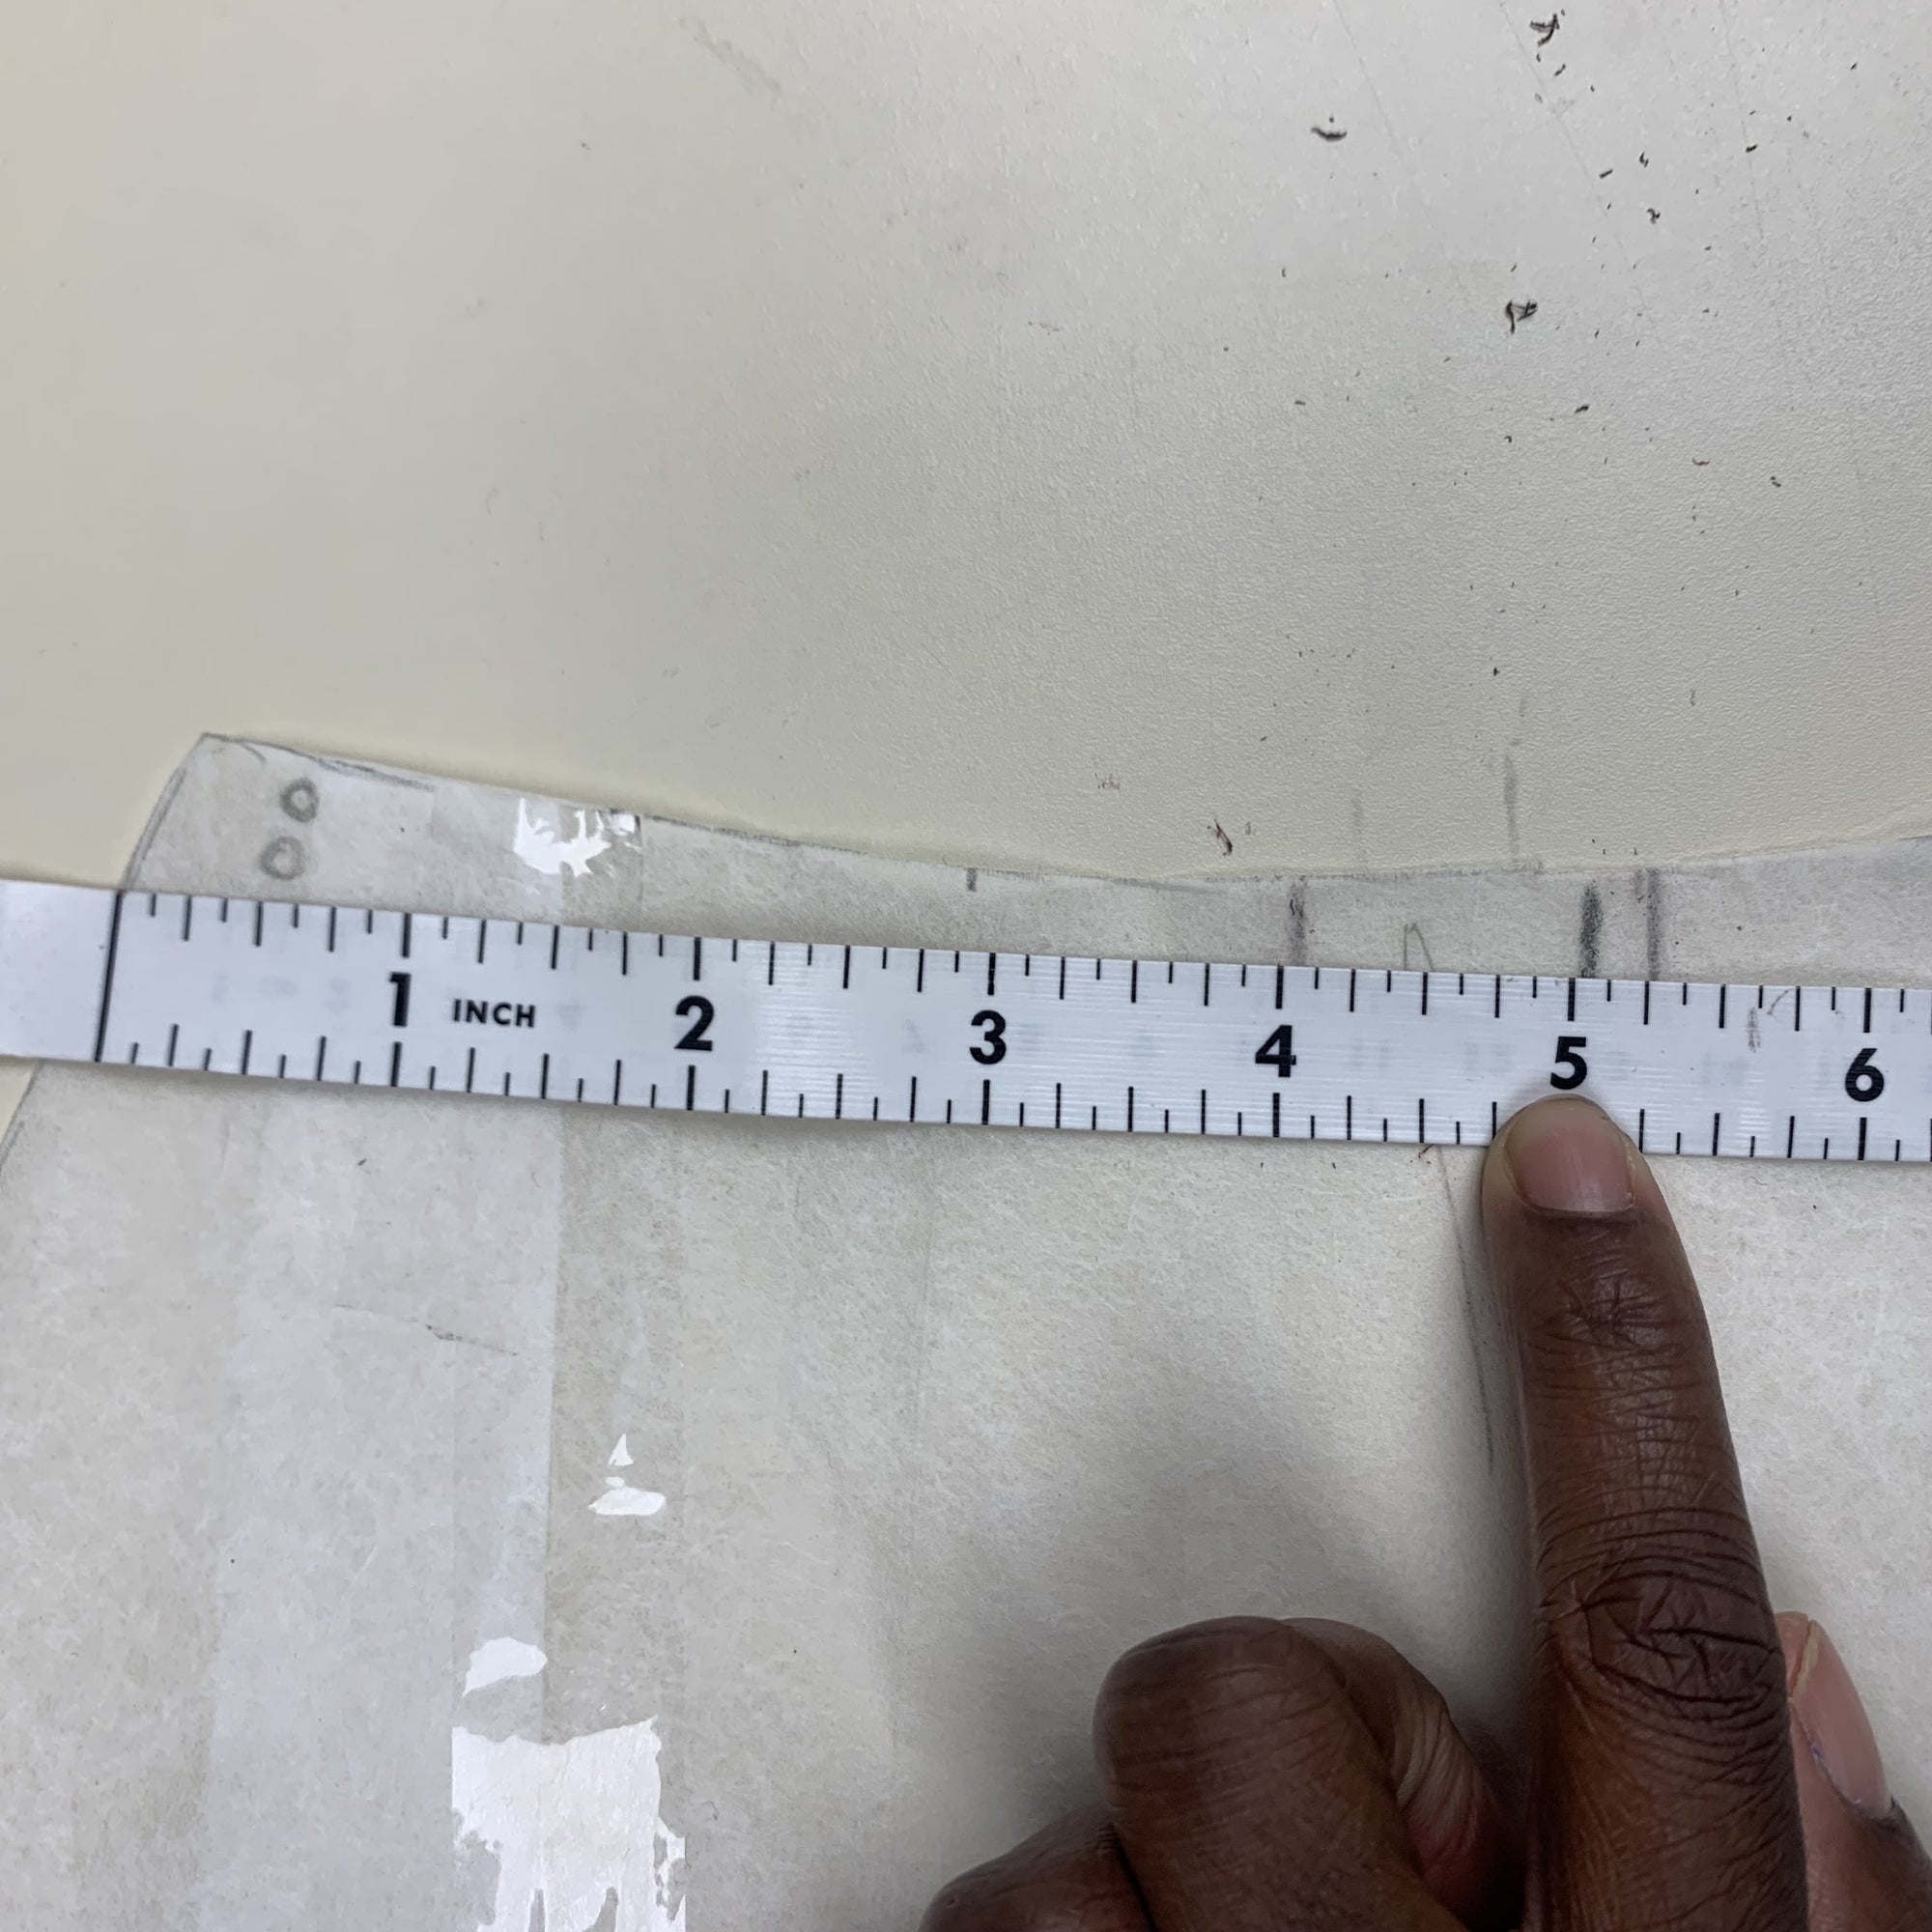
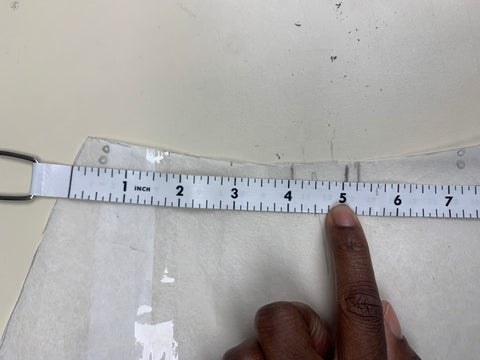
Taking the gathers out was a little confusing for me, but this is how I figured it out. I measured from my cutting line to the square for my size on the Waistband. This square signifies where the Back piece B and Side piece C meet. For me, this was 5 inches.

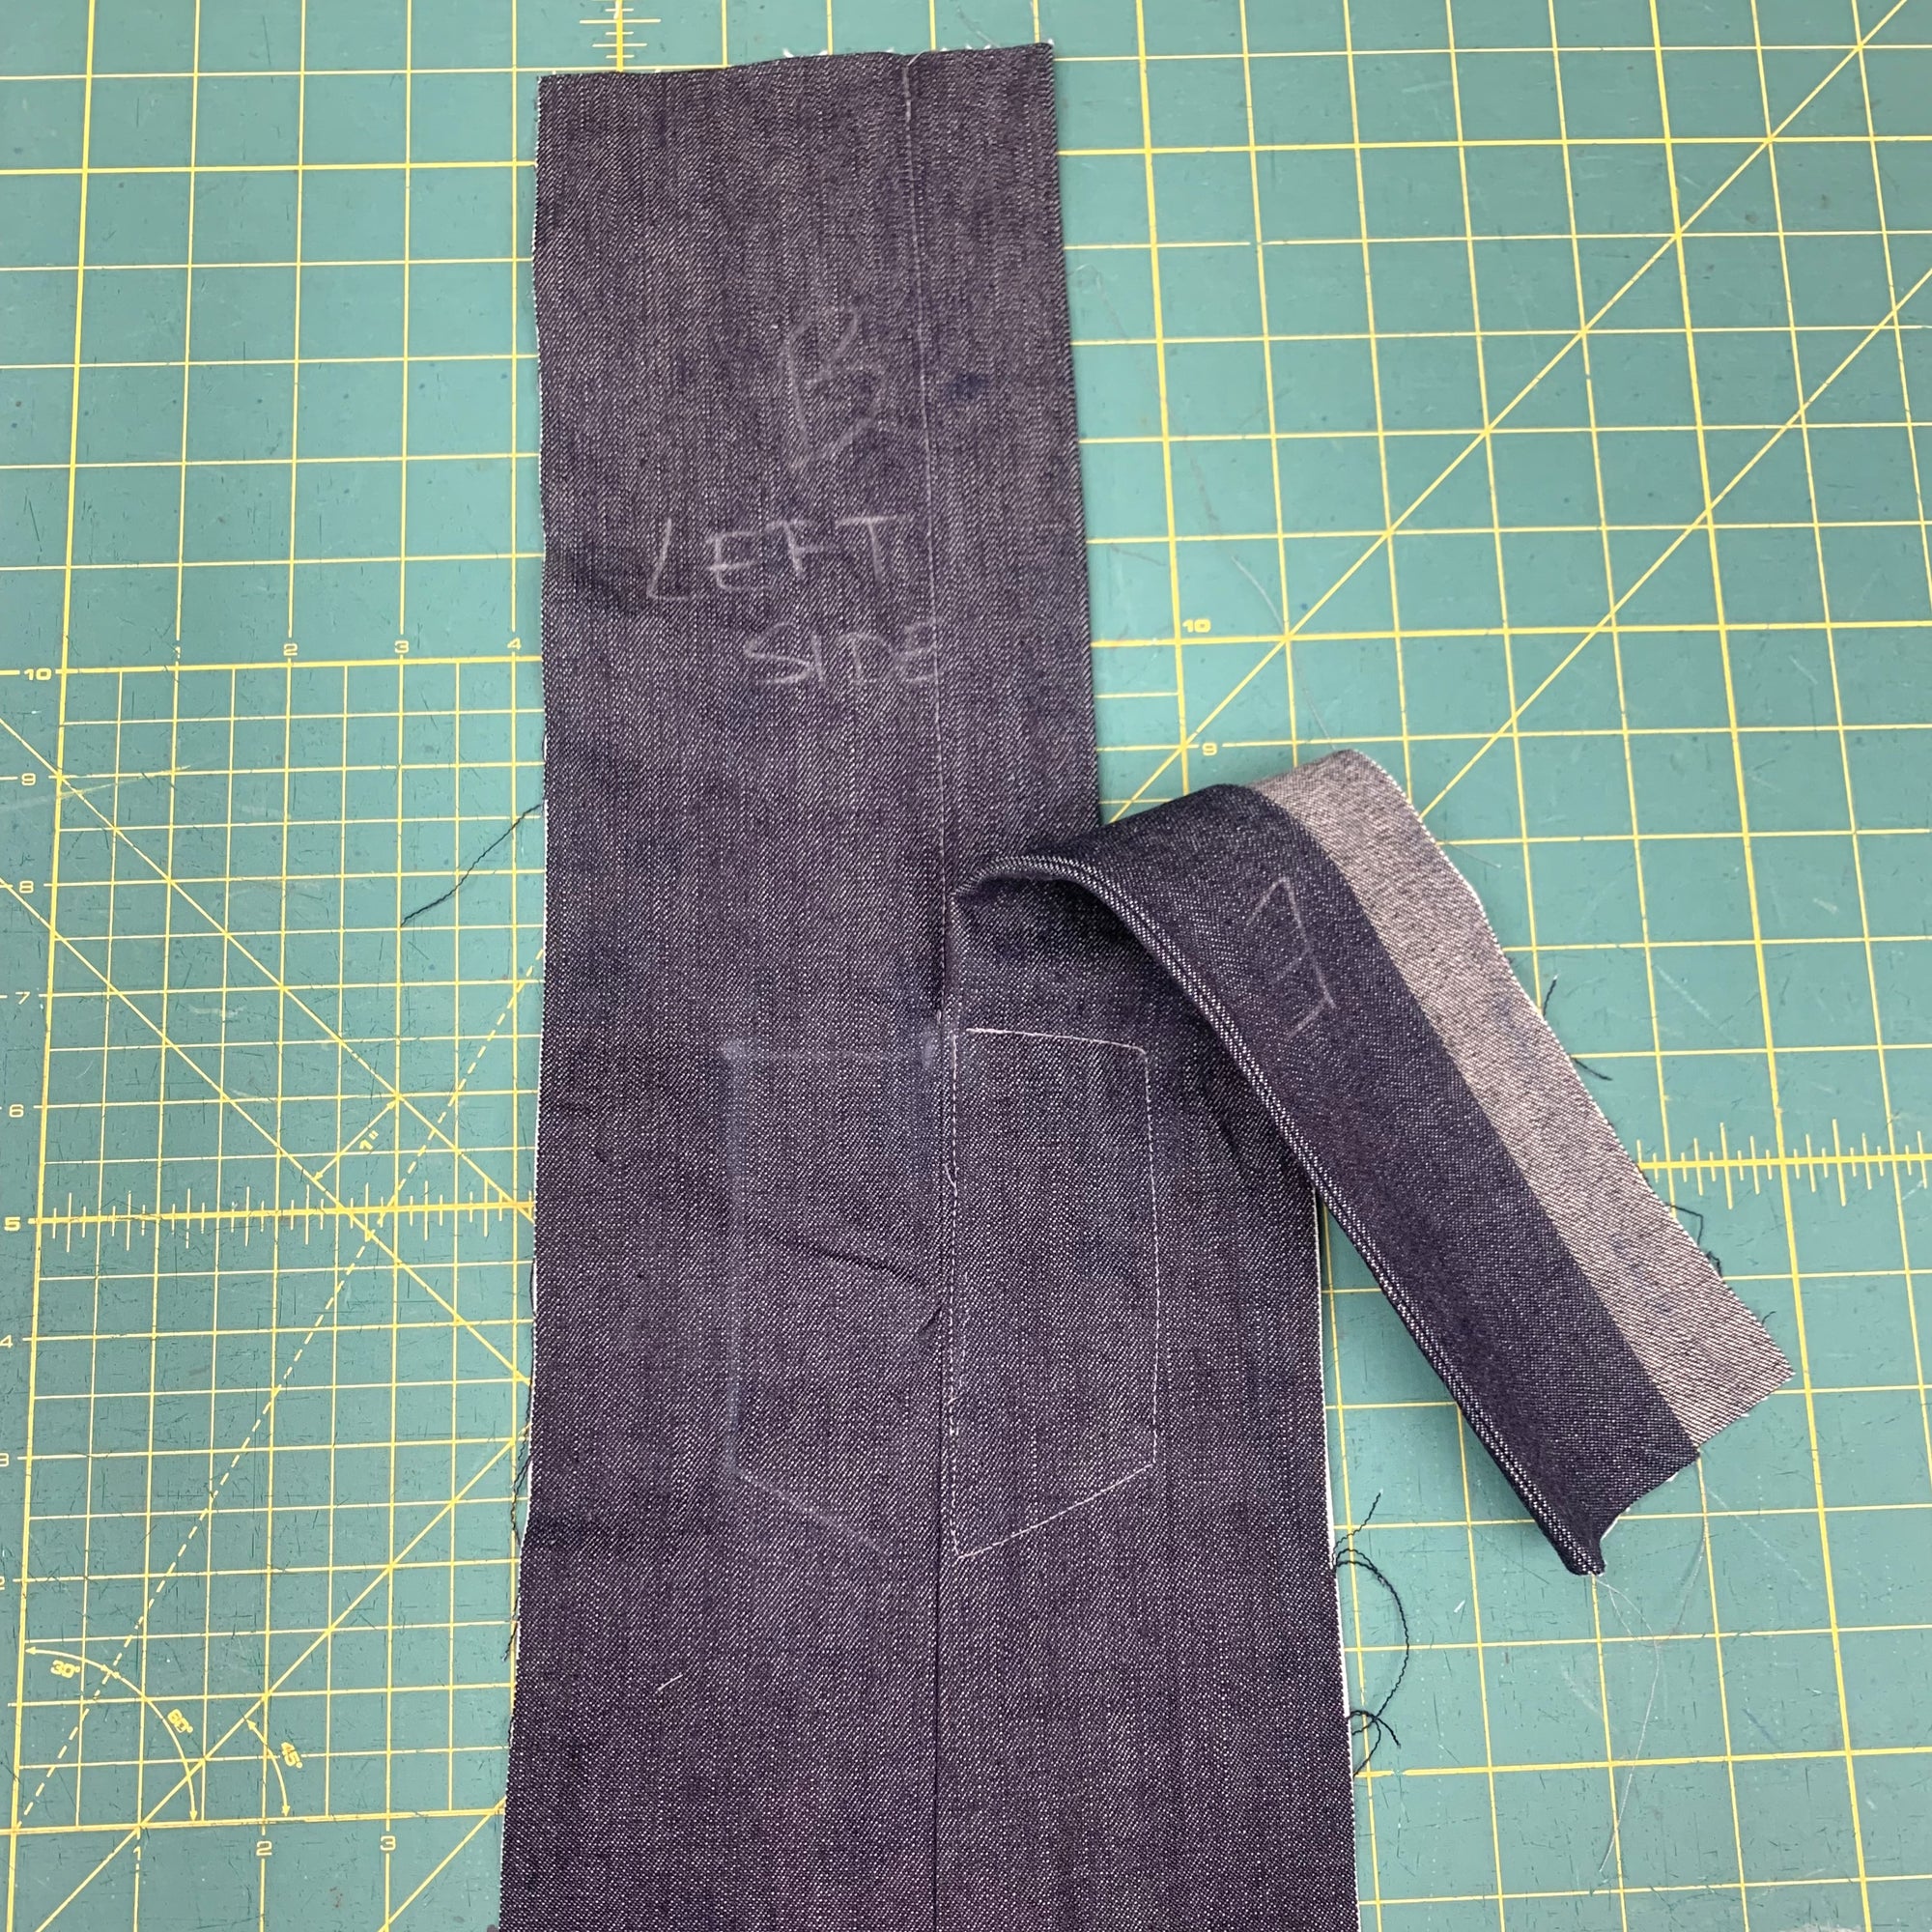
Then, I took that measurement and measured from the side of the back B pieces toward the center back, and I drew a line to show where I would fold out the pattern to eliminate the gathers. So, 5 inches from the cut line on my Back pieces, I drew a line to show how much I wanted to take out from the Back.
I folded the Back pattern piece lengthwise along this line.

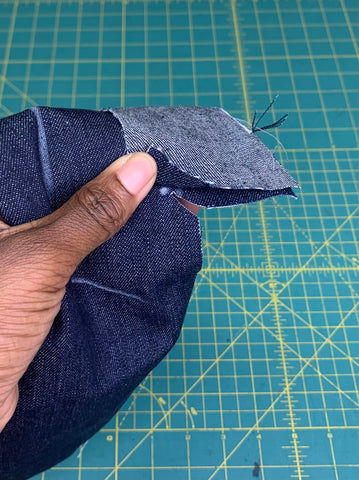
Then I folded the Back again to create a pleat so that the 1/2" (13mm) seamline (and mark where the dots are) lands just outside of the first fold I made.

This is what my piece looked like after I made this adjustment. This does take some of the width of the skirt at the hips and bottom out, but for me, this was not an issue. You could make a dart on the skirt back instead. Or just fold out a dart at the waist of the skirt pattern piece.

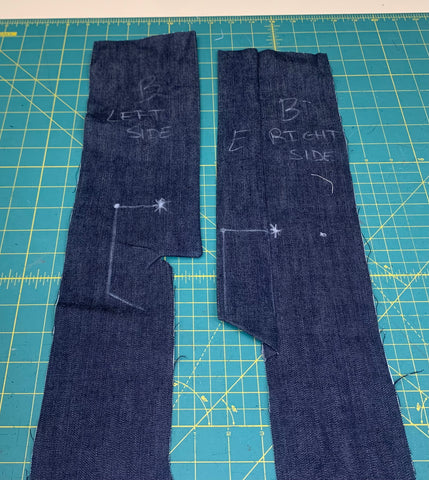
I'm in between Folkwear sizes Small and Medium, so I wanted to graded the pieces a bit to fit my body. I drew a gradual line from the size small at the waist to the size medium about 3 inches down from the waist. I did this to all the skirt pieces after I took out the gathering for the back piece B above, which maybe I should have done before, but I wanted a flat pattern piece to make the rest of my fit adjustments.


By Esi Hutchinson
Plackets serve important functions in the history of garment making, they provide a neat and finished look to the garment, as well as making it easier to put on and take off clothing. They occur at necklines, wrists, waists, and occasionally at ankles. A fastener, such as a button or snap, is often used to secure a placket closed. Not only functional, but they can also be incorporated as a decorative design on your garment. They can be designed in various ways, such as hidden plackets, exposed plackets, or decorative plackets with contrasting fabrics or unique stitching patterns. These design elements can enhance the overall look of the garment, making it more visually appealing and fashionable, as well as functional. Some Folkwear's patterns that exemplify the differences and similarities of plackets are 212 Five Frontier Shirts, 204 Missouri River Boatman's Shirt, 206 Quilted Prairie Skirt, 102 French Cheesemaker's Smock, 116 Shirts of Russia & Ukraine and of course the featured pattern this month February, the 209 Walking Skirt.
Today we are providing you with a tutorial on making the buttoned placket for this pattern, 209 Walking Skirt. This tutorial will show you exactly how to manage sewing this particular placket. Plackets can be tricky at times, but making sure you line the pieces up exactly and in the correct way makes a huge difference.
For this tutorial, I've labeled all the pieces required for assembling the placket and I've cut the back skirt pieces so that you just see the top center backs (so that you can easily see how the placket goes together). You will need the left and right Skirt Back pieces B, Facing D, and Placket E. Be sure the Skirt Back pieces are cut out at their designated cutting lines that are indicated on the pattern piece (the left side extends further out than the right side). NOTE: on some versions of the pattern, Facing D should be cut with the printed part of the piece face down on the fabric. If your fabric is the same on front and back, this does not matter. But if you have a wrong and right side of the fabric, you will need to flip this pattern piece over when cutting to get the notches to line up correctly.
Also make sure you transfer the dots, stars, and top stitching lines onto the pattern pieces. It also is a good idea to label the left and right side of the Skirt Back pieces just to make it easier.


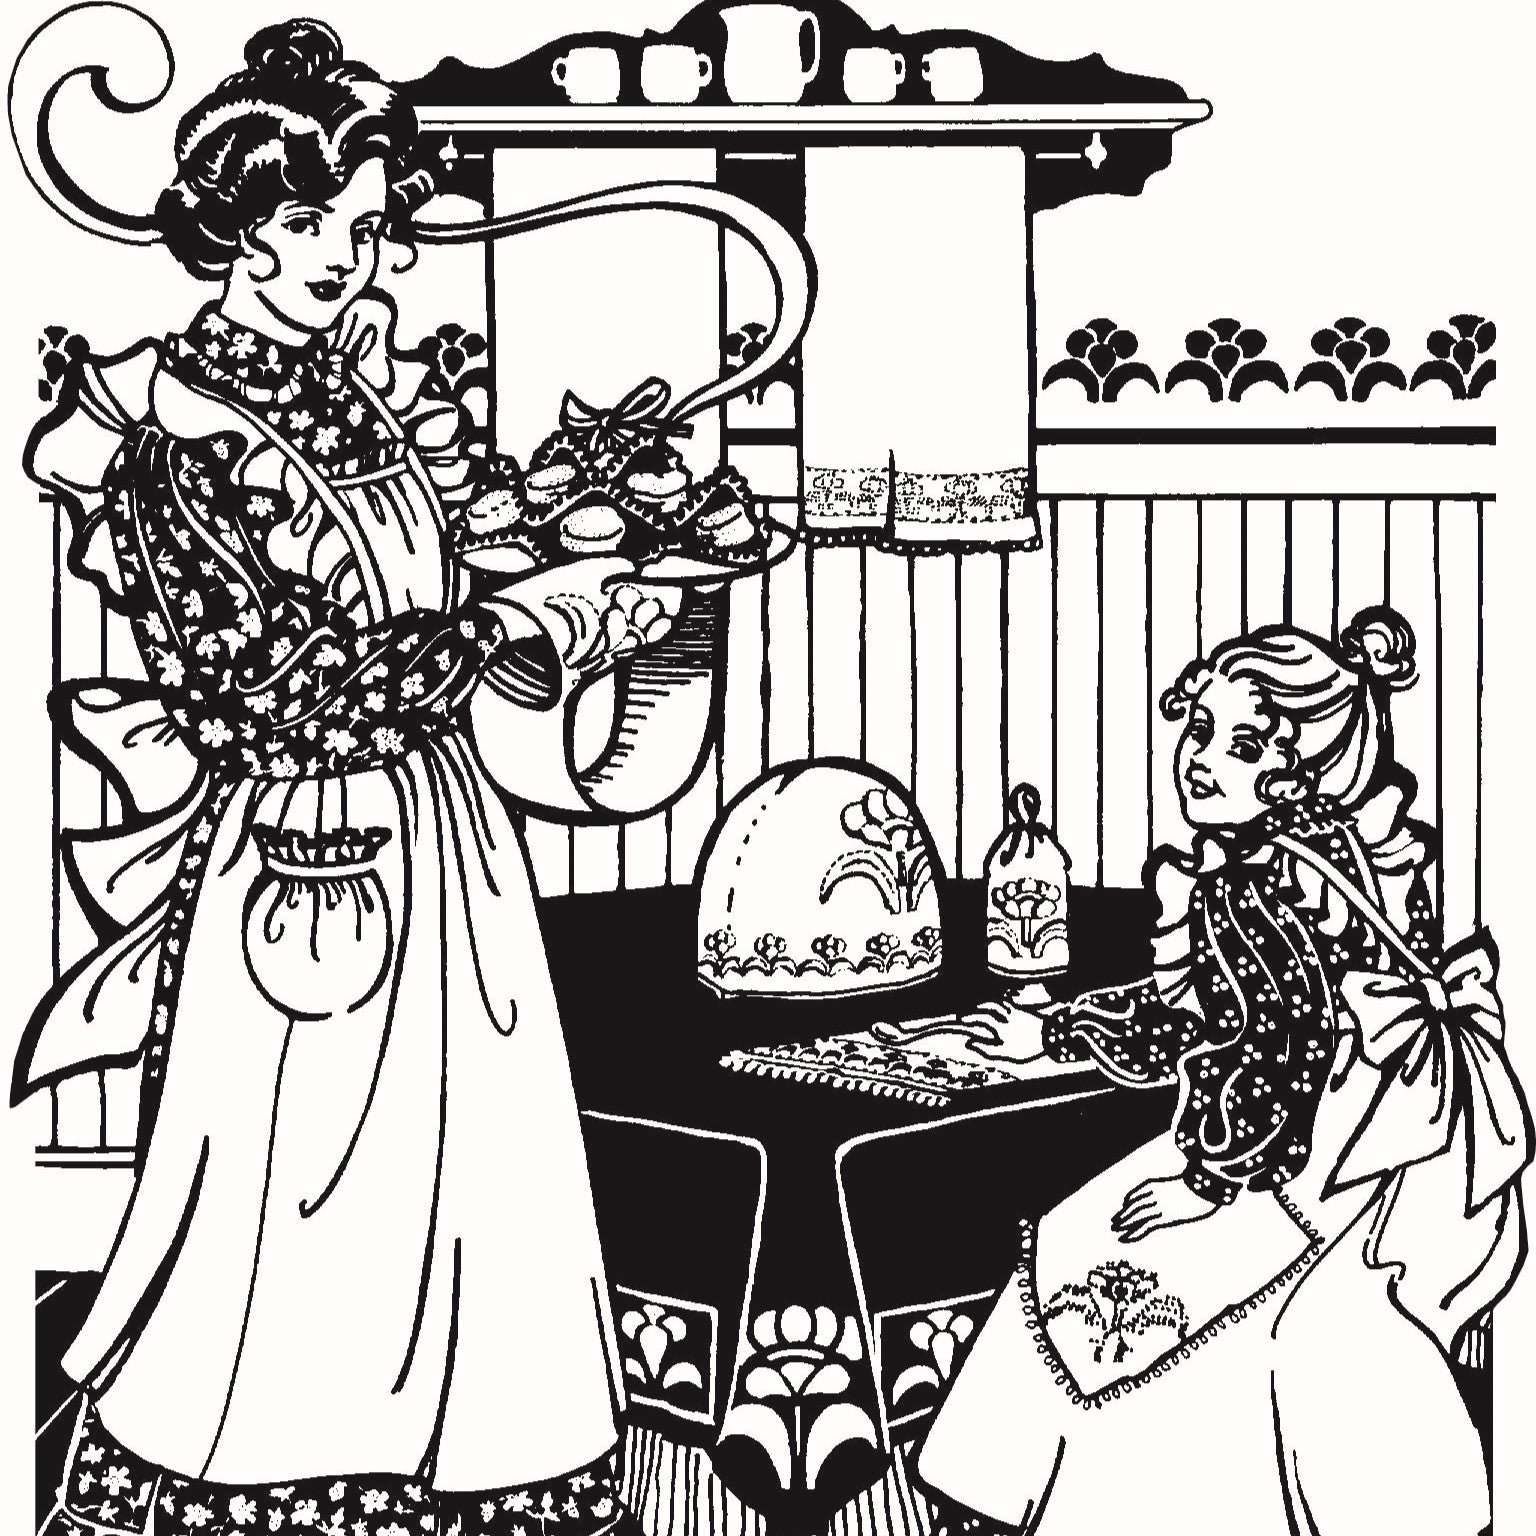
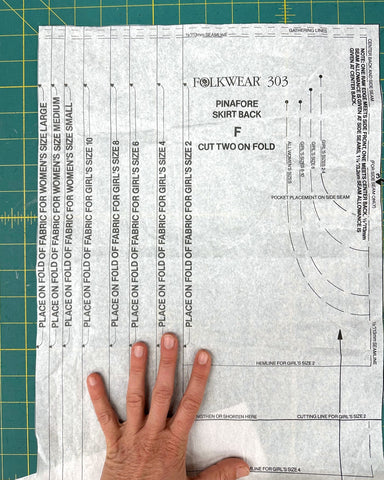
We have been excited to get our 303 English Cottage Kitchen sewing pattern back out into the world! It is such a great pattern with so much to make inside of it, and so much information and sewing inspiration. It is certainly beloved for the pinafore apron that can be made for girls (sizes 2-10) or for women. The size range for the women's apron is somewhat limited, so we wanted to include a tutorial on sizing this pattern up.
In general aprons are very adjustable. They don't close in the back so you have usually have ample room for different sized bodies. The pinafore version of this apron does close in the back with buttons. So if you are making the pinafore, in particular, you will want to make sure the waist fits your body. The other parts of the apron that might need adjustment are the skirt and the bib. By design, the bib is fairly small, so a larger bust might want a little more coverage. However, it is up to you! The final adjustment that might need to be made would be for the straps. If you have large shoulders or back, you may want to make the straps a little longer.
This blog post will show you how to make all these adjustments. Plus, we have a video that shows how to make the adjustments on the pattern as well!
Waistband
The waistband is sized by waist size. You can choose the size closest to your waist measurement. There is about 1.75" (4.4cm) of ease at the waist, however if you are going to have a closed back apron/pinafore, you will take up about at least 1" (2.5cm) of this ease with a button and overlap. So keep that in mind.
Each size up for the waistband adds 1/2" (12.5mm) to each end of the waistband. So if you want to make a waistband for a 31" waist, you would add 1/2" (12.5mm) to each end of the waistband. If you want a waistband for 32" waist, add 1" (2.5cm) to each end of the waistband, and continue that pattern for each size up you want to go.

You can see there is a 1/2" (12.5mm) between each waistband size.


Mark 1/2" increments for each size up you want to make the waistband larger.

Be sure to do this to both sides of the waistband!
Apron Skirt
You may or may not need to adjust the apron skirt. The top of the skirt is gathered into the waistband, so especially if you are making an open-back apron, you may be able to just cut the largest size skirt for women and be done. But, if you want it to button in the back (like a pinafore), you may want a little extra room. The largest size of skirt finishes at about 53" (135cm) at the hip, but you will loose an inch or so if you are adding buttons to the back. So if you want to add more room in the skirt, you can just add to the folded edge of the Front and Back of the apron skirt and even amount.
For any Skirt and Waistband adjustments, be sure to gather the skirt evenly into the waistband. You may need to adjust the marks on the waistband for the sides seams (or ignore them) and just make your skirt gathers evenly all the way around the waistband.
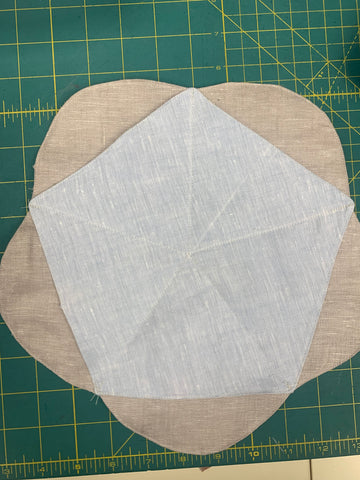
Apron Bib
The apron bib is fairly narrow, but also fairly tall. You probably won't need to make adjustments for height on the bib, but if you do, you can draw a lengthen/shorten line above the notch on the bib and lengthen it as needed. Be sure to adjust the star notch on the straps (or ignore it) when you got to put the strap on the bib if you adjust for height.
To make the bib wider, you can add to the center at the fold. Add the extra width you need, and be sure to remember that whatever you add there will double. So if you add an extra inch to the center fold line, you are adding 2" to the width of the bib.


Here I am adding a 1/2" (12.5mm) to the center of the bib pattern piece. This will add 1" (2.5cm) to the center of the bib and to the width of the whole piece.
The bib is gathered at its bottom and top. To add a little extra width, you can also not gather it as much as indicated by the notches on the waistband (and by the bib stay, but we'll get to that in a minute). Again, either ignore the notches on the waistband or adjust them to the width you desire. However, do line up the center of the bib (notch 6) with the center notch on the waistband so everything comes out evenly.
If you are making the bib wider (or just not gathering it in as much), you will also need to adjust the Bib Stay. This is a small rectangle of fabric that goes over the gathers at the top of the bib to create a ruffle at the top of the bib.
The Bib Stay is a simple rectangle. You can add 1/4" (6mm) to each side for each size up you want to go. OR, add the extra length you need to get the size you desire.

Here I used my ruler to add 1/4" (6mm) to one end of the Bib Stay to make it a size larger. You can add as much as you need to get the width you want for this.

Be sure to add the same amount to the other side of the bib stay as well!
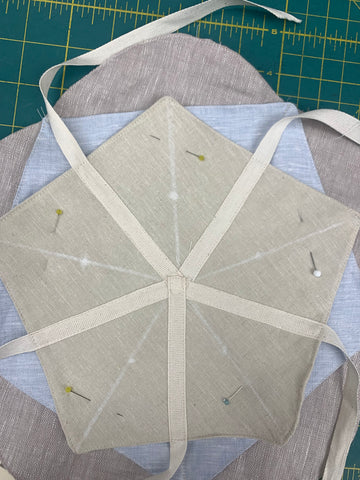
Straps
Your straps may or may not need to be adjusted, but if you have large shoulders or back, you may want to add some length to them. The longest straps are 33" (84cm) and cross in the back. There is a little extra length built into them so you already have some adjustment room. But, you can easily add length to the front and back of the strap. Again, use your ruler to add the same size increment to create larger sizes for the straps. Do this to the front and back of the straps.

Back of the strap with markings for adding larger sizes (just as the waistband).

Front of the strap with length added for larger sizes. Be sure to add to both sizes.
Another thing to note about the straps, is that adding length to the straps will make the notches on the bib and strap not match. You can adjust your notch on the strap by the same amount you added to the strap front, or just match the pieces together and ignore the notches.
If you lengthened the straps, you may or may not need to adjust the Strap Ruffle. If you didn't add much length to the straps, you may not need to adjust the ruffle since it is gathered and will easily gather into the strap. If you don't adjust the ruffle and you added a lot of length to the strap, your ruffle just may not be quite a full as normal. However, if you want to, you can adjust the ruffle by adding length to the ends or at the shoulder. Just extend the ends by the amount you want to add. But if you want to add more than a 1/2" (12.5mm), you can add to the shoulder. Just cut the pattern piece at the shoulder line and spread apart the pattern by the same amount that you increased the straps (or as much as you want to add), then tape a piece of paper in place to keep the new length. This will also keep the ruffle very full.

Ends of strap ruffle. You can add a bit to these ends to make the ruffle longer.
Or . . .

Add length to the Strap Ruffle at this shoulder line. Spread the tissue apart here to add length.
You can always add extra buttons to the strap ends with a few inches between them so that you have an adjustable apron for different sizes. You can do this with both straps (instead of sewing one side to the skirt waist).
I hope this tutorial helps you to adjust the sizing of this apron. If you have questions, let us know at info@folkwear.com. Or drop a question in the comments below!

by Esi Hutchinson
Are you tired of your biscuits getting cold too quickly? There is a way to keep them warm and toasty for longer. Well, Folkwear has a solution to your biscuit woes: the biscuit cozy! From the 303 English Cottage Kitchen which has many kitchen accessories, this is my personal favorite. I love making sweet potato biscuits, and now that I can make a biscuit cozy (which I didn't know even existed), my biscuits can sit in the most darling looking cozy to keep them nice and warm when I take them to a potluck or to a breakfast table.
This project is also a good way to use scraps. However you should use sturdy fabric such as canvas or twill, and one that is easy to wash. If you don't have fabric that's sturdy on its own you can use interfacing as I will show you below.
I used interfacing for each layer because I wanted to use a linen we had and it was not very sturdy. So, I cut two fabric pieces instead of one for each layer as well, because I didn't want the interfacing to show on the wrong side. If you are using sturdy fabric and don't need interfacing, be sure to know that the wrong side of the fabric will show in this biscuit cozy.

Cutting one interfacing piece.

I applied the interfacing to the wrong side of one piece for the bottom.

Right sides together, I sewed the two pieces together for the bottom layer of the cozy, using a 1/8" (3mm) seam allowance. I also left enough room open to turn the piece right side out. Once turned right side out, I slipstitched the opening closed. This was now my bottom layer.


Do the same for the rest of the layers.

Next I sewed on the ribbons. As instructed, I cut ribbon (or twill tape) into three lengths: one 9 in. (23cm) and two 18 in. (46cm).
I pinned the shorter ribbon on one of the stitching lines for ties on the TOP LAYER and stitched along both long edges of ribbon.
I sewed the longer ribbon along two opposite stitching lines for the ties, pleating it at the center. Then I stitched the remaining long ribbon along the last stitching lines for the ribbon, covering the ribbon edges at the center.

Then, I stitched the wrong the side of MIDDLE LAYER to right side of BOTTOM LAYER from the center to each corner of the Middle Layer, matching stitching lines at the center.
Next I pinned the wrong side of the TOP LAYER to right side of the MIDDLE LAYER only. DO NOT catch in Bottom Layer. I stitched along the stitching lines from small dots to the corners of the Top Layer. This part was a little tricky. If you can't make it to the dot of the stitch line that's okay, just get as close as you can.
Look how cute!!! I love it, all I need are some biscuits!

Say goodbye to cold biscuits! I'm sure there are other ways to keep your biscuit warm, but this has been the best looking so far in my opinion. The next time you bake a batch of biscuits, don't let them go cold, give them the warmth and comfort they deserve with a beautiful biscuit cozy.

by Esi Hutchinson
We have just reprinted the 303 English Cottage Kitchen pattern again after many years of being out of print. And what I especially enjoy about this pattern is the authentic detailing, which gives tips and how-to's, on stenciling, quilting, embroidery, and how to make your own tatted lace. On the whole this pattern is perfect for tabletop accessories, napkins, placemats, tablecloths and more that just brighten your experience when eating your favorite meals and having a cozy time at home.
Are you looking for a fun and creative way to add a personal touch to your home decor? This blog post will focus on making a stencil out of the floral designs given in this pattern. You can add them to your linens, to your furniture, to your clothes! This post is helpful to refer to in addition to the pattern instructions on stencils.
The earliest evidence of stenciling can be traced back to ancient Egypt, where stencils were used to decorate the walls of tombs and temples. Stenciling techniques were also widely used in ancient China and Japan to create intricate designs on fabrics and ceramics. Its a great way to duplicate designs you want to use more than once.
You will need: Stencil paper, or something sturdy like carboard or cardstock , fabric paint, blade knife, and a cutting mat.
Before you begin stenciling, make sure your surface is clean and free of any dust or debris. You may want to use painter's tape to secure the stencil in place or you can use fabric weights.
Cutting the Stencil
I printed out the stencil and cut out the design. I then taped the design down on to the stencil paper and started cutting the design out.
Make sure your blade is sharp and go slow, try to cut as clean as possible.


I cleaned up the edges of the stencil.


by Molly Hamilton
We are very excited to bring this special pattern back into print! The 303 English Cottage Kitchen is a treasury of sewing patterns for lovely kitchen items that will make any kitchen feel like a sweet and cozy place to cook and eat and visit. This pattern has been out of print for many years, but was the very first Folkwear pattern I ever owned. It appealed to my sense of creating a home wherever I was. I could imagine making tea and scones, and sitting in a chair by a table with my tea pot covered by a tea cozy and set on a placemat. There would be a vase of peonies and a sweet little tea towel too. Ideally, I would have all this set in a garden or maybe a cozy kitchen overlooking a garden. But it was also perfect for whatever apartment or room I was temporarily renting - to give me that feeling of an idyllic, romantic cottage. Sometimes that is the power of sewing patterns - to help you envision a look, a life, you want. Or to just give your imagination some fun exercise.
We have brought this pattern back as a paper pattern for those who prefer a physical pattern and a PDF version for those eager to sew it as soon as possible. The PDF pattern has copy shop versions (A0 and 36"). There is a print at home file (with all the page numbers noted for printing the different items - so you don't have to print it all to get just the placemat, for instance). The A0 and print at home versions are layered for printing the kitchen items or the apron (and apron is layered by size). And for the first time, we have a projector file as well! Sewing instructions and detailing are also included, of course!
We loved this pattern so much that we even have a few items from this pattern that we have released as free patterns over the years, but 303 English Cottage Kitchen as a whole is exceptional. Not only do you get sewing patterns for a tea cozy, egg cozy, placemats, napkins, oven mitts, tablecloth, and an apron, but you also get all the instructions for adding designs to these items. The pattern provides 8 pages of instructions on stenciling, quilting, and embroidery as well as several interchangeable designs for flowers to stencil, quilt, or embroider onto the kitchen items. Or make up your own designs, and using the instructions provided, add them to the things you make! Plus there are instructions for tatting your own lace! It's not that hard. On a side note, my great grandmother (born in 1898) told me many years ago that tatting lace was her favorite handwork. After seeing this pattern, I can understand why. I thought it was impossible until I read through the instructions here.

Stencil design for 303 English Cottage Kitchen. We will have some tutorials soon about using this pattern.
Stenciling information is given for application to a floorcloth, as well as instructions for how to make a floorcloth. Floorcloths were used in the 1700s and 1800s to protect floors (and rugs) and to insulate rooms, but they were also decorative and often covered in stencil or painted designs.


I don't know what my favorite item in this pattern is, but I do love napkins. And they are a great way to use smaller sections of fabric. They also make wonderful gifts. I really enjoy the biscuit cozy as well. It is so cute and makes presenting biscuits (or scones or cookies) memorable.

Many of these patterns are perfect for using smaller sections and scraps of fabric. And, they make wonderful gifts.
I also find the apron to be romantic! The words Apron and Pinafore are often used interchangeably in this pattern, but I generally call the garment an apron. However, it can be a pinafore, especially if made for girls. The pattern is sized for women (SM-LG) and girls (2-10). We will have some tutorials for sizing the adult apron up very soon. The Pinafore apron pattern can be made so that the skirt buttons in the back and the bib straps are buttoned in the back. And, it can also be made like an apron, with the waistband ending in a large sash which is tied in the back (and apron is open in the back).

All this to say, we are thrilled to be re-releasing this pattern and re-introducing it to you! If you have any questions about this pattern, let us know! We are glad to talk more about it, and we hope you enjoy it as much as we do!
by Molly Hamilton
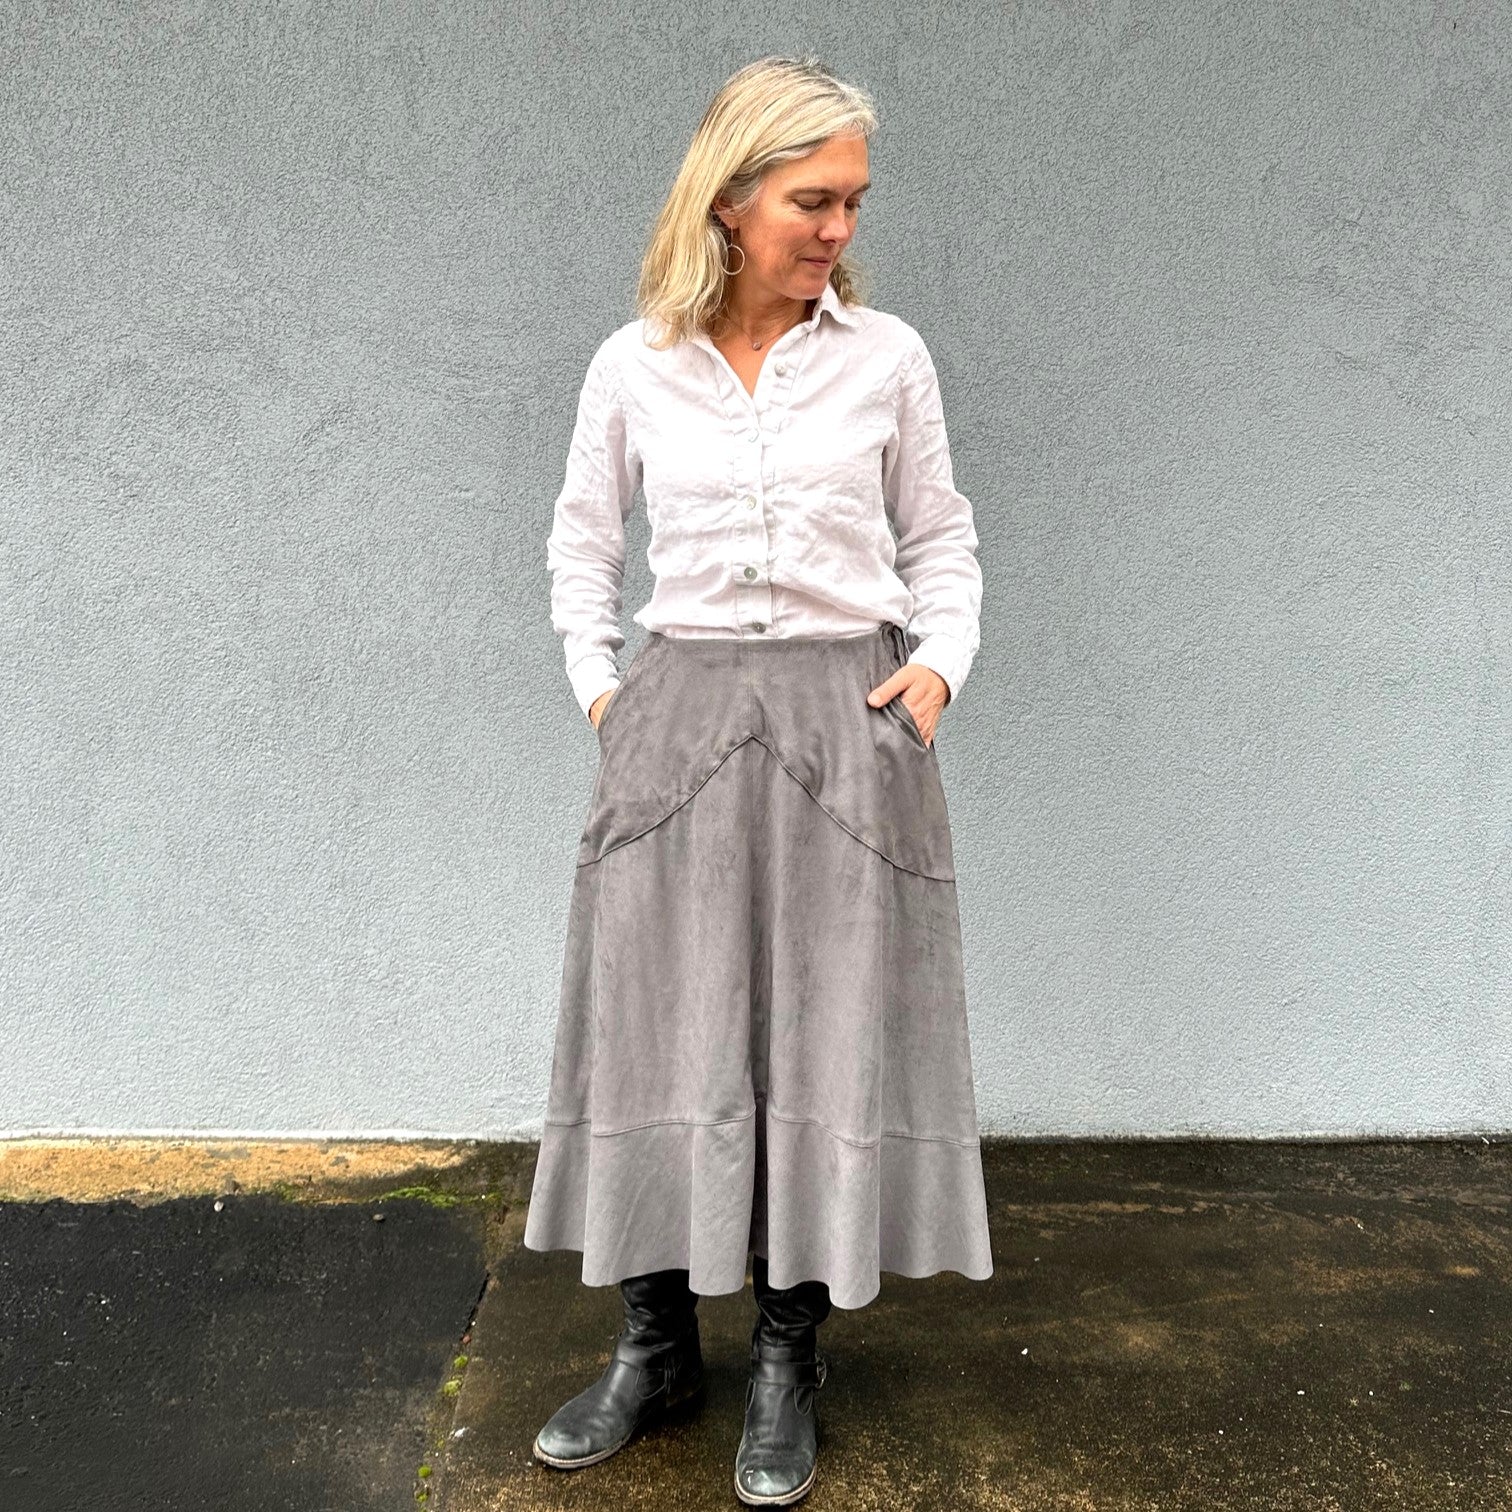
When we picked the 243 Rodeo Cowgirl Skirt sewing pattern to feature this month, we got excited about the possibilities. All the different yokes, hem treatments, fabrics, embellishments to choose from! It was almost overwhelming. We had a great time making a Pinterest board of inspiration, and narrowed down some possibilities in this blog post. Esi made a beautiful skirt with some lovely floral silk and Western flair hem applique.
I went a slightly different direction with my skirt. There was a version I saw where the almost one-toned leather skirt laced on the side and had a slightly darker very small yoke. I remembered I had a nice length of grey Ultrasuede that I thought would make a great Western-style skirt. I loved the way the fabric moved and the texture it had. I decided to make View B of the pattern. View B has a skirt that is cut a little bit shorter and has a flounce sewn to the bottom of the skirt. The flounce was a good fit for this fabric because of how well it moves. And I wanted it to lace with long laces on the side.
My Modifications
The Ultrasuede had a little bit of stretch to it, so I decided to cut a size smaller than I normally would. I fall between the Small and Medium in Folkwear's grade rule, so I decided to cut a Small for this pattern. I really didn't want a skirt that ended up being too big because of the stretch. The front and back skirt facings help stabilize any stretch also.
I also moved the back plackets to the left side of the skirt. These plackets are for the laced closing, but I wanted mine to be on the side. This meant that I treated the left side of the skirt as if it were the back in the instructions for the placket and laces. I sewed the back up with one seam instead of putting in any closures. I was a little worried that having the placket and lace on the left side of the skirt would interfere with the pockets, but it really did not. I just had to be careful of not catching the pocket/front yoke in the stitching when I stitched down the plackets. Of course, you can make this skirt with a zip closure (as Esi did and shows you how in her post).

Here you can see the placket I sewed onto the skirt on the left side of the front (it will be on the wearer's left, but here it is on the right side of the skirt piece).

For the front yoke pockets, I wanted my yoke to be one smooth arch, instead of scalloped as the pattern shows. I traced the pattern, used a curved ruler to make a new cutting line, and then had a new pattern piece to use.

Original front pocket yoke with scalloped edges traced on paper.

Here you can see where I connect the two peaks of the scallop with the curved ruler.

You can see the new line drawn with the hip curve ruler. This will be my new pattern piece.
I topstitched all the seams. On the side seams, I pressed the seams to one side and stitched (like a faux flat felled seam), and for the center seams at front and back, I pressed the seams open and topstitched on each side of the seam. I pressed the seams toward the skirt at the flounces and topstitched there. I trimmed the seam allowances for all seams. Since this fabric is a little thicker than a similar cotton or silk, I wanted to reduce bulk where I could. I also used a longer stitch length than normal when topstitching.

Close up of the topstitching at center front and at the flounces.
For the ties, or laces, I used long strips of fabric left over from cutting out my pattern. I used the lengthwise stretch (or "grainline) since it felt the most stable when pulled. If you are making this skirt with laces, I think a soft leather would be amazing, but you can also use twill tape (which comes in many colors) or make your own bias tape. I think bias would work better than a straight grain woven fabric to give some flow to the ties and string.
I did not hem this skirt! The Ultrasuede does not ravel at all, not does it roll. So I just trimmed it up to be completely even, using a curved ruler where I needed to.
Sewing Tips for this Pattern
First, a very important tip for View B that I would use next time for sure, would be to label your flounce pieces clearly. Label front and right and wrong side of fabric as well as center fronts and backs. I had to rip out nearly all of my flounces because I put them in backwards on each piece! That was a huge pain. The flounces have notches that indicate front and back and side. There is one notch for center front, two notches for sides, and 3 notches for center back. But if your fabric is the same on each side (as mine was), it is easy to switch them around. I would even caution that you should label your skirt front and back fabric pieces also. They look very similar and it is easy to confuse them.
The yokes call for a lining in this pattern. You can make and attach them, as Esi did, by folding in a hem and stitching down, but for the front pocket yoke, a fabric lining is best. You can use the same fabric you are using for the skirt or yoke, but if it is a thick fabric, it is not ideal and will add quite a bit more bulk at the seams. I used a Bemberg silk to line my pocket yoke and it worked really well and hardly added any bulk at all.
Also, when placing the yokes on this pattern (or even the hem applique), I would baste them by hand (or maybe by machine) to get them to lay even and flat when you are working. For this yoke, you can stitch from the center to the edge for each side. This technique is the best way to do the yoke. You could also use the sticky seam tape at the seams of the yoke and appliques so they don't shift while you are stitching.
Finally, I hand sewed my eyelet holes for the laces. At first I thought I would put in grommets, but I decided to try hand stitching the eyelets. I cut the holes in the fabric with a grommet punch tool which was by far easier than trying to cut with scissors or even making a hole with an awl. I needed the holes to be big enough to easily sew a blanket stitch around the edge. I also needed to get through several layers of fabric. The punch in the grommet tool was perfect. I punched where I'd marked the lace holes (from the pattern) and I used a tiny pair of scissors to trim any bit of the hole that did not get cut completely.

The tool I used to cut the holes for the laces.
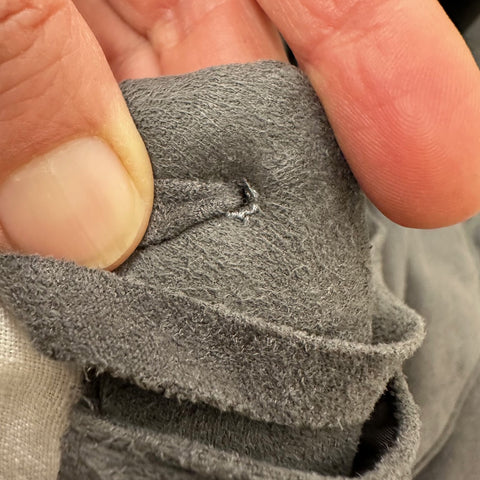
Close up of the hand finished lace holes. This fabric is forgiving and my stitching is not nearly perfect, but you can't really see it!
I really like this skirt! It came out very much as I imagined. I loved finding a great pattern for this fabric. And I am glad to have another winter skirt! Here I am wearing it with my version of the 212 Five Frontier Shirts - and you can see the details of how I made this shirt here.


