- Home
- About
-
Shop
-
Sewing Patterns
-
Fabric
- Sewing Supplies
- Folkwear Clothing
-
- Blog
- Customer Gallery
- Contact
November 29, 2023

by Molly Hamilton
Adding monograms to garments is quite an old tradition. It seems to have originally started as a way to identify things belonging to high ranking people and therefore was also a status symbol. However, eventually monograms also became more practical (though still often for the privileged). By the 16th century, when people sent their laundry off to be washed, having their initials monogramed on the garment allowed it to be easily identified and returned to the correct person. This was especially helpful for undergarments, like the chemise.
Our 223 A Lady's Chemise pattern includes an alphabet in Victorian script that you can use for adding a monogram to the chemise. Of course, you can add a monogram to nearly any fabric - tablecloths, napkins, handkerchiefs, shirts, quilts etc. Monograms can add a bit of elegance to these things. It also adds some personalization to your garments or items. And monograms can make a sweet addition to gifts (especially baby gifts). We have a free pattern and tutorial for a Victorian potpourri sachet, and it is perfect for adding a monogram to. Small and simple, and you can try out different lettering if you make a few of them. Monograms can also be used to sign a special garment or quilt, using simple stem stitch, to identify the maker of the work (of art!).
There are many options for how you make a monogram. You can make your own design (as monarchs of old did) with your initials, combining them or overlaying them with your own special flourish. You can make very plain, simple letters in a straight stitch or embellish them in fancy fonts. Fonts can be romantic and Victorian with lots of scrolling or it can be block script or Art Deco style fonts. You can cross stitch your letters - using waste canvas or free-handing the letters. You could couch stitches so that the thread looks like handwriting. I learned shadow work at a ThreadWritten monogram workshop which was very interesting and simple. On a side note, I highly recommend Sarah's workshops at ThreadWritten, and her monogram workshop is fun and informative.

Medieval monograms from Byzantine empire - these were made of stone and used to press lead.

Royal monogram on metal from the 1700s in Europe. These combined letters (and a number) into a monogram to identify the royal.

White on white embroidered monogram in block letters with chainstitch and knotted embroidery around it. Pinterest link.

A simple block letter monogram made with satin stitch. Pinterest link.

At deco style lettering that can be used for embroidered monograms. Pinterest link.

A fancy script, cross stitched monogram. Cross stitch can also be used to make very simple letters. Pinterest link.

This is a handkerchief that I have that has been in the family a long time. The H is embroidered in scroll and with a nice satin stitch.

This is on the other side of the same handkerchief. Most likely commemorating a marriage with the year of the marriage. The letters are a bit fancier and much smaller and also done in satin stitch. Note the threadwork hem also. I think the letters are MAS and OGH.
Monogramming Your Garment
Monograms don't have to be perfect. They can be playful; and the imperfections are beautiful also.
Most traditional monograms are made with satin stitch over an outline of backstitch or split stitch, as you can see in many above. You can also do lines of stitching in chain stitch or stem stitch.
If you don't know these stitches, we have several of them shown on our blogs or YouTube channel. Many of these stitches are also taught in our Mexican embroidery pattern.
Starting the Monogram
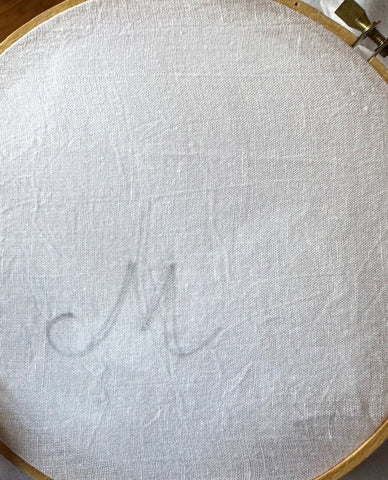
First, you usually add a monogram to a garment after it is made. You can draw the monogram design freehand on your garment or you can trace it. For more information on transferring embroidery designs, find our blog post about it here. I often use a fine, water soluble marker to draw my designs for monograming. Sometimes I'll even use a sharp pencil on a light-colored fabric (as I did below), knowing I will stitch over the markings.
Thread for monograms is usually perle cotton or 2-4 strands of DMC floss. I often use DMC floss, but perle cotton gives a little bit of a different feel and look. Often undergarments (and handkerchiefs, etc.) were monogramed in the same color as the fabric - usually white. But, you can use any color you want. Variegated floss is very pretty and contrasting thread will stand out more. Multicolored monograms are fun. It is up to you to decide the look you want.
I also like to use a hoop for monogramming. I don't always use one when embroidering, but the hoop keeps the fabric taut and makes it easier to see the outline of the letter. It also helps me with tension when I am doing satin stitching (it is not my strongest skill).
The Stitches
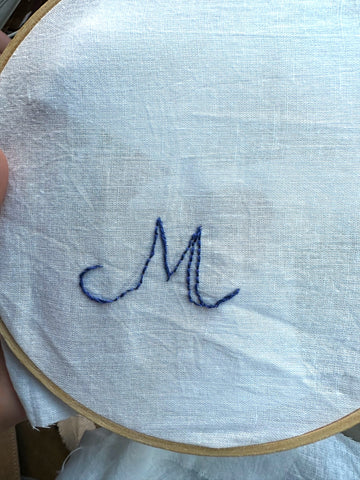
I am going to show you how I did monogram similar in design to the ones in our 223 A Lady's Chemise pattern, using a Victorian script and satin stitch over a straight stitch (back stitch) with stem stitch when the design gets narrow and curved. I am using a contrasting thread so you can see the design and stitches easily.
I started by drawing a letter in pencil that shows where the wider part of the letter would be. I could have made this whole letter with stem or back stitch and kept the letter the same width all through, but I wanted to experiment with the satin stitch also.

I started my monogram with a knot at the end of my thread, but there are other ways to secure your thread, including making a few small stitches inside where the satin stitches will go.
Below are the stitches I used for this monogram.
Stem Stitch. I started with a stem stitch. This stitch gives a little more depth to the lines and helps make a pretty curve, in my opinion. Work stem stitch with a simple forwards and backwards motion, always keeping the working thread to the same side of the needle with each stitch (usually below the line, or to the outside of the curve).
Bring thread up through fabric and take one stitch about 1/4 inch (6mm) up.

Bring thread back up for the next stitch about 1/4" (6mm), and go down about half-way back on the first stitch, staying to one side of the thread.


Continue this way, staying on the same side of the thread each time and keeping working thread to the same side).
Backstitch. This simple stitch produces a straight uninterrupted line. I transitioned to the backstitch in the areas that would be covered with stem stitch. This is a good stitch to outline the area to be covered with satin stitch. It also provides a bit more relief to the design when covered in satin stitch.
Bring needle up slightly ahead of starting point (1/4" (6mm) or less) and take it back down into the fabric at the starting point. Bring the thread back up again one stitch length (1/4" (6mm) or less) ahead of the first stich and take it back down, meeting the first stitch, as you can see below.


I continued the backstitch on each side of the wider parts of my monogram.

Satin Stitch. These are simple straight stitches worked closely side by side to cover an area. Bring the needle up on one line, then down on the other one. Bring thread up again next to the first stitch and work second stitch beside the first, and repeat, filling the area and adjusting stitch length as needed.


To End the Monogram (or your strand of floss)
You can thread the last bit of your thread through the stitches that you've already made in the back of the monogram. This is an easy way to secure your thread. Then clip any remainder floss.
And that is about all there is to hand embroidering a monogram. These are handmade touches to your garments or linens that are special and commemorative. And they can be fun, fancy, plain and simple, and sometimes wonky - and that is part of their beauty. Have you hand sewn monograms? What have you added monograms to? We love to know!
April 04, 2025
