- Home
- About
-
Shop
-
Sewing Patterns
-
Fabric
- Sewing Supplies
- Folkwear Clothing
-
- Blog
- Customer Gallery
- Contact


by: Cynthia Anderson
In honor of all the essential workers who are making personal and professional sacrifices in order to protect and support us all, through this challenging time, we at Folkwear, hope to inspire the "can do" attitude of one of our history's iconic women . . . Rosie the Riveter. We are happy to offer a tutorial on how to transform the 240 Folkwear Rosie the Riveter Overall into a dress for sunnier days. I made this version (above) for Cari, Folkwear's wonderful Customer Service and Shipping Manager, and I am going to show you how to make your own in this post!

Getting the most out of any pattern you invest in is always preferable. Learning how to look at a pattern and knowing how to create other options is often easier imagined than executed. Seeing the possibilities in a pattern and setting the challenge of making something new, is much easier when the foundation and options of the pattern are as tried and true as a Folkwear pattern. The Folkwear 240 Rosie the Riveter pattern already has so much to recommend it - the iconic overall, a flattering slack, the perfect classic shirt. Then there is the sweater, which could be knit in many varieties of yarn and colors. The options are endless. This pattern is loaded with "can do" possibilities.
Folkwear's 240 Rosie the Riveter overall pattern is a natural for a transformation to a snappy sundress for warm weather wearing. The versatility of this dress is also a plus. Wear it with a tee or shirt or simply go bare and comfy cool! Make it long or short, full or slim.
As a plus, nothing is lost in the dress portion we are about to make. All the great overall details of the pattern, including the pleats, darts, and pockets will all transfer to the skirt portion.
Getting Started
To make the dress from the overalls, the bodice portion of the Overall version will be made according to the pattern instructions, and the bottom portion (the Slacks part) will be the foundation for making the skirt.
Find the your size and cut pieces for the bodice and waistband. To insure fit, make a muslin and make any adjustment necessary.
For the skirt part of the pattern, trace and cut out the size pattern you need for the front Slack pattern (Piece G) and back Slack pattern (Piece H), the front inset/pocket (Piece J) and the inner pocket (Piece I). You may not need the entire length of Pieces G and H, and may want to trace/cut from the knee area and up. Also, leave extra tracing material on the seam edge of pocket pieces, J and I, because the skirt edge angles out and a little extra will be needed. See the illustration before cutting these two pieces out below.
Note: Size Large and XL are accidentally reversed on slack pattern pieces G and H. Be sure to follow the outline of the size you need.
When tracing off the pattern, be sure to draw all the markings that help guide the assembly. This includes all the notches, dart markings, pleat indicators, and the grain line.
I find using Swedish Tracing paper, to be  very useful material for this type of work. It's transparency makes tracing easy, it takes both pen ink and pencil lead well. It behaves a lot like fabric, which is helpful when making darts and pleats. It is durable enough to handle lots of pining and manipulation. If you trace your pattern you can keep it intact for future projects. We have it available here.
Planning and Cutting the Skirt Portion
Now, decide the length of your skirt and how wide you would like the bottom edge of your skirt to be. I want the width of my skirt to be a full a-line just about knee length, to ensure it will drape over the hips with enough room for cool comfort. So, I have decided to make my skirt 35" wide laying flat, and 25 inches in length. The Rosie waistband is at the true waist, so you can measure from there to determine your desired skirt length.
To create the skirt pattern, draw out a rectangle with one side the desired length of your skirt (in my case 25 inches) and the other side half of the desired width of your skirt (in my case 17.5 inches - half of 35 inches). This will be used for both the front and back of the skirt, however the back of the skirt has an additional 3/4 inch seam allowance at the center back, as noted in the pattern. A bit more seam allowance is added to make inserting a zipper easier.

Place the both the front and back slack patterns on top of each of the paper or Swedish tracing paper used to make the skirt pattern.

Find the Center Front and Back: To find the center back, draw a horizontal line from the top back edge of the slack pattern. Use the grain line as a guide. The line you are drawing should be parallel to the grain line.
To find the center front, draw a horizontal line from the edge of the slack pattern center. Remember that a 1/2 inch seam allowance has already been added to the pattern at the center front, however, because we are cutting the center front of the skirt on the fold we will not need that 1/2 inch seam allowance. So, the center front line should be on the fold. The 1/2 inch seam allowance should be off the center front edge. See the illustration above.
Add the pocket pattern pieces to the Slacks pattern to finish the shape of the Slacks front.

Now you will create the skirt shape. For the front, use the pocket pattern pieces placed with the Slack front to help create the shape of the skirt. Line the three pieces up using the pocket curve and edges as a guide. See the illustration below.

Once you have pattern pieces G, J, and I aligned, draw a line from the top edge of the waist to the bottom corner. Do the same for the back piece, going from the outer edge of the Slacks back to the outer edge of the rectangle. See the illustration above.
Transfer all notches, dart and pleat markings to the new pattern pieces, cutting the top of the new skirt pattern to match the top of the Slacks pattern.

Now you have all the pieces you need to create a dress from the 240 Rosie the Riveter pattern!
Making the Dress
Proceed with sewing as the pattern indicates. Assemble the front bodice and waist band and set aside. Assemble the right and left back bodice and waistband and set aside. Assemble the front and back bodice facings and the shoulder straps and set aside.
Skirt Front and Back
Use the Sewing Guide for Slacks provided in the 240 Rosie the Riveter pattern for reference as you proceed.
For the front of the skirt, assemble pockets and pleats as described in the pattern. For the back of the skirt, stitch darts as indicated.
Now assemble the front and back of the dress SEPARATELY.
Assemble the front of the dress first, by attaching the front bodice at the waistband to the top of the front of the skirt, with right sides together. Press seam allowance towards the waistband.
Assemble the right and left back sides of the dress, by attaching the back bodice at the waistband to the corresponding back skirt pieces. Press seam allowance towards the waistband.
You should have one front dress piece constructed of a bodice, waistband, and skirt. You should have two (right and left) back dress pieces constructed of a back side bodice, a back waistband, and a back skirt. Insert your zipper and join the back pieces at this point (remember the 3/4" seam allowance at center back). Press seam allowance open.
Put the dress together
With right sides together match the notches on the front and back bodice pieces, align either side of the waist bands both top and bottom, and match the bottom edge of the skirt. Be sure to pin and ease as necessary along the length of the skirt. Sew the side seam allowance and press seams to the back. Do this for each side. You can finish the seams and topstitch them down for a faux flat felled seam here, if you like.
Use the 240 Rosie the Riveter instructions to finish the bodice and waistband facing and and to add the straps to the bodice, as well as for all finishing work.
I hope you enjoy turning the Folkwear 240 Rosie the Riveter Overall pattern into a dress to be worn all summer long! All it takes is a bit of inspiration and a "can do" spirit to encourage you to look at any pattern with fresh eyes and see other possibilities. Try using this simple formula in other pant to to skirt transformations.


 Gathering the Inspiring bits of this and that is half the fun.
The team at Folkwear is terribly excited to be offering a smart & select, new Flapper Dress Pattern! This is a fabulous little dress pattern and so easy to make. A dress that can literally be made the afternoon before the party. There is no excuse to claim you have nothing to wear!
The 1920's was not called the "RoaringTwenties" for nothing. It is the iconic flapper dress that we all associate with this bold and exciting time. Whether dancing to the electric energy of jazz party tunes, or relaxing all afternoon sipping a fancy drink on the lawn, the flapper dress is always appropriate. Plus, there is hardly a dress more fun to wear!
Our very own Cari provided Folkwear with the inspiration for this dress. We copied this original flapper dress that belonged to Cari's grandmother. The dress was hand sewn and hand beaded. We were inspired to make the dress for ourselves. And because it was so fun and easy to make, we decided it would be a perfect project to offer to the Folkwear community. You can download this simply fabulous flapper dress as a PDF here.
One of the things that can make a flapper dress have its great drape and swing is the beading on the dress. Glass beads add a weight and glamour to the dress that is iconic of the time. You can use beaded fabric, or as with our original, add beads to your dress. Below you will find a tutorial on how to add beads to fabric, and at the end we've included videos to show beadwork that is both fun and simple to do. Every Flapper, even if only in spirit will enjoy learning a few beading tricks to embellishing a perfect something. You only need a few supplies to do amazing things with beading on fabric.
Beads
Everybody in the know, knows that a flapper dress gets it's swing from the weight and drape that only beading can provide.

Seed beads and bugle beads are perfect for beading on fabric and allow for beautiful details.
Flapper dresses were originally adorned with glass beads, metal beads, pearls, and sequins. Today, beads are easy to find whether new or vintage. Online sources such as eBay and Etsy are a great place to search for vintage or antique beading treasures. Glass beads originally used on flapper dresses were mercury glass beads, jet glass beads, Czech glass beads, etc. Millinery supplies shops are also good places to look for beads too. For new glass beads, most craft stores, such as Jo Ann's fabrics and Michael's carry a beautiful and wide range of colors and shapes. One of my favorite local bead shops is Chevron Bead Shop in Asheville, NC.
Designing with beads is one of those endless possibility pursuits! There are just so many different beads to chose from and the design possibilities are endless.
Fabrics
Just about any fabric will work well for beading. Flapper dresses with fancy elaborate beading designs were originally made of silk, velvet, and rayons that varied in weight and textures that always lent a soft drape. Stiff or heavy fabrics really do not allow for the drape that is synonymous with the flapper dress aesthetic.
The beauty of the flapper dress is that it can be made for easy everyday wear or done up for a fancy glamorous party or evening dress. Recommended everyday fabrics include cotton lawn and voile, handkerchief and mid weight linens, and rayons for warm weather wearing. Light weight wools, flannels, mid-weight cottons are perfectly acceptable for cool weather wearing. Depending on the weight, knits work well for an even more casual look in all seasons. For a glamorous evening look, silk and velvet are always absolutely perfect. Basically you want a soft fabric that hangs and drapes nicely and makes you feel beautiful.
Thread & Needles

While everyday all purpose polyester thread like Guterman will work just fine for beading, cotton thread, silk thread, and plastic thread just for the purpose of beading are also available and work well.

A long beading needle above a shorter Milliner's needle.
The eye of the needle is the element that counts in beading. Like Milliner's needles, the eye and the shaft of a beading needle are the same width. You can use any needle that will allow the eye the needle to pass through the hole of the bead. Beading needles are useful and a pleasure to use because the eye is extremely small which will pass through tiniest of seed beads and the needles are long and wire thin. The long length of the needle allows for you to load lots of beads on the needle at one time. The size of the thread used also depends on whether it will pass through the eye of the needle.
Helpful Hint: Due to the really tiny eye of beading needles using a needle threader is highly recommended.
 Just about every sewing mending kit come with a useful needle threader.
Preparing your Fabric
Once you decide on a beading design for your project you will need to transfer this design to your fabric. Both transferring your design and the actual beading will require working on the right side of your fabric. This part of the process will take some consideration, and experimentation may be in order to achieve success. The idea is to be able to see your design guide well enough to outline or fill in with beads, but to not see the transfer marking or lines once your piece is completed. Depending on the fabric you use, will in part depend on the transfer method used.
Invisible pens used in sewing are a good option for drawing or tracing your design to your fabric.
If your fabric can be seen through, tracing your design using a light box or light table would be ideal. Using a window instead a light box will work too.
No matter what method you use, always use a light hand with an ink pen or fine leaded pencil.
If your fabric can not be seen through, then laying and pining your paper design guide on top of your fabric, with fabric appropriate carbon paper sandwiched in between, is a good method to try. Instead of trying to actually draw your design with a continuous tracing line... use small continuous dots to create a line. Just remember that fabric is not paper and will not behave like paper when transferring is the task.

Freehand drawing my design directly on my linen fabric.
Depending on how much beading you intend to venture into will in part determine how you approach preparing your fabric for beading. Beading will add weight to your fabric and the more beads your design requires the heavier your fabric will be. Beading also cause your fabric to shrink ever so slightly, because beading draws the fabric up. Generally, this is not enough to impact fabric size, but it is good to know.
The decision you need to make up front is when you will bead your project. You may want to consider beading your fabric before actually cutting out your garment if your beading design is extensive. Draw the outline of your pattern piece onto your fabric using a stay stitch or drawn outline. If using an ink pen be sure to use a light hand and allow the ink to completely dry, to avoid smudging your fabric. A useful method, is to trace your pattern piece with a pencil. Once again using a light hand, and then stay stitch over your pencil line. Be sure to allow space between the edge of your outline and the seam allowance - you want to avoid beading in the seam allowance and leave a quarter inch for your machine foot, if needed (sewing machine feet have a hard time going over beads). Do all your beading just a bit outside the seam allowance. You can always go back and fill in with a bead here and there if you have any unwanted empty spaces, once you have sewn up your garment or piece.
Also, consider starting your beading design work in the center of your fabric and work outwards. This will allow you to more evenly distribute the weight of your project, which will help prevent the fabric stretching out of shape.
If your beading work is not extensive or only occurs in small areas or as trim work along the edges, you may decide to do your beadwork after you have assembled your garment.
It is always prudent to try and think out the possibilities and challenges you may encounter in a new project. For that reason I am going to demonstrate several simple beading stitches and complete a simple design just for the fun of it!
Preparing to Bead
Tiny little seed beads can become unruly and literally bounce and fly off in all directions if you do not know how to handle them. A few simple preparations will help make your beading project go more smoothly and remain tidy. You can purchase beading blankets to help make working with beads more manageable. Beading blankets provide a soft surface, which help to keep your beads from uncontrollably rolling around or popping and bouncing about when you try to load your needle with beads. If you do not have a beading blanket a simple piece of felt will work just as well.

Felt to help prevent beads from bouncing about.

Loading beads onto a needle.

Beaded border designs in progress. See video for instructions.

Finished beaded design. See video for instructions.

Up close detail.

We are excited to introduce a fun and easy sewing pattern that is a bit of departure from our regular patterns. It is, of course, for a historic garment - the "flapper dress" of the 1920's, and includes a garment history. But, it is a PDF-only pattern, and is quite a simple garment to construct. Our pattern for this simple dress comes from an original beaded gown from the 20's. We are providing this pattern is sizes from XS to 3XL. There is a print-at-home version (only 13 pages long), a Copyshop version, and instructions included in the pattern.
We were inspired to produce this fun dress as a nod to the returning '20s, but also because this is an iconic historic dress-type and our pattern is flexible enough to make an exquisite beaded gown but also a simple sundress. And, many of us are looking for something fun and easy to create at home.
We hope this dress inspires you to dress up and have fun (have your own croquet or cocktail party at home or even by yourself), be creative (bead your own dress, make a silk shift, or a cotton lawn sundress), and take it easy (sometimes simple projects are what we need). We will have some blog posts around this pattern in the upcoming days and weeks, including fabric suggestions, working with beaded fabrics, and hand beading tutorials.
Here are a few photos from a little cocktail party we had to briefly celebrate the release of this pattern. Cari is wearing the original black and red beaded gown, Cynthia is wearing the dress made of linen from our own shop (we will have the modifications she made on an up-coming blog), and I am wearing the dress made from a beaded gauze fabric from Mood.
Get the pattern here! It's on sale all week!


Click here for Part 1 (creating rondels from 114 Chinese Jacket embroidery motifs) and Part 2 (embroidering the rondels).
by Cynthia Anderson
I hope it goes without saying that I am wishing you are all well and safe. At this point we are all still waiting and wondering what our future lives will look like. Despite the unknown, a new version of normal has started to occupy our daily lives. I feel extremely fortunate that working for Folkwear pretty much continues as making and doing has always occupied my days. I find great solace in this normalcy of my cozy space with all my sewing things about me, plenty of projects to engage me, and my garden literally springing into life outside my window. It is my hope that you have all found the head space to loose yourselves in making something that brings you joy and helps you anticipate the other side of this pandemic.

Finished embroidered roundels nearly ready to applique on to purse!
While working on this tutorial and in the process of making the final project, I tried to envisage a day in the near future in which a new purse would be perfectly normal. As you can imagine, no matter how pleasurable, embroidery simply takes time. For this reason I wanted to enjoy my labors on an everyday item. I used the embroidery motifs from the 114 Chinese Jacket pattern, which are perfect for adding to a garment or an item like a purse. That's what I love about Folkwear patterns - they provide so much inspiration, and sewing information that they can go well beyond the actual pattern. You can see how I developed the embroidery rondels from the 114 Chinese Jacket in our first two posts, here and here.
Whether you are inspired to delve into an embroidery project or not, I hope you will find this simple "Full Circle Purse" as much a pleasure to make as I have. We are providing this purse as a free downloadable pdf pattern here.
Note: This pattern can be scaled up or down in size, depending on how much fabric you have or in simply allowing you to make your purse any size you desire. Print at 100% scale, or "Actual Size", or scale it up or down when printing to make it larger or smaller.

This pattern requires a scant amount of fabric, especially if you chose to make the outside of the bag out of a different fabric from the inside lining. In my quest to refrain from making unnecessary purchases, my stash and box of remnants provided all the fabric required! I bet you have what you need in your stash too!!
I laid out all of my fabric possibilities and let the colors of my embroidery work dictate the fabrics I would use. My stash yielded the perfect shade of blue handkerchief linen for the lining, a scrap of barely-there-blush-colored medium weight linen for the outer bag.

The only necessary purchase I made was for the handles. Luckily, I darted into Jo Ann's before all the craft shops shuttered due to the virus. Thankfully, ordering online is an option.

Getting the Embroidery Ready
In order to get my embroidered roundels ready for appliquéing to embellish the outer fabric of my purse, I set to ironing my work, covering it with a protective piece of silk organza to smooth out all the creases and wrinkles.

With a long stitch, sew a circle to border the roundel and to provide a guide to help turn under the edge to create a neat finish.

Cut a circle out using the stitched edge as a guide. Cut about 1/2" from the stitching .


Up close of stitch guide to help turning under the edge.
Let's Make the Purse!
Supplies Needed:
Now that the roundels are properly prepared, set them aside and now it is time to cut out the purse. Pin your pattern to the fold of your purse fabric on the straight grain, unless your design dictates you do otherwise. Do the same for the facing if using the same fabric as the outside of the purse.

Cut two outer purse fabric pieces each on the fold. Do the same for the facing.

Outer purse cut out of medium weight linen.

The facing cut out of medium weight linen.
These four pieces represent two sides of the purse and the facing that will eventually hold the bamboo handles in place.

Prepare the facing for future use by sewing a stitch to create a stable guide on the outer 5/8" seam allowance and to stabilize the inner semi-circle. I have chosen to use the outer purse fabric to create the facing, because this fabric is heavier than the lining fabric. You could just as easily use the lining fabric to make the facings. If using a lighter weight fabric for facings you might want to use a fusible interfacing to add stability and strength. Simply cut your interfacing using the facing pattern.

Snip the outer edge but do not cut into the stitch line.

Turn the snipped edges under to the wrong side and press to create a smooth curve edge. Pin in place and topstitch to secure the turned edge. Be sure that this process is done neatly, because it will show on the inside of the purse. Prepare both facing pieces the same way.

Applique the Roundel to the Purse Fabric
Using the stitch line already created as a guide, turn the raw edge of the each roundel under to create a neat edge to each circle. Press to set the edge. Then determine where you want to position the appliquéd roundels and sew in place, either by hand or using a sewing machine. Be sure to use a small stitch close to the edge so it will not be too visible.


Both roundels sewn to either side of the purse fabric.

With right sides together, pin and sew 5/8" seam allowance all the way around the purse. Do not sew the straight top edges of the bag or the semi-circle. The top of the purse should be left open.

Clip the curves and trim the seam allowance. Iron the remaining seam allowance open.

Make the Lining
Now, using the same pattern piece create the lining, the exact same way as the outer purse. If using the lining fabric to make the facings cut those out and any interfacing too.

These two pieces of handkerchief linen will become the lining.

With right sides together, pin and sew 5/8" seam allowance all the way around the purse lining, stopping at the bottom edge dots and backstitch. Start again at the next bottom edge dot, backstitch and continue around the remaining side. The idea is to leave a space open at the bottom of the lining to allow for turning
Be sure to backstitch at the beginning and end of your sewing. .
Do not sew the straight top edges of the bag or the semi-circle. The top of the lining should be left open.

Clip the curves and trim the seam allowance. Iron the remaining seam allowance open. Be sure to not trim the seam allowance at the bottom edge opening.

Below shows the edges clipped and trimmed with the seam allowance not trimmed away at the turning opening. Leaving the seam allowance intact will make it easier to sew the opening up to finish.

Below is the opening at the bottom of the lining. This opening will be used for turning.

The Purse and Lining Finally Meet.
Insert the outer purse right side out, into the lining with wrong side out. The right side of the purse to the right side of the lining.

Slip the outer purse all the way into the lining, smoothing out so the two pieces fit neatly. You do not need to iron the lining seam allowance open, unless you are using a heavy fabric.

Slip the facing between the purse and the lining. Make sure the facing and purse fabric are right sides together. Line up the top edge and the semi-circle.

Now it is time to sew up the top edges of the purse, the idea is to not catch the straight edge of the facing in the seam allowance. In order to do this fold the straight edge of the facing down, far enough to avoid sewing into the seam allowance of the top of the purse fabric and lining. Pin to hold folded facing piece down.

Match the top edge of the purse fabric and the lining, pin to hold in place.
Sew a 5/8" seam allowance across the top edge, sewing the purse fabric and the lining together, minus the facing which should be turned down and out of the way.

Then sew up the semi-circle using a 5/8" seam allowance. This time the facing is sandwiched between the lining and purse fabric. Right sides of facing to right side of purse fabric. However, you want to leave an un-sewn gap at the at each end of the semi-circle, before reaching the stitching of the top straight edge. Backstitch to secure. This gap needs to be approximately 1/2". Do this on both sides.
Snip the curve of the semi-circle and trim seam allowance. Do this to both sides. Be sure not to trim the seam allowance too much at the edge of the semi-circle gap... you will need a bit of remaining fabric to turn into the seam.

Now the lining and purse are ready to be turned. Starting to pull the purse through the lining hole.

Pull the purse completely through the lining. Notice the facing is visible with right sides together to purse fabric. Through the lining hole, adjust and shape the corners where the lining and purse corners meet with your fingers or a turning tool. There should be small gap at the semi-circle edges.

Fold the unattached short straight facing edge under and press to set. Sew a top stitch to secure and finish off. Notice where the gap is.

Push the lining into the purse and smooth to make lining fit and lay flat on the inside of the purse.
Then turn the purse wrong side out so the lining is facing you.
Now you can begin doing the facing finishing work on the inside of the purse. The photo below shows the lining inside the bag and the facing laying right side to the right side of the purse.
Here is the small gap we created. Sew to close by hand, using a simple whip stitch.

Turn the facing from the purse fabric side to the lining side. The wrong side of the facing to the right side of the lining.

Press the top straight edge of the purse, so that the outer purse fabric rolls slightly to the inside of the bag. This will prevent the lining from being visible on the right side of the purse.

Slip the handles into place under the facing and pin the facing in place. Stitch creating a tunnel on each side to secure the handles. Do this either on the sewing machine or by hand.

I have chosen to sew by hand because I did not want to see the tunnel or facing-securing stitching on the right side of the purse.

Turn the lining hole opening seam allowance into the inside of the lining, press and pin to hold securely. Sew up the bottom of the lining by hand using a small whip stitch. Press the seam to finish. Only sew up the hole once you are satisfied that the purse and lining are fitting and laying together nicely.

Now, that we have come "Full Circle" and all the finishing work is done, turn the purse right side out. Carry on as normal!

Voila!... and a tassel added for good measure.

Voila on the other side! Another tassel, but of course.

Thank You for following my tutorial.
I hope you find inspiration in making and doing.
Sew, Stay Calm, and Be Well.
Cynthia

The Prairie Dress has been enjoying a boom in popularity in recent years. And the style is staying around with the growing trend of large ruffles, floral fabric, and "romantic prairie" looks. I have been intrigued by the modern styling, but didn't really think it was my general style, but when we decided to feature the 201 Prairie Dress in March, I thought, "here's my chance to see if I can take this dress and make it more modern and into something I might wear daily."
So, when I came across this beautiful, drape-y rayon when I was in Madrid, I knew exactly what to use it for! The fabric is feels glorious - soft, smooth, light. All of which make it difficult to sew with! So, it took me quite a bit longer to get this dress finished than I expected (getting the flu at the end of Feb. and school shutting down in March also didn't help). So, I am posting this after the dress was featured last month, but still really wanted to share it with you.

I made a few modifications to the pattern. First, I used the "street-length" version which was exactly the length I wanted. I made the size medium even though I should fit in the small sizing with my measurements, but I know that the armscye of this dress (like many traditional dresses of the time) runs small. I measured the pattern and felt I would be more comfortable in the size medium, and I think I was exactly right. There is no tightness at all in the shoulder or arm.

I also used the smaller front opening (not the traditional opening which is much longer), and I did not add any buttons, yet, to the front. I think it works fine for now. I also did not add in the collar ruffle. The pattern is really not too difficult to make, though I would suggest an easy-to-sew cotton if you are a beginner sewist, and not a silky, slinky fabric. There is quite a bit of fabric in this dress, but I managed to make the whole thing with just 3 meters.

While at first I was not sure about the dress without a belt (it kinda felt like a nightgown), it grew on me. The lightness, the flowy-ness, was a lot of fun to wear. I really love the sleeves. They are beautiful in this fabric and easy to wear. Even my teenage daughters liked this dress (especially when belted), and may be borrowing it from my closet! If I made it again, I might shorten the skirt and add a flounce to the bottom. There are lots of ideas!

I hope this gives you a bit of inspiration for your spring sewing! And, to think a little differently about this pattern - to see it in a different light. Try it for yourself: 201 Prairie Dress.
Happy Sewing!


If you've been around here for a while, you know that I took a trip to Ghana in February 2018. I traveled to Accra and Cape Coast to work with Global Mamas, a non-profit business that works with women in Ghana to create a fair-trade, sustainable clothing and accessories line, based on the locals crafts of batik dying and glass bead making. I volunteered with them to help with product development and education, but also so that I could learn more about production in another country. I learned soooo much (some of which you can read about here and here)!
When in Cape Coast, I stayed with a family and the host mother was a seamstress - quite skilled. We became friends, and while I was out on a walk with her, I saw a man wearing what I she told me was a Ghanaian Smock. It was handsome, somewhat traditional-looking, but also casual. I thought, "here is a folkwear pattern". I learned more about the smock while I was there, and more from research when I came home.
Another inspiration for this pattern was the West African patterns that Folkwear produced in the 1990s - the Yoruba Tunic and Trousers and the West African Tunic and Trousers. These patterns have a very similar construction, with strips and godets, but these older patterns were for formal clothes (like a chief would wear) and were extremely voluminous. I love these garments, but they are not really for "common folk" (and they take a huge amount of fabric to make). And, I've wanted to increase the number of patterns from Africa in the Folkwear collection.
The origination of all of these patterns, including the Ghanaian Smock, is from northern Ghana, Burkina Faso and into northwestern Nigeria. In Ghana, the smock (like our pattern) is for informal occasions and is often called a fugu or batakari. The longer or more full the garment, the more formal it is.
I loved the Ghanaian Smock also because it became a symbol of African liberation after Kwame Nkruma and his colleagues wore them when setting up Ghana's independence in 1957. The popularity of this garment soared and spread around the world.

Though originally was only worn by men, the smock is also worn by women today (usually women's smocks have an elastic band in the waist or can be belted). These smocks looks great with trousers, jeans, over t-shirts, and as a dress on their own (you might want to make ours a little longer).
Our smock is fairly easy to make, easy to size, and fun and comfortable to wear. It is made of strips of cloth which can be cut or torn from regular yardage. Or, you can use aso-oke fabric which comes in strips (usually 4" or 5" to 7" wide). With these strips, you might want to size down (our pattern has strips finished at 4". You can also use your own handwoven fabric! We provide instructions using handwoven for that in the pattern. Often, the strips of fabric are made with lengthwise strips, so the garment has a striped look. Also in the pattern are designs and instructions for embroidery which are iconic of the garment (as well as history of the garment and West African weaving). However, you don't have to embroider - or you can just add you own, very simple, stitching to the neckline or pockets.
Either way, I hope you thoroughly enjoy this pattern! We have a Pinterest board with lots of inspiration, but I will include a few of my favorites below.
Wear to the office or on the weekend - as a tunic or as a dress!
Men's wear - you can see that these have very little embroidery - just some stitching around the neckline made as running stitches.
The Smock can be cut short or made much longer, like these images. Lots of possibility!

by: Cynthia Anderson
First, let me take a deep breath and express how much I hope that you are all healthy and safe during what has become an unprecedented time for us all. Yes, I am acknowledging the coronavirus and how all our lives have become much altered since the last entry of this blog tutorial. I admit feeling unsettled to say the least and feeling the need to find a good place to focus. Going deep in the weeds with creative projects is always a place of solace for me. It feels good to be so engaged simply by making something with my hands. This level of engagement can be a helpful salve at disconcerting times.
Now that we are finding ourselves hunkered down at home with time on our hands, I encourage you to find a creative outlet. I keep reminding myself that my anxiety stems from feeling a lack of control. Understanding that a lack of control and sanity are highly correlated truly resonates for me. There is so little any of us can predict, let alone control under the current circumstances, but we can all find something creative to engage in. I encourage you to lose yourself in a project that provides you with pleasure and confidence, maybe save that more challenging project for later. Positive actions and feelings build on themselves and this is as good a time as any. When you feel like connecting find someone at a safe distance and go deep in the weeds together! Zoom or Facetime is perfect for that.
A friend recently told me that she has resorted to cleaning to redirect her focus. Cleaning is her “creative.” She puts on her "french cooking music", as she calls it, turns her kitchen cabinets and pantry upside down, and then loses herself in cleaning and reorganizes until the destruction is transformed into a form of bliss. We can all find our own ways of “keeping calm and carrying on” as the Brits say. Creating this tutorial has been a welcome project for me for many reasons, besides being engaged; I get to connect with you through the Folkwear community. No matter what you decide to engage in I hope you will make it creative and know that the team at Folkwear is always here to help and inspire.
 Inspiring working materials.
Welcome back! Part 1 of this tutorial left off ready for the embroidery to begin...
A Bit About Embroidery
Embroidery has a long and varied history and has literally existed since man has made fabric. The origins of embroidery come from China where it’s long development coincides with the raising of the silkworm. The Chinese were the first to spin silk thread and weave silk fabric. The advent of silk thread and fabrics lead to the art of embroidery. Embellishing fabric with needle and thread exists in all cultures around the world. As you might imagine there are more embroidery stitches and variations on techniques than one can conceive.
Folkwear's 114 Chinese Jacket Pattern offers instructions on how to make seven different embroidery stitches, some with variations, that allow you to create just enough varied looks to make your work fun and interesting. I hope you find this a perfect starting point that will hopefully launch you into many hours of embroidery learning.
Learning to embroider is relatively simple and pleasurable to execute, but like so many creative endeavors, it takes a bit of practice and then the sky is the limit!
As in all creative learning adventures you will devise your own way of doing things based on what you prefer and what feels right to you. The Folkwear 114 Chinese Jacket Pattern will provide you with all the information and instructions you need, to get you started in experimenting and testing your embroidery skills. Many of the stitches offered in this pattern are simple and easy to execute. I will provide video demonstrations for a few of my favorite stitches, which you will be able to find on our YouTube channel.
Embroidery Thread
Not all embroidery threads or embroidery floss as it is sometimes referred to, are created equal. Embroidery threads are made of silk, silk-like polyesters, and light to medium weight cotton. For this tutorial I am using DMC six-strand embroidery thread made in France (DMC six strand embroidery floss), which is widely available and comes in 500 beautiful colors! This thread has a lovely sheen and will smoothly pull through your fabric. DMC embroidery thread is an all around good choice and will work well on different fabrics such as linen, wool, silk, and cotton. If you are using silk fabric you might choose to go all out and use silk thread as well... just saying.
 My embroidery colour palette. Note that all DMC Embroidery thread colours have their own identifying number.
 I am also using DMC Light Effects Metallic Embroidery thread E677,
 and another DMC Metallic spool thread.
The DMC embroidery thread used in this tutorial comes in one very long continuous length, measuring 8m (8.7 yds.) gathered into a tidy signature 6" loop. This long continuous thread is made up of six equal individual threads. The long strand is designed in such away that allows for the threads can be divided or separated depending on how many threads are needed or desired. The anatomy of an embroidery thread.
Do not divide your thread until you have cut the thread length you need to work with, keeping your continuous thread intact for the next thread need. I typically feel comfortable with a thread cut at 18”-20” long, but you can work with what feel right to you. Next, you must separate the threads in order to use the number you wish for your embroidery project. Separating or dividing your cut main thread into one, two, three, four, or five threads is not difficult, just a little awkward until you get the technique mastered.
Technique for Dividing Your Embroidery Thread
Gently pull how ever many threads you want to extract from the main thread and hold in your left hand, between your thumb and forefinger. Then insert your right hand forefinger between the separated threads, pull down and away from your left hand. Keep gently pulling and separating until you get to the end. Neatly coil up the remaining thread you do not intend to use at this time to keep for future use. Running your fingers down the twisted length of the threads can help un-twist the threads and make this step a little easier.

Then with your right hand forefinger between the separated threads, pull down and away from your left hand. This technique can be a little fussy, but it works.

Know Your Needles
Needles differ too and I suggest using a Milliner's needle for this project. This style of needle is a type of embroidery needle. It is a pleasure to work with, for it will give you better results and ease of use. A Milliner's needle is different from an regular embroidery needle, in that the eye of the needle is the same width as the shaft off the needle. Which in turn, makes it easier to pass the needle and thread through your fabric. This needle design has the much added benefit of not piercing such a large hole in your work. Go have a look at your needle collection and I bet you already have a Milliner’s needle.
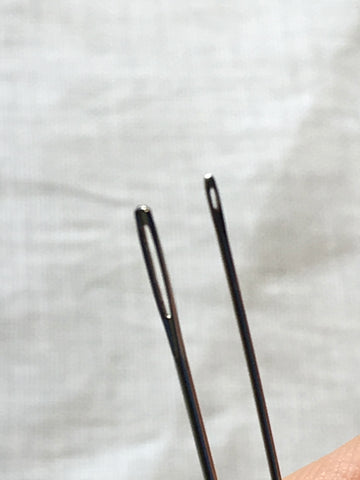 Eye of the Milliner's needle (right) versus the eye of a fairly large embroidery needle.
The length of your needle also matters. There are times a shorter needle will be the better tool for executing a particular stitch requirement and there will be times when you will find a longer needle more suitable. The size or length of the eye of the needle typically corresponds to the length of the needle. The longer the needle the longer the eye of the needle. The shorter and finer the needle then the smaller the eye of then needle. But not always, a super long needle can have a tiny eye. Once again, inspect the needles you already have, knowing there are others out there that might make your project easier. The little things always matter too.
Because, of the size and level of detail in the Chinese Jacket Pattern roundels I have chosen to work with, I am threading my needle with two to three threads at a time. Know that the ability to actually thread your needle will also determine how many threads you use. Sometimes the size of the eye of the needle will only allow so many threads. You can still remove a thread or two, using the technique above, if you find you simply have too many threads to thread your needle.
Note: After some practical application you will learn which needles to use and how much thread to use when attempting to execute your embroidery stitches.
So lets’ thread those Milliner’s needles and get started!
I recommend using a scrap of fabric (the same fabric you intend to make your final project on) to experiment creating stitches with. This will allow you to know how your fabric, embroidery thread, and needles all feel and respond in relation to what stitches you want to create. Try different needles and load your needle eye with varying amounts of thread strands and see what happens. Practice using the stitch you desire in a sample area that closely resembles the area you plan to cover in your final piece. Simply draw out or trace out the shape you want to fill on your scrap fabric. You will quickly decide and come to terms with how much embroidery will be required. This is one reason I liked the idea of using the colored fabric pens . . . less embroidery work!
I experimented with all the stitches in the 114 Chinese Jacket Pattern instructions. It seemed plausible that I would miss something if I did not completely understand or appreciate what the stitches would look like and do. I needed to try them out in order to decide what to use. I was actually rather pleased to discover that some of the stitches I initially assumed to be difficult, were actually a pleasure to make. I can take my own advice and admit that I still could use more practice, but I knew this project would be fun to explore!
 Work in progress
The Satin Stitch is a Must!
Sometimes you need filler and the satin stitch is the stitch to use. It is simple - a straight over-and-over stitch, and is commonly used in Chinese embroidery. For this project, knowing how to use filler is not difficult. You simply need to look at the space you want to fill and decide if it would benefit from a more interesting approach than just making a solid block of color. Notice how I let the coloring from the permanent fabric pens become part of the design.

 Satin stitch details
Other Stitches Used
For this project, I also used the split stitch, Chinese knot, and couching. These stitches are all explained in the pattern, but the split stitch is a simple backstitch where the needle splits the thread in two when going back into the fabric. The Chinese knot is similar to a French knot and creates an interesting texture. I have seen it used with the knots tightly packed together to create a huge embroidery by very skilled artists. And couching is securing a thread laid on top of the fabric by small stitches taken vertically over the thread. It is fun and interesting to use metallic thread with couching, either as the thread laid on top of the fabric, or the thread taking small stitches over the top thread. You can see the couching stitch and Chinese knot stitch in videos at the bottom of this post (and on our YouTube Channel).

Other stitches starting to appear.
Can you find the split stitch and the Chinese knot?
 Couching stitch for clouds.
 Up close of layering details.
 Metallic couching stitch and glass beads add the final touch.
 A peek at the backside of my roundel.
Nobody ever wants the back of their work seen for obvious reasons, but keeping the backside of your work as tidy as possible will help make your project more enjoyable. Once you finish working with a thread, pull it to the backside of your work and tie it off, then weave about a half an inch of the tread through the some of the stitching, to neatly secure and then snip. The metallic thread does not work well for this technique, because it it has a rougher texture and does not pull smoothly through. Just tie-off and snip the metallic threads.
And, check out videos below showing couching stitch and Chinese knot stitch.

The gods are in the details and this pattern is loaded with a layering plethora of great instructions and interesting history to accompany and inspire. The 114 Chinese Jacket is a fabulous pattern in it self, with so many truly wearable options. But if you love Folkwear patterns for all the "bonus material" as much as I do, then you are in for a treat! You are missing out if you do not take the time to enjoy reading all the beautifully researched history, techniques, and inspiration that accompany the Folkwear 114 Chinese Jacket Pattern.
I took my own advice and read all the "bonus material" provided in the pattern and considered all the possibilities, learning about techniques and their meanings in the Chinese culture along the way. From embroidery to making your own cording, to knotted buttons . . . it was going to take a minute to let the swirl of ideas settle.
 Pattern and "bonus materials"
Thinking my project out
Not only can you make several jackets from this pattern, but the pattern and extra features inspire creativity to use the designs and embellishments in other projects. Since there was so much inspiration to draw from, I set my sights on making a multi-layered project. I decided that I would make the two roundel designs in the pattern and decorate "something" with my results. Of course, they can be used on a jacket, but I wanted to do a quicker project and show how these designs (and the pattern) can be used in even more creative ways.
 The emblem designs provided as transfers and the roundels I would make.
When I need ideas, I go to "THE BOX". This is my box of used, to-be-repaired, or unfinished projects (you know you have "the box" at your house too). Here I found a long forgotten, but much loved old purse in my collection of worn out treasures, just waiting for me to rediscover it. It was perfect... it even had a bit of an Asian aesthetic. My old purse was going to enjoy a new life and how apropos that this spring season would be it’s debut. (I am not showing you the old purse because it's so old, it's embarrassing!)
Next I needed to decide what to make my roundels out of and how to begin? If you want to do a similar project, here's where this blog post can help you out.
Supplies and materials
First, you need the pattern, of course. The embellishment/embroidery designs are in the pattern and can be added And, this pattern is on sale all month (March 2020), so it's a great time to get it if you don't have it yet.
I am trying to being more mindful about how I approach new projects, and refraining from rushing to the craft store or online to purchase a load of new supplies. Since I had already been given a collection of fabric pens, and the pattern had suggested using fabric pens, this became my starting point.
Embroidery was the next obvious choice, due to all the instructional stitches offered in the pattern. I had an idea what to expect from embroidery, but using fabric pens was new to me. I gave the pens a try and discovered I liked the water-color-effect, as well as the more precise lines I could achieve. After some experimentation, I decide a combination of fabric pens and embroidery would be the foundation for my project.
 I let the permanent fabric pens determine my color palette.
There are a lot of fabric pens out there to try, just note they are not all permanent and the colors are many. Most come with dual ends - one fine end to draw with and the other end more like a paint brush. The brands I used were Fabricolor and Fabrico.
As for embroidery thread, I chose DMC embroidery cotton floss in colors that coordinated with my fabric pens, as well as a DMC metallic thread for couching. You could also use #8 perle cotton or silk floss.
Fabric: Coarsely woven fabrics will not take fine detail well when using the iron-on transfers provided in the pattern. This holds true for using the tracing method too. I suggest experimenting with different fabrics to determine the look you like when using the permanent fabric pens. I tried a piece of handkerchief linen, silk haboti, and cotton lawn all in varying shades of white. I chose white fabric because I wanted my ink colors to be true. Keep in mind that applying colored ink to colored fabric alters the colors of the ink. I ended up using a pre-washed and pressed fine cotton lawn, because it takes the iron on transfers well and it is also easy to see through to trace the design.
 Some fabric pen testing on the cotton lawn I would end up using
 NOTE: If you decide to use your transfers it is important to not be tempted to iron your transfers to simply smooth out the paper creases like you would when preparing a pattern piece. You will ruin the transfer. Simply smooth out the transfer with your hands and do not iron until you are ready to actually make the transfer to your fabric.
Transferring the Design
If you decide to trace use a light box or window to backlight your work to help you see more precisely, just tape your design print to the light box or widow and tape your fabric on top of your design and trace. I recommend tracing with a light hand and use a fine mechanical pencil. This will help prevent lead smudges and lead dust you can get from regular sharpened pencils which can get your fabric dirty.

 The mechanical pencil I used to trace the roundels with.
Coloring the Design
To assist me in deciding how to color my roundels and experiment with color placement, I decided to scan the roundel designs into photoshop on the computer and then printed off the designs to paper. This helped to avoid wasting my supply of fabric. You could size up or down using this approach. Of course, you can always make copies of the design and use colored pencils, pastels, or markers.
Once you decide on your color scheme, you are ready to begin!


 My experimentation with coloring
I decided to appliqué seemed like a good idea (in case I messed up or did not like my work). I traced the roundel design onto a piece of white cotton lawn and went to work colouring the fabric using the paper studies as my guide.

 One roundel colored
 Then the second one.
Add the Embroidery
I kept the size of my roundel the same size as the transfer. I felt comfortable with the size of what I was about to tackle. Going larger seemed daunting considering how much embroidery would be required and going smaller seemed like it might get to tedious with small details.
I cut my cotton lawn fabric larger than the design required, so I could use the embroidery hoop I had. Note that embroidery hoops come in varying size, so pick a size that works for you.

Now the layering fun begins and I am off to implement all the embroidery stitches I the instructions teach in this pattern. As you can imagine this part will take a bit more time, but check back next week to the outcome of this multilayer-skill-filled-learning project. And, part two will include a free PDF pattern(!) of the purse design.
A truly talented customer (from northwest Washington state), Susan, sent me photos and a description of an impressive and gorgeously-made lined and quilted Hapi Jacket from our 129 Japanese Hapi and Haori pattern. Susan has allowed me to share her project below and I think you will enjoy it very much! This jacket's simplicity allows for lots of artistic interpretation - an amazing example of which is seen here. And, Susan's sewing talent allowed her to change this unlined jacket pattern and change it into a lined and quilted coat that is perfect for the cool weather of the very northwestern US. Her artistic vision is outlined below - in Susan's words and photos:

A stash of brilliantly-colored, reverse-applique Kuna Indian mola patches has been nagging at me for years. Created by young girls as sewing samplers, later sold for pennies to tourists, they feature relentlessly cheerful birds and monkeys in unambivalently tropical habitats. What could be more inspirational during dark, January days? When a friend donated a few yards of African polished cotton from Mali, boldly printed in ochre diamonds on black, I set about inventing a garment for her that would combine these equatorial textiles into something suitable for Lummi-wear.

Assembling the components

Struggling with the back - a needle-breaker. Because of the varying thickness of the fabrics, this was difficult to sew on the machine and I ended up hand sewing a lot.
 Sussing the neckband

Solving the neckband


Tricking out the mola


Front
 Inside

Back

Bonus minaudiere


Our 212 Five Frontier Shirts pattern does not have the popularity I think it deserves. This pattern is one that I get glowing praise about, from the few people who make it. It is well drafted, with great instructions, and it comes together easily because of this. And, with five options for shirts, and all the fabric combinations (not to mention embroidery possibilities), there are endless shirts that can be made from this pattern. The plackets get the most compliments, with one customer telling me that she uses the placket from this shirt for all the shirts she makes now.

You can read quite a bit about this shirt from Wanderstitch who made it for her partner, three times! Her blog post about the first version is here (View D), second version, and modified for short sleeves here.
Also, Joanne Banko has used this pattern to create an embroidered version which she featured on her TV show It's Sew Easy (itsseweasy.com).
With this pattern, you don't have to have the front yoke parts, on any of the views. Views B and C have a buttoned yoke over the slit front neck, but they can be left off, and Views D and E have curved yokes added on top of the shirt front and back. They can be left off for a traditional-looking button down shirt.
I have been wanting another button down shirt as I don't really have many and I like to wear them. At first, I thought I would make a flannel shirt, View E, without the curved yokes, and I even ordered the flannel and was about to cut it out when I passed by our collection of organic linen and I new I had to make the shirt in linen - and in two colors so that it would be a bit more "western" and a little different than my normal button-downs. I decided to just do the curved yoke without piping, and to make the cuffs, cuff plackets, and collar with the second color.


I added snaps (but did not add the collar stand snap because I'll never use it) and it adds a bit more western feel, but not over the top. This will be in regular rotation in my everyday wardrobe. It looks cute tucked in or out!

It was a fun pattern to use and I have lots more ideas about what to make with it! You can see some on our Pinterest board. Maybe the flannel, maybe an embroidered yoke, or plaid with a solid yoke, or View A without the laces/eyelets in a linen or silk . . . .
What would you make?

Happy Valentine's Day! I thought this skirt fit really well with some themes of today, and so I would post about it on this Valentine's Day. Also, I just finished it two days ago!
I made this skirt with our 140 Flamenco Dress & Skirt pattern, and with a length of African wax print that I brought back from Ghana two years ago. This pattern is perfect for the slight stiffness (and color) of African wax prints! I loved this print and when I was thinking about making a skirt from the pattern, this one jumped out to me from my stash. Not only are the drape and color of African wax prints great for this pattern, but since they are usually sold in 6 yard increments, they are great for making a whole dress (or two skirts).

I wanted a skirt I could wear to work or out to dinner - nothing too dramatic or long. So, I decided to make the skirt and just add one ruffle, or flounce (also it would not take as long to sew). And, it really did not take very long and I thoroughly enjoyed the process!

The skirt is fairly simple, with just two back darts, a back zip, and a faced waist (no waistband). Adding the ruffles was fascinating. Since I was only going to add one layer of ruffle, I cut out fabric to make the first tier of the dress/skirt. The first tier is made of three different pattern pieces, cut into 6 fabric pieces, each of which is cut as a circle with a small center opening and a slit on one side. The pieces fit perfect to themselves and create a large ruffle of varying widths that needs no gathering! The ruffle fits onto the skirt bottom perfectly.

Look at that great pattern matching on the back seam. I'm usually not that good!

I finished the ruffle hem with a narrow rolled hem on my serger - so quick and easy and simple - it was perfect. It all came together much quicker than I expected. But, with no gathering to do, it makes sense. Now, don't get me wrong, if you are adding more tiers, the time of managing the ruffles (putting them together, pinning, slashing, dealing with all the fabric) can take quite a bit of time and energy. But, I loved how well-drafted the pattern is, making this time-sink of a task so much easier and fun.

So, I ended up with a skirt I love. A bit of a statement piece, but one I feel totally comfortable wearing out and about. And, it is perfect for V-Day. My kids loved it, too!
Make the skirt (and add more layers of flounces) or the dress with this very fun and very well-drafted pattern!

I love how swishy it is!


