- Home
- About
-
Shop
-
Sewing Patterns
-
Fabric
- Sewing Supplies
- Folkwear Clothing
-
- Blog
- Customer Gallery
- Contact
October 29, 2021
This is day TWO
For day ONE click here
To learn how to make the piping, click here
by Cynthia Anderson
I hope, you are pleased with the ease and simplicity in how Folkwear's 503 Poiret’s Cocoon Coat Pattern has come together so far. Check out day one of the sew along here.
Today, in Day Two of the 503 Poiret Cocoon Coat Sew Along, we will make the neckband or collar and attach it to the coat. You can read a separate blog post on how to make and use piping here. We will also add a button and loop closure as a final detail. After today, we have one more day of the sew along where we will finish the lining and add the trim.
Sewing often requires substitution or adjustments from the original plan. This is where flexibility can benefit your sewing enjoyment. In this sew along I decided to use trim instead of piping, because I wanted to try it and it was in my stash. I will talk about my experience using the trim in case you decide to do the same, but using piping will be very much the same experience.
Some people use fur (or faux fur) for the collar on this coat. If using fur, the collar does not need trim or piping, but edges should be finished if needed to prevent raveling.
Cutting Out the Neckband
If you have not done so already already, cut out the neck band. Cut the Neckband Pattern Pieces B according to the pattern instructions, being sure to flip one of the pieces to create two neckband pieces that are a mirrored image of each other, as seen below. Transfer any markings and notches too.

If your fabric has a nap or pile like the velvet corduroy I am using (in the photo above), be sure the nap or pile goes in the same direction. Remember, the neckband is a focal point.
Add Interfacing
After cutting out the neckband, add a woven interfacing cut from the same collar pattern piece, to the wrong side of each neckband pieces. The interfacing will add structure and strength to the neckband fabric and neckline once it is sewn to the coat. Baste the layers together along the 1/2 inch (13mm) seam allowance. I made this baste line using a long (no.4) stitch on my sewing machine. Sometimes the word baste can mean hand baste stitching to some sewist, which is perfectly fine. But in this case the 1/2 inch (13mm) stitch line will be used as a guide for aligning the piping or trim, so take care to stitch it with accuracy using a sewing machine. This basting line also helps to ensure that the bias cut neckband does not become stretched out of shape when applying the piping.

Tip: Use a thread color that is easy to see on the interfacing side of the neckband when stitching the 1/2 inch (13mm) seam allowance guideline. This stitch line will be used for aligning the piping or trim. For example, I used black thread for the top and bobbin thread that matched my neckband fabric and also showed up on the white interfacing. If I had used black colored interfacing I might have used a gray thread in the bobbin to make it was easier to see.
Constructing the Neckband
With right sides together, pin and stitch the Neckband Pattern Pieces B along the center back using the 1/2 inch (13mm) seam allowance, matching the notch. Be sure to back stitch at the beginning and ending of the stitching. Press the seam allowances open.

Hint: If using a fabric such as velvet (as I am) or corduroy do not press with an iron. Use your fingers to press and mold the fabric the best you can, or press on a needle board or terry cloth towel from the back side of the fabric. Using an iron on the top can scar and damage fabric with nap or pile.

Important Note: Whether you use piping or not, the outer edges of the neck band for this coat are finished before it is applied to the coat body. In each case the edges of the neckband are folded under to the wrong side to create a clean finished edge before being sewn on.
To make piping, see our blog post, Making Piping Basics.
Thoughts on Using Trim Instead of Piping
I used a pre-made trim instead of piping to edge my collar. This trim is more like a grosgrain ribbon with a tiny rounded edge that looks like corded piping. The grosgrain part makes it a bit stiffer and it may be a bit wide, but I made it work.
The instructions recommend starting at center back of collar, pinning and then basting the piping in place. Instead, I found it helpful to give myself enough piping length, starting at the angled points to be sure they worked well first.
It took a little trial and error to determine how much of the trim width would work so the corners would look nice. This was in part due to the thickness of the piping and the sharpness of the corners. I had to come to peace that the trim I was using was not going to allow for defined corners, but the results are perfectly acceptable.
Hence, this is a perfect example of why lighter weight fabrics work better when applied to corners. While determined to use the trim I had, my corners are more rounded, but lovely just the same.
Hint: If you are a seasoned piping master then feel free to align, pin, and stitch your piping in one go. If you are like me and only pipe occasionally, there is no shame in working in sections.
Piping and corners can be fiddly. If you have trouble stitching the corners on the sewing machine, you should hand stitch to make the corners look more sharp.
Adding the Piping to the Neckband
Note: Even though I am using trim edging I will refer to it as piping.
The idea behind adding piping is for the covered cord edge to just peek out of the seam allowance creating a beautiful finished edge detail. Adding piping is not difficult but it does take time to align accurately.
Using the pattern piece, mark the notches and squares on the piping to help with accuracy of fitting the piping to the neckband.

Be sure the piping is oriented correctly; the finished corded edge of the piping faces towards the center of the neckband. The raw edge of the piping runs parallel to the raw edge of the neckband edge. The extra piping will overlap at the center back of the neckband.

Use the 1/2 inch (13mm) basting line as an aligning guide. The idea is to align the stitch line on the piping to the 1/2 inch (13mm) seam allowance. Align by sticking a pin straight through the underneath, or wrong side, on the basting line and align the piping on top. With the pins still in place, use additional pins to secure everything in place and ready for machine sewing. Remove the original pins used for alignment or use them as well.


Align and pin the bottom edge of the piping at the corner points, matching the marks you made on the piping with the notches, squares, and bottom points on the neckband. Clip the piping seam allowance as necessary at the angles and points to allow it to bend around the corners smoothly.


Tip: You can use a bit of Fray Check if you fabric starts to fray too much with just for corners and angles.
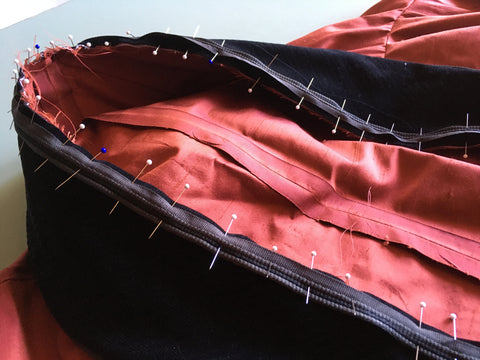
After going all the way around the neckband in this manner you will end where you began… at the center back. On the wrong side at the center back, overlap and cross the piping exactly, leaving extending tails into the seam allowance as seen below.

Look closely to see how the piping overlaps at the center back of the right side of the neckband below.

Hint: Do not feel you have to sew the piping on with one continuous stitch line. I find it easier to stitch in sections. Stitch the long sections, then sew the points and angles at the bottom edge or the other way around. Often the best way is the way that feels right to you and the materials you are working with.
Hand baste or machine baste the piping to the neckband. Then make a final stitch using a zipper foot on the sewing machine. Sew along the previous stitched seams, which should be on the 1/2 inch (13mm) seam allowance for Folkwear patterns.

Tip: Not all piping is created equal and can be made in varying widths. If the piping is wider than the seam allowance of your project, just trim the excess away once you are sure you have everything stitched with proper alignment.
At the bottom points of the neckband, clip diagonally to the stitching line through the seam allowance of the piping and neckband to release the fabric so it will lay flat. Don't clip the stitching line. Sorry I failed to take a photo of this step.
With the exception of the long notched edge, fold the other edges under at the seam allowance to the wrong side and press. Hand baste the folded-under edges to the interfacing to hold it flat if necessary. Be sure not to catch the neckband fabric in the stitching. Because the trim I am using was a bit stiff, I decided it would benefit from hand basting.

The piping should just stick out from the seam allowance as seen in the photo below.
Note: If the piping is sticking out too much from the edge of the neckband seam stitching, this may be due to not aligning the piping correctly or not stitching close enough to the cording when making the piping. Depending on the severity of the gap this can sometimes be remedied by re-stitching, moving the needle closer to the corded edge.
If you are not using a piped edge, press the turned under edge being sure the seam allowance stitching line is not visible and the edges are clean and uniform.

Attach the Neckband to the Coat
Place the wrong side of the neckband to the right side of the coat body, aligning the seam allowances at the center back, matching the notches, square to seam, and dot to dart. Pin in place around all edges.


The pattern instructions recommend hand basting or machine basting all the layers together along the stitch line of the notched edge. I machine stitched as normal.

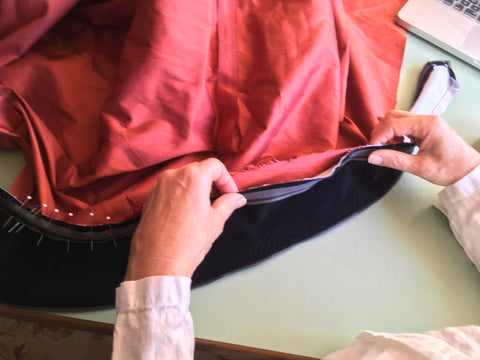
Working with right sides of the coat and neckband facing up, pin the unsewn edge of the neckband to the coat front. Make sure the neckband lays nice and flat to the coat body.
The seam allowances should already be turned under (whether using piping or not). Pin and hand baste the neckband to the coat body using a long running stitch to hold everything in place.

If you are not using piping, neatly hand whip stitch the neckband to the coat along the long un-notched edge and the angled bottom edges. Try to keep your hand stitching small and uniform, stitching just at the edge of the neckband and catching a small amount of the coat fabric with each stitch.
If using piping, be sure the bottom of the neckband lays nice and flat and double check that all edges are turned under.

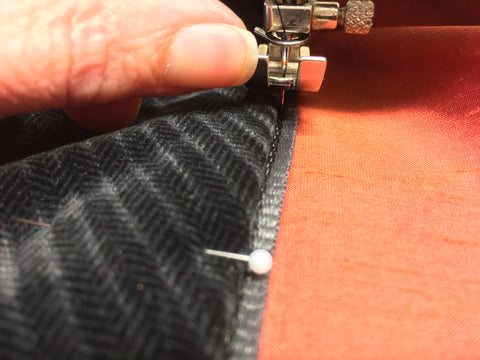
Once the neckband is secured and ready to go, align your sewing machine needle and stitch in the “ditch” between the piping and the neckband to secure. I found it easier to sew one side of the neckband at a time, by starting at the center back of the collar, stitching slowly along the long edge and then around the angled edges at the bottom. Finish with a back stitch at the seam allowance at the end of the neckband edge.
Repeat on the other side of the neckband.


Now the collar is applied and stitched down, you can add a closure.
The ClosureBecause of the simple elegance of this coat design and in staying true to Poiret’s aesthetic I am using the button and loop closure suggested in the pattern instructions. Other closures are acceptable, but keep in mind the look and feel of your coat. The pattern also suggests using a frog closure, which can be hand made or pre-made. (Stay tuned for Day Three of the Sew Along for the frog closure).
You can think of the closure like jewelry and make the closure a special final touch. If you are going for a more casual coat, make the closure look like it was part of the design plan. Whether simple or eye-catching, an inspired closure will make your coat sing.
I have chosen to use a button from my stash. It is not quiet as large as the button size suggested in the pattern, but I am hoping the special-ness of this Czech-glass button will make up for any discrepancy in size. The button needs a loop and all that is needed is a scrap of left over piping fabric. Since I opted to not make piping I am using a scrap of the fabric used for the coat body.
Making the loop is simple, use a bias rectangle measuring 1-1/2 inches (3.8cm) by 3-1/2 inches (8.9cm).
(Oops: I actually cut my strip on the straight grain by accident, but it worked fine.)
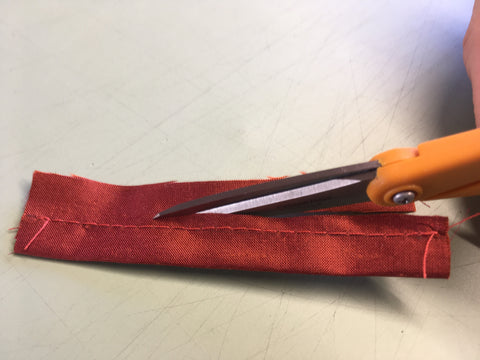
With right sides together, fold the rectangle in half lengthwise. Using the presser foot on your machine as a guide and stick about 1/4 inch (6mm) from the fold.

Trim away the seam allowance and turn right side out and then press.


Make a loop out of the turned strip. Test to be sure the button can easily pass through the loop. Remember the loop needs to be big enough for the button to slip in and out of once it is sewn to the coat.

Baste the loop in place at the bottom point of the band on the wearer’s right side of the coat, matching the 1/2-inch (13mm) seam allowance.
Even thought the right side of the coat is facing up, the loop is sewn to the wrong side of the coat edge as seen below. The edge is simply turned back out to make stitching easier in the machine.


That's it for the collar and button loop closure. We will finish up the 503 Poiret Cocoon Coat in the Day Three of the Sew Along coming soon. Have your lining ready if you are using one. If not, have a plan on how you want to finish the coat edges with either a simple turned edge or a bound edge. Please do not shy away from adding a lining, because it is not as hard as you might think!
Join in to learn how to add the lining, add a decorative (or not) ribbon trim to the hem edge, and add a length of chain to weight the hem. Plus, how to hem the sleeves, add the button to complete the loop closure, or add frog closure. The Folkwear 503 Poiret Cocoon Coat is a great piece for learning simple yet beautiful finishing techniques to apply to lots of future projects!
If you don't already have your pattern for this stunning coat, it not too late. It will be on sale until the end of October as a paper pattern or pdf.
Remember that Folkwear's sew alongs and how-to's are always free and accessible on our website, making it easy and convenient to get started any time you like. Click here to get started on Day One of the Folkwear 503 Poiret Cocoon Coat Sew Along.
April 04, 2025
